


Trending
Opinion: How will Project 2025 impact game developers?
The Heritage Foundation's manifesto for the possible next administration could do great harm to many, including large portions of the game development community.
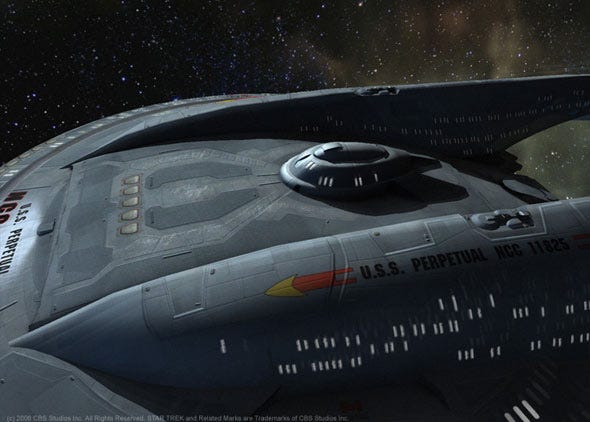
In the second in our exclusive series, Perpetual's Ian Pieragostini discusses the visual look development for much-awaited MMO Star Trek Online, focusing in on the starships, "one of the most recognizable characters in Star Trek".

Introduction
This is the second in a series of articles about the visual look development of Star Trek Online. This article discusses our exploration of starship rendering. The first part, discussing visual look development, can be found here.
How We Went About It
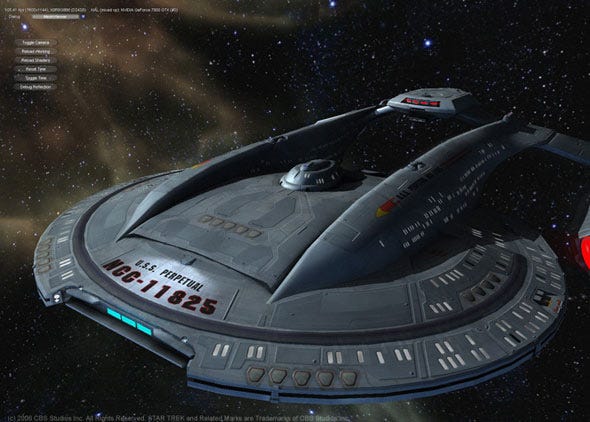
The starships are one of the most recognizable characters in Star Trek. To make sure we faithfully reproduced the look, we began by selecting a segment of footage to reproduce. We chose a sequence from Voyager.
We created an external sample application as a test bed for our ideas. We felt this would keep iteration time down and allow us to try lots of different things. Properly integrating new graphics techniques into an engine including the export pipeline is not trivial. It can also lead to dead code as ideas are tried and abandoned. An external test application is a place to quickly test out ideas with throw-away code.
Once our test application was up and running, we began conducting a series of experiments. Each experiment pitted one technique against another. We could toggle different effects on or off at runtime. We could control the strength of each effect so we could composite them together. In this way we built up a good picture of how the techniques stacked up against one another and how they complemented one another.
Our Experiments with PRT
Pre-computed radiance transfer (PRT) is an ingenious way to approximate complex lighting interactions including shadows, bounce lighting and sub-surface scattering. The most straightforward and practical implementation of PRT has two significant limitations:
Objects must be rigid (i.e. no moving parts or skin deformation)
Lights must be at infinity
Starships in space meet these criteria (for the most part) and should be a perfect fit for PRT so we were eager to try it out. However, we soon ran into problems.
PRT can only be practically implemented at the vertex level. This means that the density of vertices will determine how good the lighting looks. The more vertices you have, the better the results. We found ourselves adding vertices next to shadow casting objects just to capture the shadows clearly. Our vertex counts increases dramatically and hand tuning the model was time consuming.
When using PRT, the lighting environment is approximated using the spherical harmonic (SH) basis. This means that a very complex lighting environment can be used. But it comes at a cost. The results of transforming a lighting environment into the SH basis are not intuitive. The approximation is very rough and has strange artifacts which result from the math. Our lighting artist found it very difficult to achieve the results he was after. For example, something as simple as a nebula which illuminates just one side of a ship can be hard depending on the location of the nebula in the sky.
Part of the realism of PRT lighting comes from the darkening of crevices and contact shadows. Sure enough, this looked great. However, we discovered that we could achieve the same result using an ambient occlusion term stored in a texture. Using a texture gave better results because it was per-pixel rather than per-vertex.
One of the most striking effects of PRT lighting is cast shadows which react to the lighting environment. PRT shadows are much cheaper than other methods. The only drawbacks are that they are extremely diffused and depend heavily on high vertex density. We could not achieve the sharp shadows one expects to see in space.
Shadow Experiments
Having failed to create satisfactory shadows with PRT we turned to the two mainstream techniques: stencil shadows and shadow maps. We implemented both solutions and we pitted them against one another in a variety of test scenes. We discovered that each has advantages and disadvantages. The following chart summarizes them.
Shadow Mapping | Stencil Shadows |
|---|---|
No special processing needs to take place on the geometry. | Requires special processing of the geometry to find edges. |
No special modeling considerations. | Geometry must consist of closed manifolds which is a burden on the artists. |
Soft-edged shadows can be achieved via percentage closer filter and screen space blurs. | Shadows have hard edges. |
The resolution of the shadows depends on the amount of video memory devoted to the shadow map. | The resolution of stencil shadows is not limited. |
Geometry can contain screen-door transparency. | Only solid triangles can cast shadows. |
Stresses the pixel processing pipeline. | Stresses fill rate. |
Final Lighting Techniques
We ultimately abandoned PRT and went with a more traditional lighting solution. Our lighting environments are a combination of a single point light and an environmental cube map.
The point light represents the main sources of light in the space scene. It is typically the nearest star. Per-pixel diffuse and specular lighting is performed for this key light.
The cube map represents the contribution for other, more diffused, sources of light. For example, a nearby nebula might add a colorful glow to one side of a ship. That nebula would be painted into the cube map. Once painted, the cube map is converted to spherical harmonic basis so it looks like diffuse lighting and less like a reflection. We look up into the cube map for an additional per-pixel diffuse and specular component.
For our shadowing solution, we decided to go with the stencil technique. They got us closer to the look of our source footage and looked better in space in general. Shadow mapping looked great at a distance, but the resolution couldn’t hold up when the camera got close. Stencil shadows modulated the contribution from the key light.
Final Texturing Techniques
There are as many as six textures for each ship: color, gloss, normal, incandescence, illumination and ambient occlusion. The final game assets combine some of these textures.
A color texture provides the base color of the model. The quality of the color map turned out to be extremely important. Ships are like characters in this regard. This contrasted sharply with our findings in the interior look development where we discovered lighting was more important than texture detail.
A gloss map modulates our specular highlights. We have two specular highlights – one from the key light and one from the cube map. Both are modulated by this texture. A specular detail map is used to break up the highlight on some materials.
A normal map is used in both the per-pixel lighting from the key light and in the cube map look-up. The normal map is created by modeling additional detail features onto the low-resolution model. This creates a high resolution model which is sampled and converted into a normal map. The normal map is applied to the low resolution model.
Glowing features are painted into an incandescence map. A post-rendering screen effect is used to bloom incandescent features.
Starships have running lights which shine on their surface. Implementing these as real lights would be unnecessarily expensive. Instead, they are baked into light maps. The light maps are treated as an additional source of diffuse illumination.
The ambient occlusion map is generated offline. It modulates all the different lighting contributions. This creates dark crevices and contact shadows which give a lot of realism to the model.
Finally, we add motion blur and film grain. Our current motion blur implementation is a full screen effect using an accumulation of past frames. The film grain effect is a simple application of a noise texture.
Read more about:
FeaturesYou May Also Like


