Using Maya's Convert to File Texture Tool for Real Time Game Environments
The rendering of realistic shadows is one of the most important aspects of maintaining a game's suspension of disbelief. Maya's Convert to File Texture Tool presents interesting possibilities for creating accurate real time shadow maps. Rémi Benoist explains how—with a bit of massaging and additional tricks—this tool can make miracles happen in your scene.

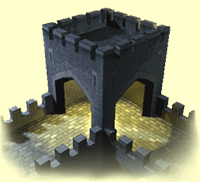 The rendering of realistic shadows is one of the most important aspects of maintaining a game's suspension of disbelief. It makes or breaks the good, solid look of a real-time environment. It can define the overall ambience and mood of a room, establish the time of the day, add a dramatic contrast to a specific area, or pinpoint the key areas of a level. More and more game designs are relying on those elements to make a game world believable and enjoyable.
The production of real-time dynamic shadows is the way of the future, and articles such as Hubert Nguyen's "Casting Shadows on Volumes" (Game Developer, March 1999) and Jason Bestimt and Bryant Freitag's "Real-Time Shadow Casting Using Shadow Volumes" (Gamasutra, 11/15/99) have only started to scratch the surface of those issues. This type of lighting is limited in the category of light used, and the look of the shadows is not controlled by the artist. Furthermore, for most PCs and next-generation consoles out there, using of dynamic shadows for the whole of the game environment is still something difficult to achieve within a respectable frame rate. This type of shadow is only needed for dynamic objects and environments while the rest of the scene could have preprocessed shadows applied to it. With a precise design of the environment, in which all the areas that need dynamic lighting have been sorted out, you could use depth map shadows for a good portion of the level, if not all, while saving valuable CPU processing time.
While the current batch of PC video cards is capable of displaying layers of textures in one pass, the current generation of consoles can only achieve this effect at a cost (they need to redraw the polygon with a different texture over it several times to achieve the effect). All the manufacturers of future graphics chips are making sure they are capable of displaying at least four textures (or more) in a single pass. This is the type of hardware that is recommended to achieve the effects described in this article with as minimal an impact on the frame rate as possible. Multiple textures (such as bump maps) offer a visual advantage on previous game engines that players can notice easily. Using this kind of feature will help ensure that your game stands out.
A good majority of games released use a very simplistic rendition of what a shadow can be. The black or dark-colored vertex used to define a shadow results in a dull, blurry zone defined by the geometric edges of the object. As such shadows are dependent on the geometry of the object, large rooms will tend to have large, straight, dark blurry zones, making the perception of the details and scale of the room difficult for the viewer, while doing a rather poor job at defining the mood of the level.
One other solution is the use of shadow maps. Different solutions exist to produce light maps and shadow maps. Some games are using licensed 3D engines that provide shadow maps in the rendering of their environments. But their need for specific editors hampers the building of intricate or more "free-form" objects required for more complex environments or game designs. The lights available are usually spotlights and point lights, with the rendering of the shadows still out of the artist's control.
The use of a regular 3D package can free the game designers and artists from the learning curve and limitations of an editor, allow the programmers to show off their own "L33t" engine capabilities, and return the licensing money needed for the engine right back to our royalty checks.
For this article, I'm going to concentrate on the Convert to File Texture Tool found in Alias Wavefront's Maya, because it's part of the main package, it's integrated in the general workflow, and with a bit of massaging and additional tricks, it can make miracles happen in your scene.
Figure 1. We are going to use this simple scene to demonstrate the power of ConvertSolidTx. |
Maya's Convert to File Texture Tool and Command Line.
ConvertSolidTx [flags] [texture] [objects]
The tool can be found in the Multilister under Edit. Click on its Option box and click on the Help menu to access Maya's manual pages. There, you can see the MEL (Maya Embedded Language) command of the tool and its flags. One command in particular tickles the fancy and whets the appetite: -sh / -shadows.
Reading the manual, you will learn that having to type the command with its flags, resolution, texture name, and object name for each object requiring a depth map shadow can be seen as a task to be assigned to monkeys over the course of many weeks. For some reason, Alias did not provide this flag as a check box in the tool interface, as it did for Antialiasing. But thankfully, they left the door open and we can correct this.
Modifying the Convert to File Texture Tool Menu
Download copyConvertSolidTx.mel and performConvertSolidTx.mel and copy them in your Maya Script directory (don't forget to back up the originals!). You now have access to the depth map shadow rendering within the tool interface. All you have to do is select the object and the relevant shader, set the size of the map you want, and let Maya render the texture and assign the new shader at the right place for you.
Examples of Use and Tool Limitations
First you will need a light. Only lights that can produce depth map shadows can be used with Convert to File Texture, so the three types available are directional lights, spotlights, and area lights. Read the manual for a complete description
Figure 2. Maya's power lies in its open architecture. |
of their characteristics. Make sure the lights you want the shadows from have Use Depth Map Shadow set to "on," and set the texture size and filtering as you would for a software rendering output. Since the tool uses Maya's software rendering to process the shadows, you can set up your lights and depth map shadow settings as you would for a regular render. You can software-render the scene with different colors in the lights to achieve different effects and ambiences, knowing that the shadows in the real-time environment will be pretty close to this result. Point lights can also be used. Those lights do not render shadow maps on or from objects, but with the option set to "on," the light emitted will not go through walls. They can be used to fake global illumination or radiosity.
You can't use raytracing, which means you can't have the direct shadow from the alpha channel of a texture (but we will see about that later), caustic effects (but you can always fake caustic with well-placed point or spotlights, or projected bitmaps), or shadows from objects made of glass.
The light setup we are going to use in our scene consists of one area light as the key light and for the shadow rendering process, with two spotlights for different purposes, and a point light just to add energy to the scene.
As specified in the online help, the tool only gives good results on objects with nonfolding UVs
In this case, the use of Maya's Automatic Mapping and Relax UVs tools are quite handy to make those UVs fit the 0-1 square with even the most intricate objects. Consult the manual for a good explanation of the workflow on those tools. The tool will also force the rendering of an object with UVs beyond 1, as one texture fitting the whole object reduces the pattern resolution.
Figure 3. The small cube textured with Automatic mapping and Converted to Solid Texture. |
Build all your objects single sided, then check to make sure that Render Stats, Double Sided and Opposite are turned off in the Attribute Editor. Check that the normals are facing the outside or Convert to File Texture tool will render parts of the object black ! (Thanks to Tom Harper from Alias Wavefront for the info.)
Finally, because the object can use two different sets of UVs, it could break the strip if they don't match up, and could slow down the rendering. Cast the Automatic Mapping tool first, and build the textures around a template of the warped polygons in Photoshop to avoid this.
Now let's look at how to gain control of the output of the tool and its multiple uses in your game.
Figure 4. All these tricks explained. |
Advanced Uses of the Tool
As a game developer, one of the potential downsides to this process is texture space. You never have enough, you can never spare enough, and this tool seems to spend it like there is no tomorrow. To prevent this, we are going to use a Layered Texture node with multiple UV sets. With this in place, we will see how it enhances the possibilities for controlling what is displayed on your objects.
I'll use a projection mapping on the right wall in the scene, covering the whole face, and call this UV set "Shadow." Then I'll apply a simple white Lambert shading group to it and apply the Convert to File Texture tool.
Then I will apply another projection mapping on the same wall, with "making new UVset" checked, and call this set "Checker." The next step is to set up the layered texture node on a Lambert shading group. Remember to give the textures names similar to the UV sets so it's less confusing.
Figure 5. Nothing beats a good old "Before and After." |
With the two textures in place in the node, I set the blending mode of the shadow texture to "Multiply."
Figure 6. The two textures used on the wall. |
Now I need to apply the right texture to the right UV set. After applying the shader with the layered texture node to the wall, I open the UV Relationship Editor and, with the object selected, connect each UV set to the relevant output color channel of the shader.
Now we should be able to see the two textures nicely blended on the wall. If not, make sure you have the files in the right order and change it within the layered texture node attribute editor with the right mouse button. Don't forget to also modify the blend mode.
We can now control the way the UVs on our main texture behave without disturbing our shadow rendering. To do that, right-click on the object and select the right UV set in the menu, then modify the UVs in the texture window. We can also select which set we want to work with on the selected object in the texture window in Image>UVset.
Figure 7. How having a coherent naming system comes handy. |
Having total control of the two separate textures and UV sets opens a new and exciting toolbox for game developers. With this setup, we can control the texture space used for the object and its shadow. With different filtering and blur in Photoshop or our 3D game engine, we can get away with a relatively small texture for the shadow of a large object, and keep the main texture its same size with full details and tiling across the whole length, with the shadow nicely breaking the pattern. Keeping with the idea of controlling the size of VRAM we are using, we can use a paletted version of the shadow map to 8-bit or even 4-bit if the size or quality of the shadow allows it, and keep the main texture in its 24-bit glory. This type of texture could sustain a level of compression relatively high and not jeopardize the overall look.
Figure 8. Layered Texture node. |
I can also modify the contrast or color of the shadow map by changing its texture attributes in Photoshop without having to reprocess the render. I could have different lights set up for different times of the day, or different light positions and colors in the same level for a different mood later in the game; I would just have to swap the shadow files around.
Alpha Shadows
Now for the plane displaying a number 4 in the scene. Notice that the number is not made of geometry but is a simple texture with an alpha channel on the small plane on the left. The only way in software rendering to get a shadow out of this object would be to use raytracing. As raytracing does not produce shadow maps, it is not usable with the Convert Texture Tool, so we have to fake it.
We will use the same number 4 texture for the color channel of the spotlight, invert it in the Texture Effect check box, and set the intensity to -1. If we render the scene now, we can see that the spotlight is projecting a black "4" on any objects within the beam. But if the light is blocked by an object (that is, the small plane we want the shadow for) it will stop there and the effect will not be completed. We are just projecting a texture. Link the light with the Relationship editor to any of the objects in the scene except the small plane -- this will force the light to go straight to the ground plane and display the texture there.
Because the spotlight is projecting a texture, it will be picked up by the Convert to File Texture tool when we process the ground texture. We can use this to project a foliage shadow on the trunk of a tree and its surroundings, or a chicken-wire fence, or any kind of object that is better described with an alpha channel than geometry in your environment.
Other effects can be achieved with a spotlight with a positive intensity. Set up a spotlight with a texture in the color channel (in this case a multi-colored letter "M" on a black background) and the tool will pick it up on the ground texture as well.
Figure 9. The converted ground texture. |
This can be of great effect for logo projection in a dance club or a shop wall, or can produce a nice fake of light going through stained glass in a temple. But this setup only works if we render the texture with the light applied to it. A Multiply blend of strong colored textures gives an odd result, but it can be experimented with for additional strange, alien effects.
Workflow on a Complex Scene
The four textures used in this next scene are small, and tinted in a light gray with a hint of blue. Each object in the scene has its own shader with a layered texture node applied to it. Consult the online manual for a description of this node and it’s use in conjunction with Visor and Hypershade. The objects are mapped with planar projections. Two different light setups were built: one for night, the other for early morning. Each setup contains several lamps casting shadows, and all of the lights are tinted according to the time of day you want to achieve. The scene is rendered in software to check the quality of the shadow-casting and for future reference.
We will start with the early morning setup. The early morning scene is copied, and a white Lambert shader is applied to all the objects in the scene and new UVs are set with Automatic Mapping. Check the Texture view to see if the Automatic Mapping is making an optimized use of the texture space; if not, change the settings until you think it's close enough without distorting the UV too much. This scene is going to be used to cast the shadows on white textures generated by the Convert to File tool. Set the size of the texture relative to the size of the object to be rendered.
Figure 10. The original scene. |
The original scene is then imported and Automatic Mapping is applied to all the original objects in the scene but with Create New UV set checked "on" (don't forget to name them). Now, all the processed shadow maps from the copied object are applied to the layered texture node of the original object by sliding the right texture to the color channel with the right mouse button. Make sure that the Multiply blend is applied to the right texture in the right order. You can change the order in which the textures are displayed by moving the files around in the Attribute editor. Check in the interface that the blending of the two textures is having the desired effect (you must have "Layer is Visible" checked "on" to see the different textures at the same time).
Figure 11. Morning light. |
If we have a look at our object, nothing coherent is happening yet. We need to set each texture to the right set of UVs. With the Relationship editor open, select UV Linking, and with the object and the corresponding shader selected, link the shadow map texture to the shadow UV sets. It is quite important to have relevant names for the textures and the different UV sets. Since the operation is done with them only, the only visual clues of what is going on is happening on the object itself. Now that we are done with all the objects in our scene and are quite happy with the result, let's go on to the nighttime setup.
The procedure for nighttime is no different from the early morning scene, except that the light emanating from the inside the tower needs a different approach. Because the color of the spotlights used there is quite strong, using a shadow map for this area would render a poor result with a Multiply blend. This kind of light beam projection is similar to the stained glass trick explained earlier. To get this to work, we need to render the ground texture tinted yellow by the spotlight and its shadow. We will then just swap the textures on the appropriate ground object. For this process, the UV on the ground objects must not overlap or tile.
Figure 12. The same scene lit for night time. |
With this technique, it's quite simple to have different lighting conditions on the objects in the scene and still keep a large amount if not all of the original textures. We could have a different set where an alarm is set off and only small exit signs are lighting a room, or for different weather conditions.
Conclusion
What stands out with the use of accurate shadow maps in real time is the immediate clean look software-rendering the scene gets. Which makes it even more interesting when we start spinning the camera around. The walls and objects standing on the floor gain a more solid feel, with a weight they did not have before. Because the control we get over the light behavior is the same as setting a scene for a software render, it's a lot easier for the artist to achieve the result he or she has in mind. With the scene rendered in software as reference, the real-time result is shockingly close. Compared to painting the vertices and software-rendering the different sides of an object and applying the textures back to it, the whole process is more accurate, easier, and faster. And it doesn't alienate the use of painted vertices, which can be of use in a dynamic environment. The use of different resolution, palette definition, and compression ratio on the shadow maps add more control to the use of texture space on what could be seen as a very expensive use of it. Adding the benefit of being able to change the shadow maps while retaining the original textures looks like a bargain for the artist and the programmer.
Other issues can be seen in the UV set management. All the processes could be simpler, with added functionality. The option to move the order of the UV sets without having to change the links in the Relationship editor and being able to transfer entire UV sets from one object to another and keep the order it originated from would be a big plus. Having the option to assign the layered textures to the corresponding UV set when the shader has been applied in the Relationship editor could bypass the use of an extra window, and add visual cues to the procedure. It might be wiser to apply those changes to the Hypershade and upgrade it. The possibility of rendering raytraced shadows or caustic lights could offer a wider choice of materials to be preprocessed (such as textures with an alpha channel and transparent objects).
One thing you may notice using the tools described here is that they tend to work better on a per-object basis. The Automatic Mapping and the Convert to File tools can give poor or unpredictable results if applied to a multiple selection of objects.
With an accurate render of shadows all across the scene, the remaining problems now reside in the render of the characters or dynamic objects in the scene. This technique can only be completed with a dynamic render of the game characters' shadows: a simple blob underneath them or a set of flat polygons that get cut at the base of a wall would not look right, and would be spotted at first glance. Furthermore, precise planning is needed if pieces of geometry (columns, walls, or roofs) could be collapsed, destroyed, or blown up by the player.
Some limitations could be tied up with MEL scripts and customized plug-ins, but since this is out of my domain, I'll leave this to the programmers out there willing to give it a try.
What strikes me is how the shadow rendering flag ended up in Maya in the first place. It looks like a half-finished function waiting for a clever interface. And it might be just that. We could see a new, full-fledged tool in Maya 4 performing the functions described in this article. Use this at your own risk, or wait for Maya 4 to come out and pray.
For More Information
How to Prelight a Scene (This tipped me off to the Convert to File tool and made me search for more)
Birn, Jeremy. Digital Lighting and Rendering. Indianapolis: New Riders Publishing, 2000.
Acknowledgements
Thanks to my friends Hubert, Pierre and David for their support.
Read more about:
FeaturesAbout the Author(s)
You May Also Like




.jpeg?width=700&auto=webp&quality=80&disable=upscale)
