Daily news, dev blogs, and stories from Game Developer straight to your inbox
Sponsored By
Deep Dive: The art of LEGO Bricktales
Here are the technical considerations that went into recreating the classic LEGO diorama in a virtual setting.
11 Min Read

Game Developer Deep Dives are an ongoing series with the goal of shedding light on specific design, art, or technical features within a video game in order to show how seemingly simple, fundamental design decisions aren’t really that simple at all.
Earlier installments cover topics such as designing combat to match the beat of music in Metal: Hellsinger, gamifying the process of learning to code with One Dreamer, and curating meaningful choices in multiplayer narrative games with Doomsday Paradise. In this edition, the developers on LEGO Bricktales share with us some of the technical details that went into creating an art style that would accurately recreate the creativity and wonder of building with LEGO bricks as a child.
Hello, we are Nathalie Schuster-Gieb and Stephan Sossau of ClockStone Studio. Based in Tyrol, Austria, ClockStone Studio is a small independent game developer which was mainly known for its Bridge Constructor series before we set out to work on LEGO Bricktales, which we had the pleasure to contribute to as artists. Indeed, the earliest iterations of our game were meant to fit right into our own franchise as a Bridge Constructor spinoff! However, it quickly became clear that there was more potential to be unlocked. Why build only bridges when LEGO bricks are so versatile a material?
What we ended up with strives to capture more of that wild, creative spark we all experienced as children, when a playmat and a pile of bricks became a whole world. LEGO Bricktales is a puzzle-adventure game with a heavy focus on building, utilizing digital renditions of a variety of bricks from the renowned Danish toy production company. In the game, the player sets out together with a helpful robot companion to help out people scattered across various worlds following five different themes. Each world takes the shape of multiple dioramas crafted entirely from LEGO bricks and comes with its own puzzles to solve, hidden treasures to discover through exploring, and powers to unlock in order to progress. Once solved, a puzzle can be revisited in a sandbox mode to keep on building. And as an extra incentive to explore the worlds in full, the player can use the treasure they find to buy new clothing items for their character to wear as well as new sets of bricks to be accessed in sandbox mode.

Accessing the menu in-game allows players to view the dioramas in their full glory
Everything is LEGO bricks
As soon as we figured out that we wanted to explore more of what it means to play with LEGO elements, we had to seriously think about what that even meant. Pretty early on we committed to the idea of creating dioramas made solely of LEGO bricks. Our vision as artists was something you could feasibly build IRL on your living room table and then play with, just like an elaborate LEGO set. Make it digital while respecting the sheer physicality of the original. This meant we had to work within established rules and guidelines.
At first glance, there are several limitations when it comes to working with LEGO bricks. The amount of brick shapes and colors provided is finite, as is the range of Minifigure movement. When your experience with the toys is limited, like ours was at the beginning, you might assume the building process is limited, too. Take a brick, stack it on top of another brick, rinse, and repeat. Thankfully, we were provided with a generous amount of LEGO sets to try our hands at. The experience gained from completing big sets like the Haunted House, as well as looking at dozens of beautiful creations from hobbyists during research, taught us that this needn’t hinder our imagination. Quite to the contrary! There is a beauty to these simple geometric shapes and how, snapped together, they fuel the imagination and take on any shape you want.
Something we purposefully wanted to leave untouched was the iconic shape of Minifigures, the little yellow folks that tend to inhabit LEGO sets. Other LEGO games have taken liberties in animating them, turning them bendy and flexible to great effect. We, however, wanted to stay as true to the real deal as possible. An actual Minifigure’s arms are stiff and can only rotate along one axis at the shoulder. But they can rotate the full 360 degrees. Can your arms do that? We think not! Now let us incorporate that aspect into our character animations to make them express themselves in a way wholly unique to Minifigures. A major inspiration was the animation of the LEGO movie franchise, which in turn was inspired by the stop-motion animation of fanmade short films using real Minifigures.
While LEGO Minifigures are limited in their movement, they provide ample opportunity to get creative with what they can do for the sake of character expression
The Big Building Blocks
The very first diorama mockup consisted of thousands of bricks and was painstakingly assembled in BrickLink Studio, a digital LEGO building tool. Master builders we were not; the building methods were unrefined, and the process came with several caveats, mostly relating to performance and the speed at which we were able to iterate. The LEGO Games had provided us with an importer package to get those bricks into Unity, which was a great start. But it wasn't enough. Imagine building a car without having figured out how to build an engine—many of the core mechanics were not yet figured out.
After some testing, we arrived at the conclusion that we would have to rely on splitting up the topology of a diorama into tiles made of LEGO elements—a very common approach in game development. To be more specific, we built the topology of each tile based on an algorithm called "Marching Cubes", which is mostly used for surface reconstruction from scalar fields. The basic idea behind it is that you build up a 3D grid of points with material IDs. In its simplest form, we only have 2 IDs: Terrain and Air. Each cube is formed by 8 points which correspond to each of its corners. A basic floor tile for a character to walk on would have the Terrain ID for its lower four points and the Air ID for the upper ones. Say you want to insert a ledge into your diorama instead. Then you would place a Cube where two of its lower points have the Terrain ID, whereas all others are Air. Voilà, we can translate every imaginable grid of points into volumes made of tiles as long as we prepare all of the possible tiles that are needed.
Cycling through a selection of "Desert" tiles
On to the issue of performance. The amount of all the collective bricks involved was through the roof and slowing down our systems. On top of the already existing features of the importer, numerous tweaks were made in order to optimize performance. To give you a better idea, here is a list of some but not all the things we changed about our static constructions, the foundation of a diorama, to save performance. Almost all the bricks share the same material. Individual colors are stored as vertex colors in the mesh. Whenever possible, bricks will not stay individual objects, but their meshes are merged together. This results in more unique meshes but opens up more possibilities for optimization. One being that the file size of our scenes is massively reduced, up to a factor of 100. Additionally, more of the internal geometry of a mesh can be removed—which was possible by coloring each face, rendering the object from different angles, counting the visible pixels of each face with a compute shader, and removing all invisible faces. Since we limited the viewing angles of our dioramas, we could remove all polygons on the bottom of the objects as well. Finally, bricks with dense poly counts, like vegetation, got custom meshes, easily saving 100.000s of polys when used often.
It all starts with a grid of cubes
Many of our dioramas have areas filled with water—some of them quite large. To really sell the effect, water has to be animated and transparent. Two properties that once again threw some challenges at us. While animating bricks in wavy patterns is technically easy, some tricks need to be implemented to get the right performance. As it is also done in most other games, a shader takes care of the animation. But other games tend to not have water that is made out of bricks! Our solution in a nutshell was to have large patches of water as combined meshes that could be part of a tile. For example, instead of placing 64 1x1 tile bricks, we only have one mesh, where all the information we need to animate individual parts of the mesh is baked into an unused UV channel of the vertices.
Transparency sorting issues are another common challenge game developers have had to face for decades now. Polygons of a mesh are constructed in a certain order, and this defines which surfaces are drawn in front of each other. On a per-object level, this can be resolved in a different way but within one mesh it's another case entirely. First, we decide in which order polygons are drawn in a single brick. Then we decide in which order all the bricks are drawn. This way we can make sure that all individual bricks sort correctly when viewed within 90 degrees from a top-down view. If we rotate the camera further, all those bricks start to be sorted incorrectly. To fix this, we turn those patches with a script based on the viewing angle.
A lot of work went into making the water flow as it does
Tying It All Together
Assembling the base of the diorama was now faster and performed well but in its simplest form still did not look great. Once we expanded our tiling system with more features though, we could achieve what we aimed for. In order to improve our diorama design, we added more variations of tiles that were used often, added custom tiles that were twice the size (and more) of regular tiles, and added more material IDs like "Water" and "Path", to give some examples. We also had to accept compromises. One of them was that we could not possibly support all shapes in a diorama when using multiple material types since the number of tiles would explode to hundreds and thousands of unique tiles that somebody would have to build brick by brick. We agreed to not lose our minds and focus on a scalable approach, adding tiles to our collection only when we really needed them.
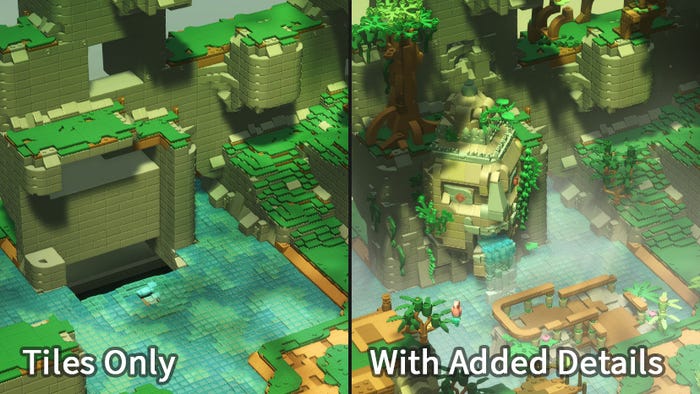
A sad, empty world on the left. On the right is the same world, brought to life using props, special tiles, and effects
To really bring the dioramas to life it turned out we had to add even more layers. With the tiles done we still needed to have more control to put in some eye-catching details. Some of this was done by strategically placing unique, one-of-a-kind special tiles, while custom props did the rest. Small props like plants were placed sporadically to make everything feel more organic (pun not intended) while keeping in mind that certain spaces had to be left free for the player to navigate. Bigger props served as focus points to drive home the theme and narrative of a diorama. These props were where we really got to think outside the box and hone our building skills.
A lot of research on real places went into the visual design of LEGO Bricktales. For example, the jungle is inspired by images of places in Cambodia, as are the statues found within its dioramas. Sure, one could probably build a decent approximation of Angkor Wat’s impressive stone heads with your average brick-on-brick method but utilizing more advanced building strategies allows for more detail taking up less space, which is crucial when you want to keep your dioramas a certain scale. One such strategy we learned is called SNOT, which stands for “Studs Not On Top”. This means changing the orientation of your brick placement through special bricks. Now you can have studs pointing out to the side instead of just up, allowing for more flexibility and a whole new look for a build.
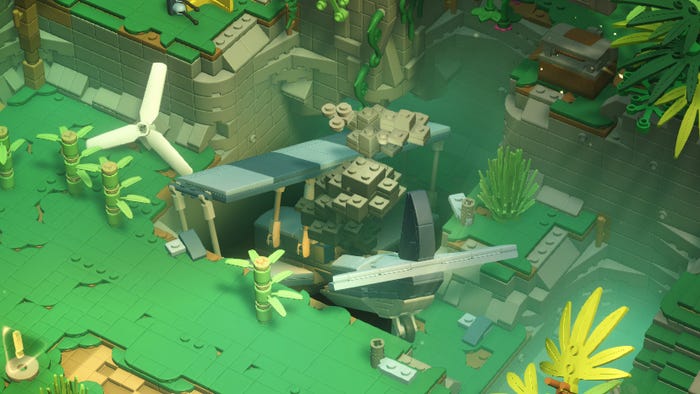
The crashed plane prop serves both a narrative purpose and diorama centerpiece. Multiple building techniques had to be used, such as SNOT
Working on LEGO Bricktales allowed us to embrace our inner child once more. We got to play with bricks in order to advance our design. We learned more than ever before about all the wonderful things you can create with them and had a blast along the way—mostly, notwithstanding the occasional game design headache. Now we hope to pass this experience on to our players. Not the headache, though. We’ll keep that one.
About the Author(s)
You May Also Like


.jpeg?width=700&auto=webp&quality=80&disable=upscale)


