Daily news, dev blogs, and stories from Game Developer straight to your inbox
Sponsored By
Physically Based Rendering and Stylization
Introduction to PBR and tips for creating stylized designs using this system.
8 Min Read

Overview
Physically based rendering (PBR) is a shading model that has seen widespread adoption in the game industry of late. It aims to create a more realistic lighting environment using lighting physics and actual material values to accurately model how light interacts with a surface. It is not a true standard per say as there are different variations in its approach, but it can be seen as a commonly used set of guidelines that keeps art direction and work from different artists consistent. Most current gen games use this approach and it is part of the "pop" that makes graphics seem that much more realistic compared to last gen.
Theory
There are many resources on the web that break down the theory behind PBR. Of note is The Comprehensive PBR Guide by Allegorithmic which does an amazing job explaining it in depth. Because of this, I won't go into too much detail and will provide a brief overview of the concepts outlined in the guide for those who are unfamiliar (feel free to skip ahead to the "Stylization" section if you are already familiar with the concept).
When its comes to lighting physics, there are two important types of light interactions, specular reflections and diffuse refractions.
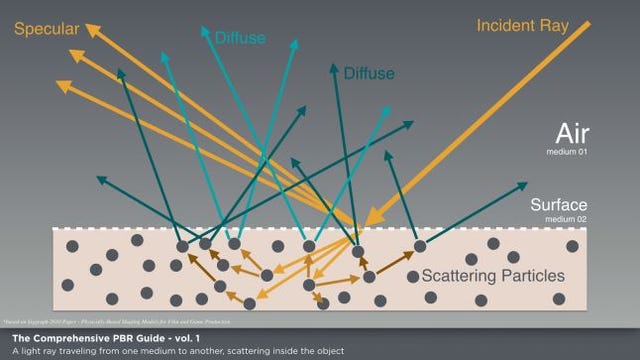
Light interactions
Specular reflection occurs when light bounces and reflects off a surface. This is the "shine" we see when looking at certain objects, usually metals. The roughness of the surface plays a large role in the look and intensity of this reflection. Extremely smooth surfaces have reflections that are small and intense, whereas rough surfaces have reflections that are dimmer and more spread out.
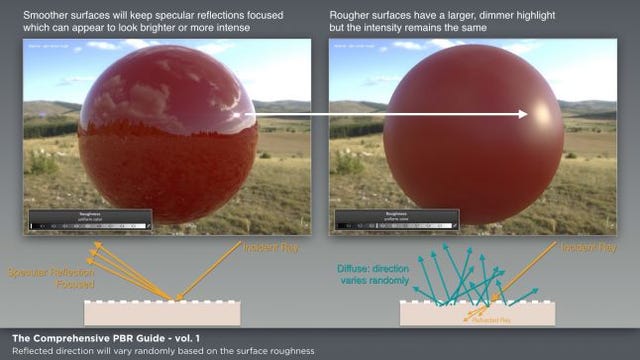
Effect of surface roughness on specular reflection
Diffuse refractions occur when light refracts into a surface. This light is bounced around inside the surface and is either absorbed or quickly refracted back out. The light refracted back out is the diffuse light, and is the color we often associate with that surface.

Diffuse lighting results in red apples appearing red
There are a few other factors that PBR takes into account. The first is Conservation of Energy. This states that the total amount of light reflected and refracted by a surface can not be greater than the total amount of light received. This seems fairly obvious, but was often violated in the past when artists were hand painting maps and playing it by eye to achieve the intended look.
The second is the Fresnel effect. In its simplest form, this states that the amount of light reflected is determined on the viewing angle. When viewing surfaces at grazing angles (parallel), reflectivity approaches or achieves 100% depending on the surface. This results in the edges of objects being brighter. When viewing objects straight on (0 degree angle or perpendicular), the amount of light reflected is referred to as an F(0) value. These values are different depending on the type of material (metal or non-metal) and will be expanded on in the next few sections.

Fresnel Effect
These factors are for the most part handled by the shader so artists don't have to worry about accidently violating any of these rules.
Metals
Metals are things like gold, copper, aluminum, and steel which are highly reflective and great conductors of electricity. Metals have no diffuse refraction as all diffuse light is absorbed. Another important distinction is that specular light for metals is coloured and is the colour we perceive of the metal (ex. Gold reflects gold coloured light). Metals have F(0) values usually from 70-100%.
Non-metals
Also known as insulators or dielectrics, non-metals include things like wood, paint, leather, and fabric. These surfaces reflect very little specular light and the colour of this light is dependent on the light source. As noted above, the colour of the diffuse light is the colour we perceive of the object (ex. An apple is red because it's refracted light is red). Non-metals have F(0) values between 2-5%.
Workflows
There are two main workflows to consider when using PBR. These workflows function similarily but use different texture maps and have slight advantages and disadvantages.
Specular / Glossiness
This workflow uses diffuse, specular, and glossiness maps.
Diffuse contains just the diffuse colour with no shading or lighting information. Usually when doing stylized and/or hand painted textures, shading and ambient occlusion are baked into the diffuse map. With PBR, shading is handled by the system and ambient occlusion is a separate map. Since metals have no diffuse colour, metals should appear black on this map.

Diffuse map
Specular contains the colour of specular reflections. These should be grayscale and dull for non-metals and bright and coloured for metals.

Specular map
Glossiness controls the appearance of specular reflections. As described earlier, the roughness or glossiness of a surface determines the intensity and size of specular reflections. This map is greyscale with whiter values indicating a smoother or glossier surface.
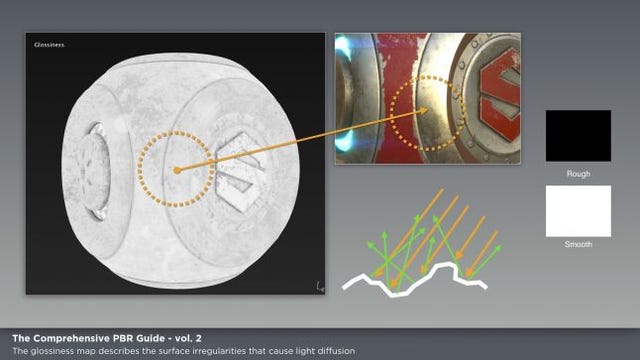
Glossiness map
Metallic / Roughness
This workflow uses base colour, metallic, and roughness maps.
Base colour contains both diffuse colour for non-metals and specular colour for metals. This map is basically a combination of the diffuse and specular maps from the previous workflow.

Base colour map
The metallic map is a greyscale map which tells the shader whether the coloured section is a metal or non-metal. Black indicates non-metal and white indicates metal.
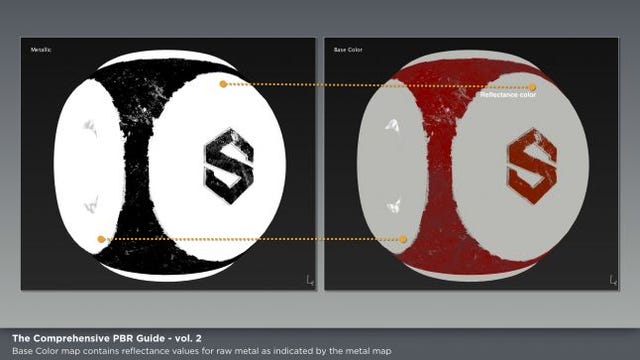
Metallic map
The roughness map is just the inverse of the glossiness map with whiter values indicating a more rough surface.

Roughness map
This workflow is slightly more popular as it removes control of the F(0) values for non-metals which can often be used incorrectly. It is also more memory efficient as 2/3 maps are greyscale compared to only 1/3 in the Spec/Gloss workflow.
Common Maps
Regardless of workflow, there are a number of other common maps that can be used and are often necessary to achieve a desired look.
These include (but not limited to):
- Normal (this added detail should be reflected in roughness / glossiness map)
- Ambient Occlusion
- Height
- Bump
- Emissive
- Opacity
Advantages
So now that the theory is out of the way, why is PBR used? Why go through all the work and effort to adopt this workflow?
PBR is widely used because it reduces a lot of the guesswork that used to go into creating realistic textures and combined with more realistic lighting, makes realism much easier to achieve.
Another great advantage of PBR is that it is accurate in all lighting conditions. A texture set can be used just as well in a bright snowy environment as a dark, torch-lit cavern without additional work.
Third, PBR provides a consistent workflow for various artists. It can often be difficult to have work from different artists look consistent as many of us have different approaches and art styles. By starting with physically based materials, a consistent groundwork is layed that keeps work from all artists looking consistent from the start.
Stylization
With all the emphasis on realistic values and physics, can stylized art even be done?
By definition, stylized art is not realism. But even with all the focus on realism in PBR, stylized art can indeed be done! Even if the textures and models are simplified and styled, they look even better with physically accurate material values and lighting.
There are many examples of movies and AAA games using stylized designs in conjuction with physically based rendering.

Crash N. Sane Trilogy

Ratchet and Clank (2016)

Monster's University
.png/?width=640&auto=webp&quality=80&disable=upscale)
PBR comparison
Take the above example, a model from my third year project. The model on the right uses traditional rendering and simplified textures. After learning PBR, I redid the texturing using Quixel as seen in the model on the left. The difference is quite noticeable, especially in the metal where the non-PBR model looks rather flat in comparison and not very metal like. The stylization in the design and the simplicity in the texture maps is still present in the PBR model but the lighting looks much more real and elevates the look of the entire model.
A few things to consider with stylized designs in PBR
- Still free to create anything you can imagine (the model itself doesn't have to look realistic)
- Can still keep textures clean and simplified
- Tell the story of the item / character through weathering (rust, dirt, scratches, etc)
- Most PBR applications allow you to paint masks and detail directly on the model so you can use these to paint stylized rust, dirt, etc with correct values automatically
- If hand painting textures, don't have to worry about getting material values correct
- Many resources available online display correct values for all sorts of materials
- Most current game engines, including Unity and Unreal, have PBR shaders built in
Applications
Substance is the industry standard for PBR texturing. Substance Designer is used to create and modify texture presets whereas Substance Painter allows users to apply materials and paint directly on the model.
Quixel Suite is an add-on to Photoshop and another great tool for texturing in PBR.
Links
The Comprehensive PBR Guide by Allegorithmic
Read more about:
BlogsAbout the Author(s)
You May Also Like
Latest News

Trending


Featured Blogs