Daily news, dev blogs, and stories from Game Developer straight to your inbox
Sponsored By
Adding depth to 2D with hand-drawn normal maps in The Siege and the Sandfox
Gamasutra speaks with Cardboard Sword artist Keith Duke-Cox about hand-drawing normal maps to add a sense of visual depth to their 2D platformer, The Siege and the Sandfox.
9 Min Read

Pixel art has a certain timeless look, but that doesn't mean the tools and methods for creating it are trapped in 1993.
UK-based developer Cardboard Sword is developing The Siege and the Sandfox, a 2D stealth-based platformer in Unreal Engine 4 using Paper2D, and they've been posting a series of development diaries introducing other would-be developers to using these tools to make their own games.
One of the chief technical differences distinguishing The Siege and the Sandfox is their use of hand-painted normal-mapped tilesets and sprites, allowing them to use 3D lighting methods in their otherwise fairly conventionally-design 2D pixel art game.
Keith Duke-Cox, one of the art directors at Cardboard Sword, recently took the time to speak with Gamasutra about how they arrived on this particular technique, and why it works in their game—and how you can adopt these techniques for use in your own 2D games.
Questions and answers have been edited for brevity and clarity.
Adding a sense of depth
What advantages does using normal mapping offer over traditional, flat lighting in a 2D game?
Keith Duke-Cox: Art direction is all about individual style and the objective of the delivery. We wanted our art to be rich, deep, and really ‘lift off the page’. The normals help us achieve that, giving a sense of shape and solidity to our world and the things within it.
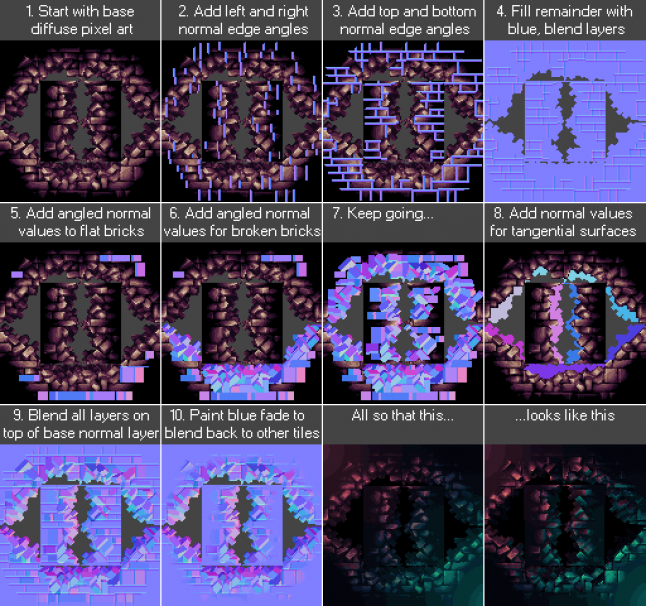
This example image, originally posted by Keith Duke-Cox on Twitter in August 2017, is a striking example of this technique.
[For example,] the use of normals provides threats with a more tangible feel when danger is imminent. Light now reacts more correctly to the surfaces it hits, whereas without the normals it has a very flat ‘sheet of paper’ look.
Used correctly, normal maps can add a sense of depth and weight to objects in a scene, in a way that flat 2D bitmaps can't quite match.
Our use of normal mapping is mostly for visual benefit, rather than as a functional gameplay choice. We want the player to feel more immersed in the environment, so that the parkour has a sense of depth and physicality, rather than that paper cut-out feeling some pixel games can have. If you’re going for bright simple colors, or a more true retro look, then flat lighting works well.
What initially attracted you to this method of using normals for lighting in 2D? Where did you learn about it, or first see it done well?
Applying normals to 2D artwork was a natural extension from their use in 3D, though obviously it wasn’t possible on the older systems that inspire the aesthetic. We’re certainly not the first studio to use them in modern pixel art titles, but the results vary.
We were initially put off using the effect, as many examples we’ve seen had a habit of destroying the charm and aesthetic that pixel art has, giving it too much of a shiny metallic look. Our first attempt at hand painting normals on pixel art led to a very detailed normal—as that’s what its main purpose is in 3D art—but as each tile in our game is only 32x32 pixels, there’s not a lot of pixels to sell the surface information and so the end result was just a noisy mess.
When we saw Motion Twin’s Gwenael Massé’s art on Dead Cells, we saw normalled pixel art done very well and decided to have a second try at it. This time, [we used] the normal map not for small surface detail such as you might in 3D art, but to use the normal map to ‘sculpt’ the large obvious shapes of the pixel art instead.
Sculpting shapes with normal maps
Can you briefly walk me through your process of developing an asset, particularly how it differs from how you'd otherwise make a similar simple 2D bitmap asset?
Generally, pixel art is drawn with a ‘master’ light direction in mind. In our case, this master light is top down with a right side bias for most sprites and foreground tiles, with background tiles having a more generic ‘light from the camera’ to simulate dark rooms and not distract the player from the foreground.
This meant that when it came to draw the normals for the sprites and tiles, the shape, surface detail and materials were already decided. We actually found this approach to work really well. It meant that the shapes and details we had to mimic in the normal were already very obvious and clear.
Dependent on the nature of the sprite being normalled, we use a mix of painting normal angle colors from a ‘normal map dome’ (basically a sphere which acts as a palette of all the possible angles you can paint a tangent normal map with) and painting in the individual RGB grayscale channels, with other applications such as NDo, Crazybump or AwesomeBump helping on some shapes, and blending multiple parts of normals together correctly.
We use Nvidia’s TextureTools for Photoshop to correct/normalize vectors after finishing painting the normalmap.
What are the advantages of hand-drawing normal maps this way, over using off-the-shelf tools like Sprite DLight?
When we started looking into how to make normals for a 2D object with no high poly model, we did come across applications with functionality to do this to some degree.
We researched and looked at some tutorials to see how they went about normal map creation, but found that they either make guesstimations based on the color value of pixels, which results in generally inaccurate or completely incorrect results or have the user input multiple grayscale images to simulate light from different directions, essentially building the normal map channels yourself.
A program can’t really know what a given pixel in a piece of art’s height and angle are, especially a pixel art game where colours are very limited and the same colour is used to represent multiple depths and angles across an object. We must add though that we’ve not actually used any of these programs, we’ve just seen their intended use.
Two common methods used for faster automated normal map generation are Grayscale Conversion and Shape Recognition. We did some mockups with all three and decided that the hand painted method definitely gets the best results.
Grayscale Conversion and Shape Recognition can produce better effects than those shown here, but even with more time and effort invested, [they] would still not be as accurate or produce as good a result as hand drawn.
Using normal maps in your own 2D games
What advice can you offer other devs who want to follow in your footsteps?
Doing hand painted 2D normals accurately was no small task. For all of the foreground and background tilesets, it’s taken about 3 man-months. So be prepared to sink the time in to get the best results.
Quickly made normals on 2D art, especially pixel art, generally look poor. The ‘one button’ routes can often result in substandard assets that look weaker than the unlit pixel art when rendered in-game. Do some tests on a small game area (a small sample of foreground, background, props and characters), and find what best suits your game and your art style.
[On the other hand], the cost of adding normals to our world, render-wise, is very cheap. We have two 2k normal maps for practically the entire game world. They don’t use much memory and the few extra textures to perform the normal render pass won’t impact draw calls too much. Lights are dynamically lit only, they don’t dynamically shadow at all in our game, so they are very cheap too.
If you don't currently understand how tangent space normals work or what they represent, then some brief research will help you paint so much more easily.
You had to adapt your existing assets to take advantage of this method, rather than implementing it from day one. Do you have any advice for anyone else retrofitting normal maps to their existing sprite art?
If we had to do this again, we’d probably approach it the same way: do the diffuse art first and then do the normals afterwards using the diffuse as a reference.
We may have drawn things a little differently in some places. There are problems in pixel art where one pixel can represent a nail or stud sticking out, for example, but that same pixel on the normal map can only represent one angle, so we may have chosen to draw some things a little more chunkily to give us more pixels to relay angles of images.
If you go any smaller in pixel resolution than we did on our tilesets (32x32) then you may find yourself too constricted by size. The limited resolution you have with a 16x16 or 8x8 tile probably won’t let you get any real shape or volume out of the process, unless the entire tile is one large detail, such as a slab of rock or concrete.
Especially in pixel art, clean gradient curves don’t look as good as chiseled hard angled surfaces. So if your art style will allow it, he’d suggest going more for angles than gradients on your normal surfaces. For example if you had a barrel, make each plank that constructs it have its own angle and make the barrel appear more octagonal than curved.
Do you have any advice for developers who want to apply these techniques outside of the Unreal ecosystem? For example, in Unity or Gamemaker.
Check your normal map orientation before you start. The approach for painting your normals won’t change from engine to engine, just what each color channel of the map represents.
Generally only the Y axis (green channel) gets switched about dependent on engine and creation method. Unreal uses DirectX left-handed coordinate-based Y- normals, but Unity uses OpenGL right handed coordinate based Y+ normals (we believe), so its green channel would have to be flipped from what we’ve drawn.
However, if you have done it the wrong way most of the time a simple inversion of the green channel is all that’s needed. You will know if you have messed up a channel as the image will light inversely to what you expected.
About the Author(s)
You May Also Like


.jpeg?width=700&auto=webp&quality=80&disable=upscale)


