Daily news, dev blogs, and stories from Game Developer straight to your inbox
Sponsored By
Featured Blog | This community-written post highlights the best of what the game industry has to offer. Read more like it on the Game Developer Blogs.
Unity Editor Scripting (A kick-starter guide) – Part 2
Get yourself introduced to editor windows. If you want to make an utility which extends the capability of an existing tool inside Unity or want to add something up for your ease or for your project, editor windows are the solution.
6 Min Read

This article is originally published on devcrew.io
In our previous post, we introduced you to Unity editor scripting and discussed about how you can use Gizmos and Custom Inspectors to extend the capability of Unity editor. In this post, we will introduce you to editor windows.
What is Editor Window?
Each panel that is a part of Unity editor is an editor window. It is used as a base to display the GUI and support all the user interactions for a specific functionality. Most of the graphical elements are rendered over an editor window. You can dock/pin/tab it inside the editor or you can use it as a floating free window. If you want to make a utility which extends the capability of a existing tool inside Unity or want to add something up for your ease or for your project, editor windows are the solution. They keep the interface clean, tidy and relevant.
Let's start it quick.
The EditorWindow Class
The EditorWindow class is part of the UnityEditor namespace and must be extended to any class used to create editor windows. To create an editor window, just make a simple C# script in the project view and inherit your class with EditorWindow class like this:
using UnityEditor;
using UnityEngine;

public class EditorWindowExample : EditorWindow
{
}
Now we will add some code inside the class:
public class EditorWindowExample : EditorWindow
{
  private static EditorWindowExample _winInstance;

  [MenuItem("My Tools/Show My Editor Window")]
  public static void ShowWindow()
  {
     _winInstance = GetWindow<EditorWindowExample>(true, "My Editor Window");
  }
}
The GetWindow() method, which is part of the EditorWindow class, is responsible for getting an instance of the specifed type of window, in this case, the EditorWindowExample type. So, each time you call this method, the current live window instance will be returned.
The static method ShowWindow() encapsulates the GetWindow() call and the static variable _winInstance saves the reference to the EditorWindowExample instance. The first parameter of the GetWindow() is a boolean 'isUtility', to check whether the editor window should be a utility window or a dock-able editor window. A utility editor window cannot be docked or tabbed in the editor as Scene or Inspector tabs do. It's one of the eight overloads of GetWindow() method I used.
Above ShowWindow(), We used an attribute 'MenuItem' which makes a menu in the editor's file menu and invoke the function as an action that precedes it. In our case, that function is ShowWindow(). This menu will appear in the editor like this:

Callbacks
EditorWindow has its own callbacks similar to those, MonoBehaviour and Editor classes use. It is worth mentioning and explaining most important of them.
OnEnable(), OnDisable() and OnDestroy() are used for initializing and decommissioning resources as mentioned in part 1 of this post. OnGUI() can be used to render the GUI and calls only when our editor window is clicked or mouse hovered while button clicked. EditorWindow has another callback Update() similar to MonoBehaviour's Update method. It is called 100 times per second in all the visible editor windows due to which it can be used asynchronously. You can read about callback messages in the Unity's documentation under the messages section.
Adding GUI in Editor Window
Let's add some GUI and see it in action. Add this code in OnGUI():
private void OnGUI()
{
    EditorGUILayout.LabelField("My Label");
    EditorGUILayout.TextField("enter your text here...");
}
Switch to Unity editor and your editor window should look like this:

You can explore more about EditorGUILayout class here. As you can see, we have drawn a label and a text field in the editor window which is placed hierarchically. To give it a proper layout, use EditorGUILayout.BeginHorizontal() and EditorGUILayout.EndHorizontal().
private void OnGUI()
{
     EditorGUILayout.BeginHorizontal();
     EditorGUILayout.LabelField("My Label");
     EditorGUILayout.TextField("enter your text here...");
     EditorGUILayout.EndHorizontal();
}
This will arrange our UI in a proper layout:

The AssetDatabase Class
When creating an editor utility, most of the times we need to find an asset on editor run-time from the project. For this purpose, Unity API provides you the AssetDatabase class. This class contains methods and interfaces to access assets and perform file operations on them. We are going to get a prefab from assets and instantiate it in the scene. Let's first make an object field in our editor window inside the OnGUI() method:
private void OnGUI()
{
   EditorGUILayout.BeginHorizontal();
   EditorGUILayout.LabelField("My Cube Prefab");
   myGameObject = EditorGUILayout.ObjectField(myGameObject, typeof(GameObject), true) as GameObject;
   EditorGUILayout.EndHorizontal();

   EditorGUILayout.EndVertical();
}
Object field in the editor window looks like this:

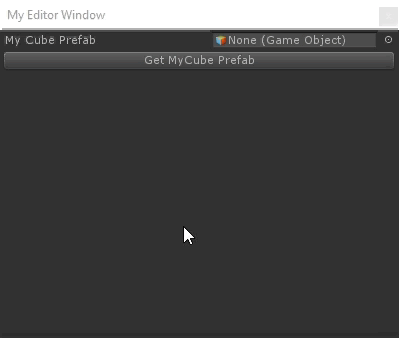
Let's get the prefab from assets on the click of a button. We have already a prefab in Assets/Prefabs folder.

Declare a global variable 'myGameObject' of type GameObject and under the line 8 of the above code add this:
EditorGUILayout.BeginHorizontal();
if (GUILayout.Button("Get MyCube Prefab"))
{
    myGameObject = AssetDatabase.LoadAssetAtPath<GameObject>("Assets/Prefabs/MyCube.prefab") as GameObject;
}
EditorGUILayout.EndHorizontal();
The GUILayout.Button() returns a boolean as true when the button is clicked and false otherwise. And this is how it gets the prefab from the assets:
Now let's add another button which will instantiate that prefab in the scene:
EditorGUILayout.BeginHorizontal();
if (GUILayout.Button("Get MyCube Prefab"))
{
    myGameObject = AssetDatabase.LoadAssetAtPath<GameObject>("Assets/Prefabs/MyCube.prefab") as GameObject;
}

if (GUILayout.Button("Instantiate MyCube Prefab in Scene"))
{
    Instantiate(myGameObject);
}
EditorGUILayout.EndHorizontal();
Let's take a look at the final result now:

and here's the complete code of the script:
public class EditorWindowExample : EditorWindow
{
   private static EditorWindowExample _winInstance;
   public GameObject myGameObject;

   [MenuItem("My Tools/Show My Editor Window")]
   public static void ShowWindow()
   {
      _winInstance = GetWindow<EditorWindowExample>(true, "My Editor Window");
   }

   private void OnGUI()
   {
      EditorGUILayout.BeginVertical();

      EditorGUILayout.BeginHorizontal();
      EditorGUILayout.LabelField("My Cube Prefab");
      myGameObject = EditorGUILayout.ObjectField(myGameObject, typeof(GameObject), true) as GameObject;
      EditorGUILayout.EndHorizontal();

      EditorGUILayout.BeginHorizontal();
      if (GUILayout.Button("Get MyCube Prefab"))
      {
         myGameObject = AssetDatabase.LoadAssetAtPath<GameObject>("Assets/Prefabs/MyCube.prefab") as GameObject;
      }

      if (GUILayout.Button("Instantiate MyCube Prefab in Scene"))
      {
         Instantiate(myGameObject);
      }
      EditorGUILayout.EndHorizontal();

      EditorGUILayout.EndVertical();
   }
}
You can read more about GUILayout, AssetDatabase.LoadAssetAtPath() in Unity documentation.
The Selection Class
You can also select an object from hierarchy or project view and modify it. For this purpose, Selection class comes in handy. This class gives access to any type of selection inside the Unity editor. Let's get hands on it. Replace the code from our EditorWindowExample class in OnGUI() with the following:
private void OnGUI()
{
   EditorGUILayout.BeginVertical();

   EditorGUILayout.BeginHorizontal();
   EditorGUILayout.LabelField("Scene Selected GameObject");
   myGameObject= EditorGUILayout.ObjectField(myGameObject, typeof(GameObject), true) as GameObject;
   EditorGUILayout.EndHorizontal();

   EditorGUILayout.BeginHorizontal();

   if (GUILayout.Button("Get Selected GameObject"))
   {
      myGameObject = Selection.activeGameObject;
   }
   EditorGUILayout.EndHorizontal();
   EditorGUILayout.EndVertical();
}
You can see in line 14, we just assigned our 'myGameObject' variable to Selection.activeGameObject. 'activeGameObject' property returns the currently selected game object in the hierarchy. And finally:

In our next post, we will give you a kick-start to some more magic you can do with editor scripting. Stay tuned!
Read more about:
Featured BlogsAbout the Author(s)
You May Also Like