

Daily news, dev blogs, and stories from Game Developer straight to your inbox
Sponsored By
Featured Blog | This community-written post highlights the best of what the game industry has to offer. Read more like it on the Game Developer Blogs.
Quad-buffered stereoscopic 3D with Unity3D
This post will explain the steps I went through to enable stereoscopic 3D in Unity3D. Specifically, quad-buffer stereoscopic 3D (QBS3D) used to perform professional grade 3D effects. This journey starts in 2011 and conclude with the latest release 5.1.3.
7 Min Read

What ?
Stereoscopic 3D is a technique used in computer graphic to simulate the natural stereoscopy of our visual perception system. This is an important part allowing us to perceive the depth in what we see from the two "flat" images provided by our eyes.
Stereoscopic 3D is a crucial element of immersive virtual reality.
There are multiple ways to achieve this in computer graphic, but the main idea is still the same: render two images representing the view of each eye, and then address each image to its target eye.
This is clearly visible with the output of an Oculus Rift application, with the left part reserved for the left eye and vice versa.
Some devices, like CAVE-like systems, power-walls or video projectors cannot use the same mechanics as HMDs. The eyes' position is undetermined relatively to the display(s). In this case, we use another method: the display shows both the images with a different filter (time, light polarization...) and the viewer uses a dedicated device to un-filter the images for each eye.
Ok, you got it... The "device" is those well-known and appreciated pair of 3D glasses.
The benefit of this setup from a side-by-side method (HMDs, some 3DTVs and video projectors) is that each eye-frame use 100% of the resolution of the display. In fine, the brain perceives 100% of the resolution and not only 50%.
How (in general) ?
When you use a setup with 3D glasses, you need to feed the display with both the left and right images. Then it is responsible to filter and to present them correctly. Here let's assume the 3D glasses are part of the display.
In order to achieve this, on technique is to use the existing and wild tested APIs in DirectX and OpenGL. Especially, this is called Quad-buffer in OpenGL world. It is simply a twin double-buffer mechanic, one for left/right eyes.
The usual process is:
A) Initialize context and enable Quad-buffer
…
B) Main Loop
C) Update states
D)
Setup left camera
Select left back buffer
Render left camera to left back buffer
E)
� Setup right camera
Select right back buffer
Render right camera to right back buffer
F)
Flip buffers
Pseudo-code 1 : Typical Quad-buffered application flow
In a pure OpenGL application, this is straightforward. But what about in a feature beast like Unity3D game engine ?
How (in Unity3D) ?
In this section, I will explain two methods to achieve this. The first one is complex and I was using it since 2011. The second one is simpler and an out of the box feature in the latest Unity release, 5.1.3.
Both methods are explained because it is interesting to follow the evolution of the process. It is worth noting that QBS3D is kind of easy to implement once you have access to the source code. Unity could have implemented it years ago, but this was not a priority probably due to the low audience for this feature.
For both methods, I will translate the key-points noted in "Pseudo-code 1" in real C, C# code.
Method 1: DLL injection + DLL hook + native DLL plugin
A) To configure an OpenGL context in QB mode, you need to set a specific pixel format during the context/window creation. To do so, you use the SetPixelFormat method:
https://msdn.microsoft.com/en-us/library/windows/desktop/dd369049(v=vs.85).aspx
The problem is that this call is made internally by the Unity engine and it is not exposed to customization.
In order to force a specific pixel format, the solution is: DLL injection and DLL hooking.
The principle of DLL hooking is to intercept a call to a function in a specific DLL and redirect it to a custom function.
I know this technique from videogame cheating (think full wireframe world :P)
The DLL injection is a technique to force a process to load a specific DLL, thus allowing hooking by function redirection.
To achieve this, you need an injector program and a custom DLL responsible of the hooking. The target function is SetPixelFormat to enforce a PFD_STEREO flag in the call.
Following is the code for the hook function, this is just inserting PFD_STEREO in the arguments and call the orginal OpenGL function.

B) C) These steps are handled by Unity and your scripts.
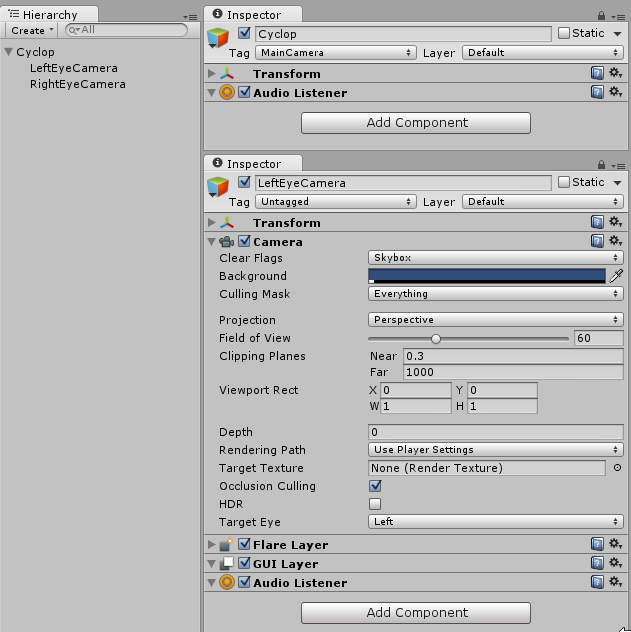
D) E) These steps are almost identical. This technique use two Cameras which are children of a Cyclop GameObject. The left and right cameras are placed accordingly to the Interpupillary distance (IPD) of the user (default value is often 63 mm, but it is important to adapt it to each individual). In this setup you can freely control the Cyclop object (translate, rotate) while keeping a consistent eyes placement.
Ok, now, how to select the correct drawbuffer?
The Unity API do not expose a way to select a specific drawbuffer, the workaround is to use a native DLL which maps the original OpenGL function.
Here is the code for this DLL:
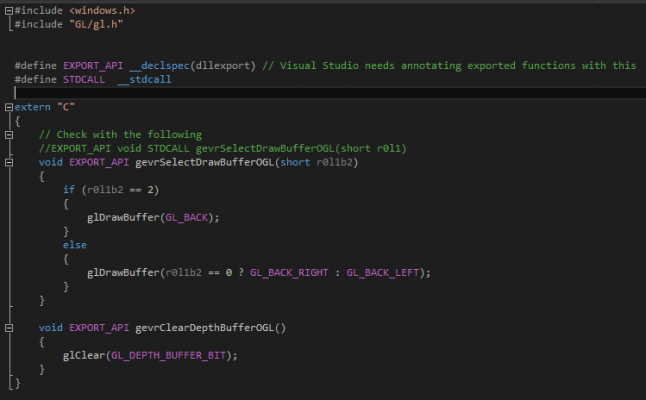
This DLL needs to be placed in the Unity Project folders, inside a "Plugins" directory. Now you can control the draw buffer in a script.
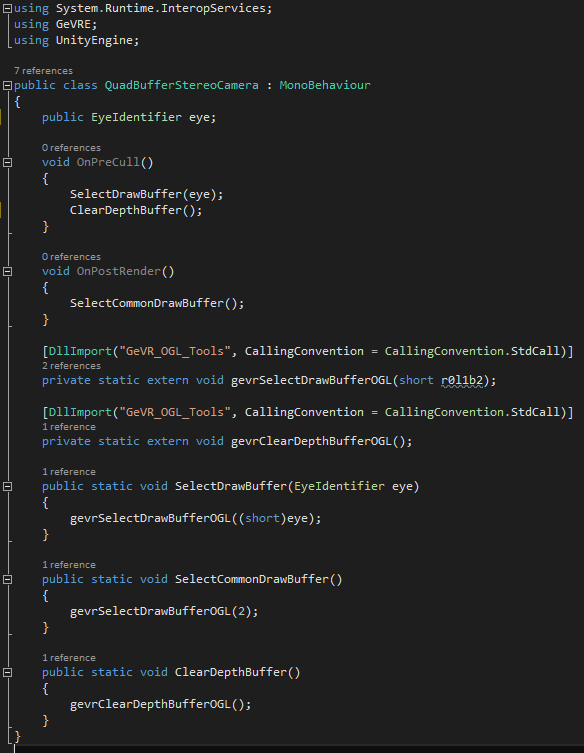
This script is added to each camera and configured accordingly with the EyeIdentifier enum. Before the culling, thanks to a Unity callback, this scripts selects the correct drawbuffer and clears it. Then normal render can occurs. After rendering, it revert the drawbuffer to the common backbuffer.
F) The last step is done internally by Unity.
Voilà !
This was not simple, but this has worked for me since 2011 and the contemporary version of Unity at that time.
Method 2: Built-in (from Unity 5.1.3)
A) This part is easily achieved via the Player settings. As shown in the following image, these settings enforce OpenGL renderer and enable "Virtual Reality" mode.

Now, the standalone builds will start in OpenGL mode and will support Virtual Reality. Currently, Unity supports Oculus as the main target, but you can infer from the documentation (here) that there are other modes. To ensure that the player starts in stereo mode, one of the methods is to use a command line argument (as explained here http://docs.unity3d.com/Manual/VROverview.html):
start MyWonderfulApp.exe -vrmode stereo
B) C) These steps are handled by Unity and your scripts.
D) E) This starts with the same GameObject setup as in method 1: a Cyclop parent of Left and Right cameras placed accordingly to the IPD. The Cyclop is the object that will be tied to the physical head movement and to the virtual "player" movements.
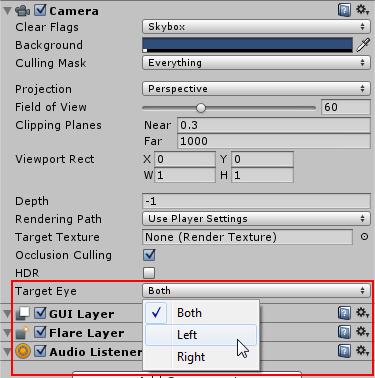
The last action is to configure each camera respectively to its side. This is easily done since the last update 5.1.3 of Unity.
F) The last step is done internally by Unity.
Voilà !
Conclusion
We can clearly see the benefits of the second method: simpler and integrated. Of course, the first method would not have been necessary with source code access. Thanks to the attention VR gained since 3 years, we now have an integrated solution, even for "professional-grade" VR.
Last word, the feature is not well documented yet. The main target for the VR features are HMDs like Oculus, Vive and Morpheus. It can subsist some issues while using the method 2.
Note on Quad-buffer:
It’s not the best optimized technique to achieve stereoscopic rendering, this is merely a simple brute force method. A lot of people are showing very smart methods on how to avoid doing twice the same calculations (for shadows, screen-space effects…).
Read more about:
Featured BlogsAbout the Author(s)
You May Also Like
Latest News


Trending


Featured Blogs


