Daily news, dev blogs, and stories from Game Developer straight to your inbox
Sponsored By
Let’s Build A Decentralized Game Economy Using Blockchains (Part 2)
In Part 1 of this series we created the foundations of a decentralized game economy on the blockchain. If we’re going to start writing other contract code aside from the boilerplate ERC20 token though, it would be a good idea to set up a local environment
9 Min Read

Setting Up A Local Solidity Development Environment and a Private Blockchain
In Part 1 of this series we created the foundations of a decentralized game economy on the blockchain. We discussed Decentralized Applications, created our own ERC20 token on the Ethereum blockchain, and used Metamask and Unity to transfer tokens from one account to another.
To reduce setup time and quickly get started, most of the software we used for Part 1 were online cloud-based tools: remix.ethereum.org to deploy our contract code, the Ropsten testnet as our blockchain, and ropsten.etherscan.io to verify our contract transactions.
If we’re going to start writing other contract code aside from the boilerplate ERC20 token though, it would be a good idea to set up a local development environment. Having one would allow us to easily recreate our own private blockchain with provisioned accounts, execute contracts more quickly, and even run test scripts on our code.
Let’s Set It Up!
Here’s a side-to-side comparison of the tools we used in Part 1 and the ones that we’ll be using by the end of this article:
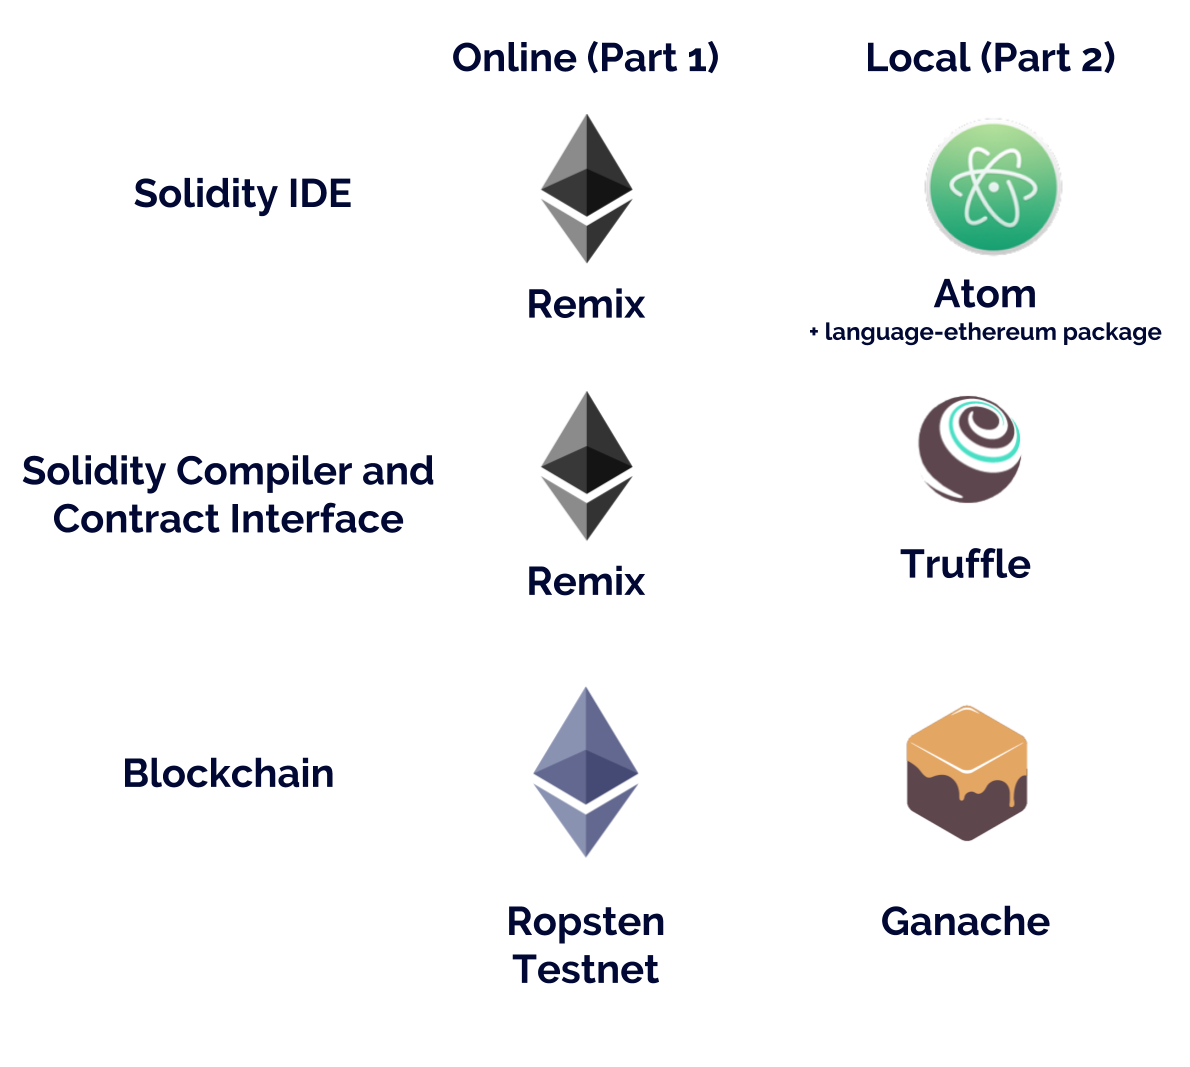
Let’s install the tools we need one by one, starting from the top.
1. Atom + language-ethereum package
In Part 1, we edited (or actually just copy-pasted 😅 ) our code using Remix on remix.ethereum.org. If we want to edit and save code locally, we’ll need an IDE that can read Solidity.
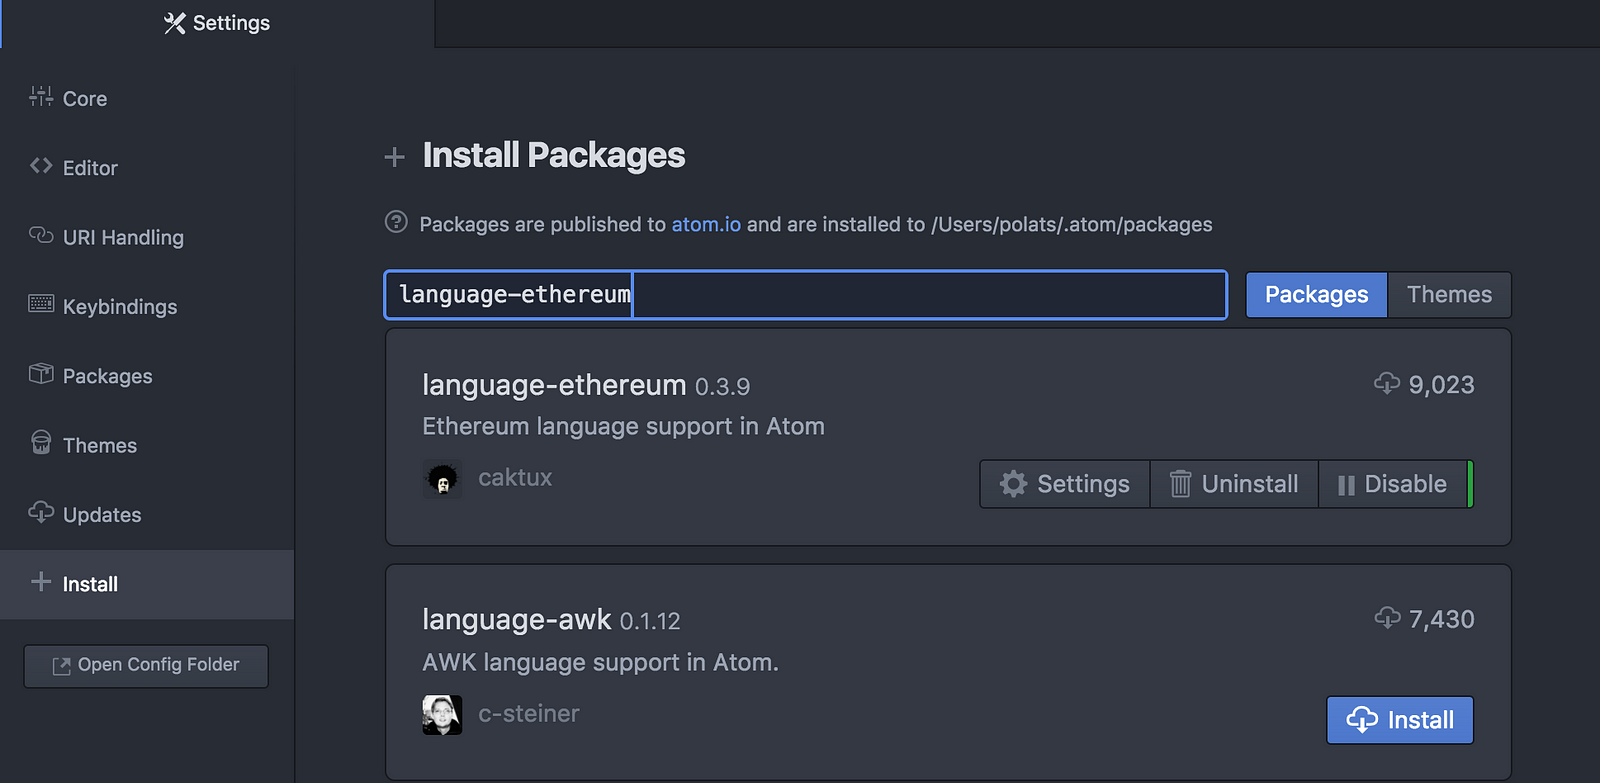
Atom is a great IDE for this — not only is it a clean and customizable code editor for any language, but it can also be used with Solidity after we install the language-ethereum package.
Install atom from their website: https://atom.io/
After installation, go to Atom → Preferences → Install and install language-ethereum to enable Solidity code highlighting.
2. Truffle Framework
Previously, we also used Remix to both compile our source code and to deploy it to the Ropsten testnet blockchain. Atom doesn’t have a built-in Solidity compiler and blockchain interface though, so we’ll use Truffle instead.
Truffle is a great development framework for Ethereum from ConsenSys. They also made Ganache (previously TestRPC) which we’ll be using for our private blockchain.
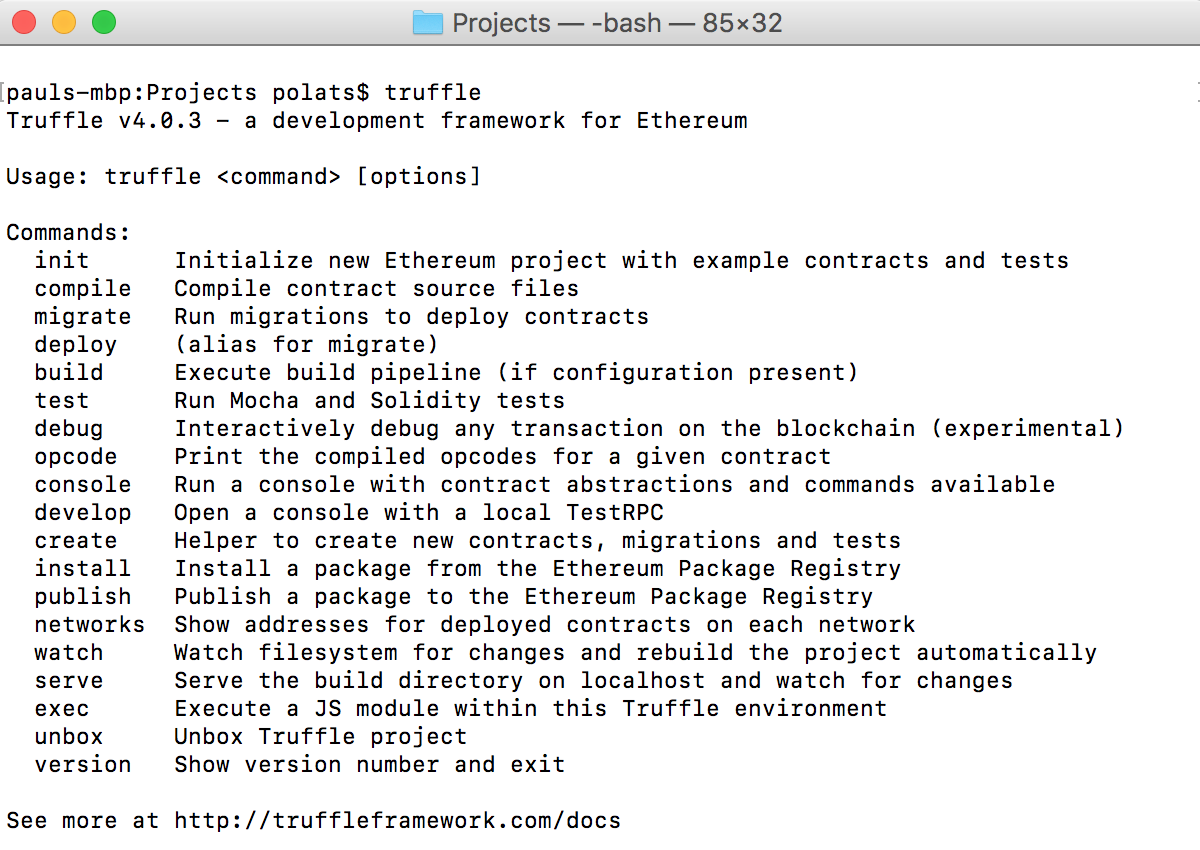
Install Truffle by following instructions on http://truffleframework.com.
Truffle uses node.js and npm, so if you don’t have them installed you would also need to download the installer from https://nodejs.org.
To test if Truffle installed successfully, run ‘truffle’ from the Terminal or command line. You should see a list of commands that Truffle can execute.
3. Ganache
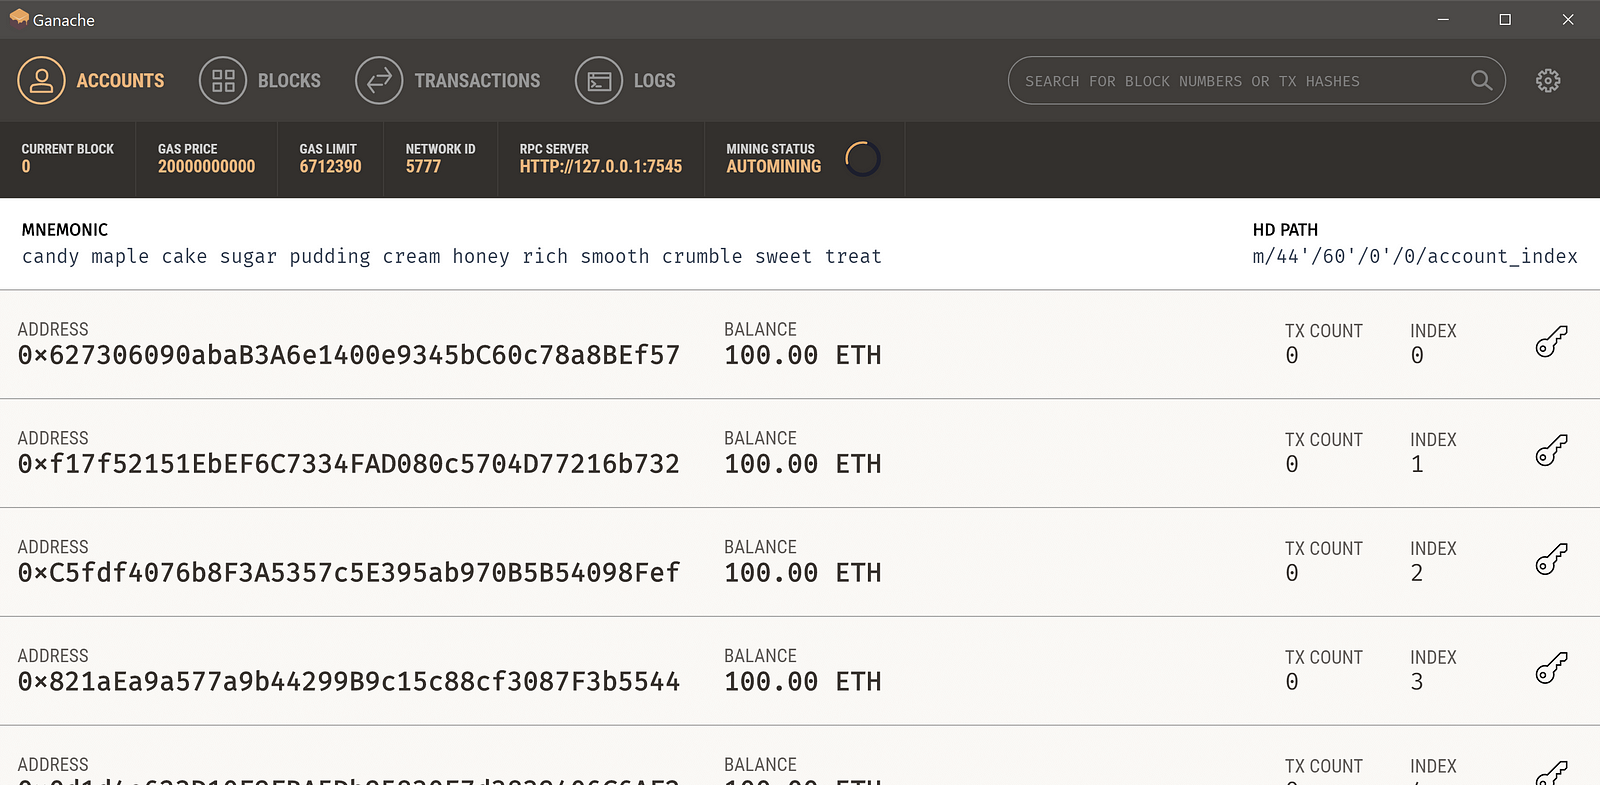
Lastly, Ganache will allow us to easily set up a local private blockchain and interact with it through an rpc connection. The latest version also uses a GUI where we can easily see what transactions have occurred on the blockchain, similar to Etherscan.
Installing and running Ganache is pretty straightforward. Download it from http://truffleframework.com/ganache/ and then start the application. Once the blockchain is up and running, you’ll see the following screen.
Let’s Try It Out!
Now that we have our local development environment and private blockchain set up, let’s perform some operations to familiarize ourselves with how they work.
1. Set Up Our Project Environment using Atom and ‘truffle init’
Let’s get started by creating a project directory and running ‘truffle init’ inside that directory. Run the following commands in the Terminal:
mkdir local-blockchain
cd local-blockchain
truffle init
If we look into our directory, we’ll see that ‘truffle init’ has created some initial files for us.
Let’s view these files in Atom. In Atom, select File → Add Project Folder, and select the project directory that we created.
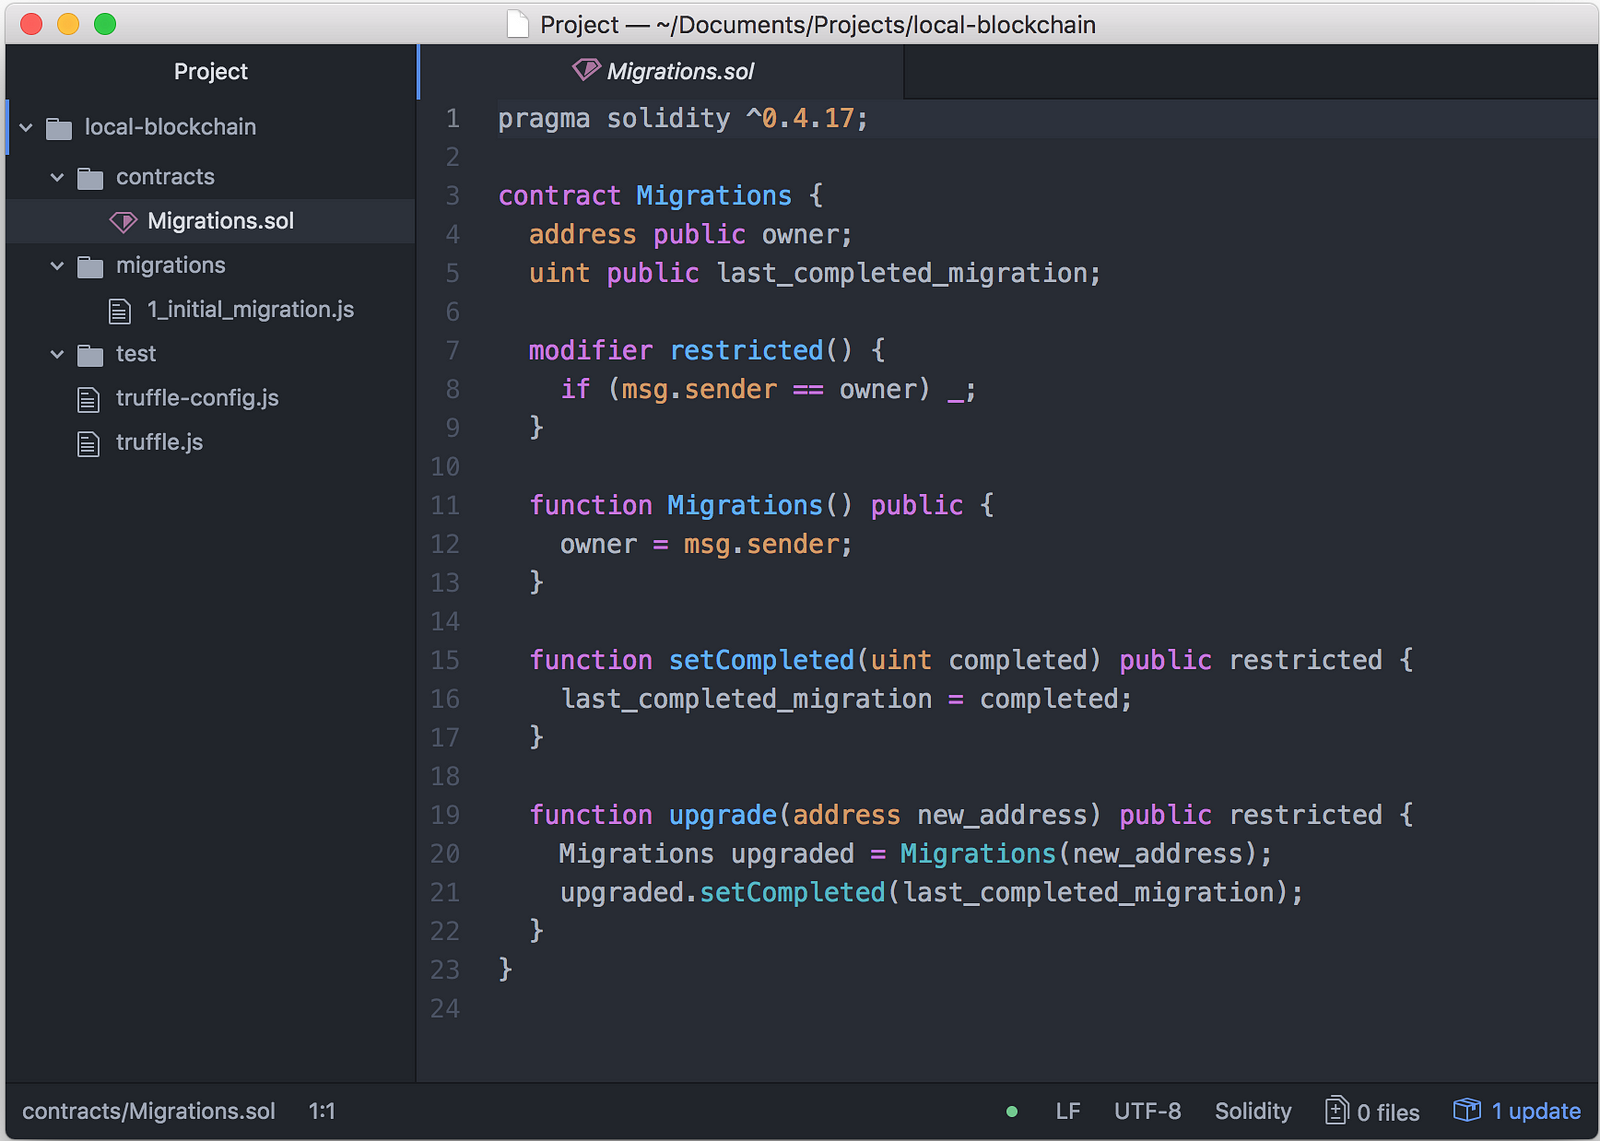
Viewing the ‘truffle init’ files in Atom, with language-ethereum code highlighting
We see that Truffle has created an initial contract for us called ‘Migrations.sol’. This is a special smart contract that’s used to keep track of changes. There’s also a migrations directory where we’ll be putting javascript files to deploy our contract code.
2. Recreate our Token Contract on Atom and create Deployment Script
For this step we’ll need to create 2 files: our Solidity smart contract (TokenERC20.sol) and Javascript deployment script (2_deploy_tokenerc20.js).
Create a new file called TokenERC20.sol in the contracts directory (In Atom, right-click on the contracts folder and then select ‘New File’.)
Edit that file and let’s again copy-paste the boiler plate ERC20 token code from Ethereum. (Here’s a raw link to the source: https://raw.githubusercontent.com/polats/unity3d-blockchain-wallet/master/Solidity/token.sol)
Create another file called 2_deploy_tokenerc20.js in the migrations directory. Copy-paste the code below:
var TokenERC20 = artifacts.require("TokenERC20");

module.exports = function(deployer) {
  deployer.deploy(TokenERC20, "10000", "Local Dev Token", "LDT");
};
If we look at the other deployment script in the folder, 1_initial_migration.js, we’ll see that 2_deploy_tokenerc20.js has mostly the same code.
The only differences are we’re deploying TokenERC20 instead of Migrations, and we’ve added additional parameters to deployer.deploy. These additional parameters are the constructors for the Smart Contract (totalSupply, tokenName, and tokenSymbol).

TokenERC20 constructor variables highlighted. The project folder also shows the 2 files that we should have already created: TokenERC20.sol and 2_deploy_tokenerc20.js
3. Compile then Deploy our Contract on the Ganache Private Blockchain using ‘truffle console’
Now we’ll use Truffle to deploy our contract to the private blockchain. First though, we’ll need to get the rpc network hostname, port and network id from Ganache. Go to Ganache settings by clicking the gear icon on the upper right, and take note of the details.
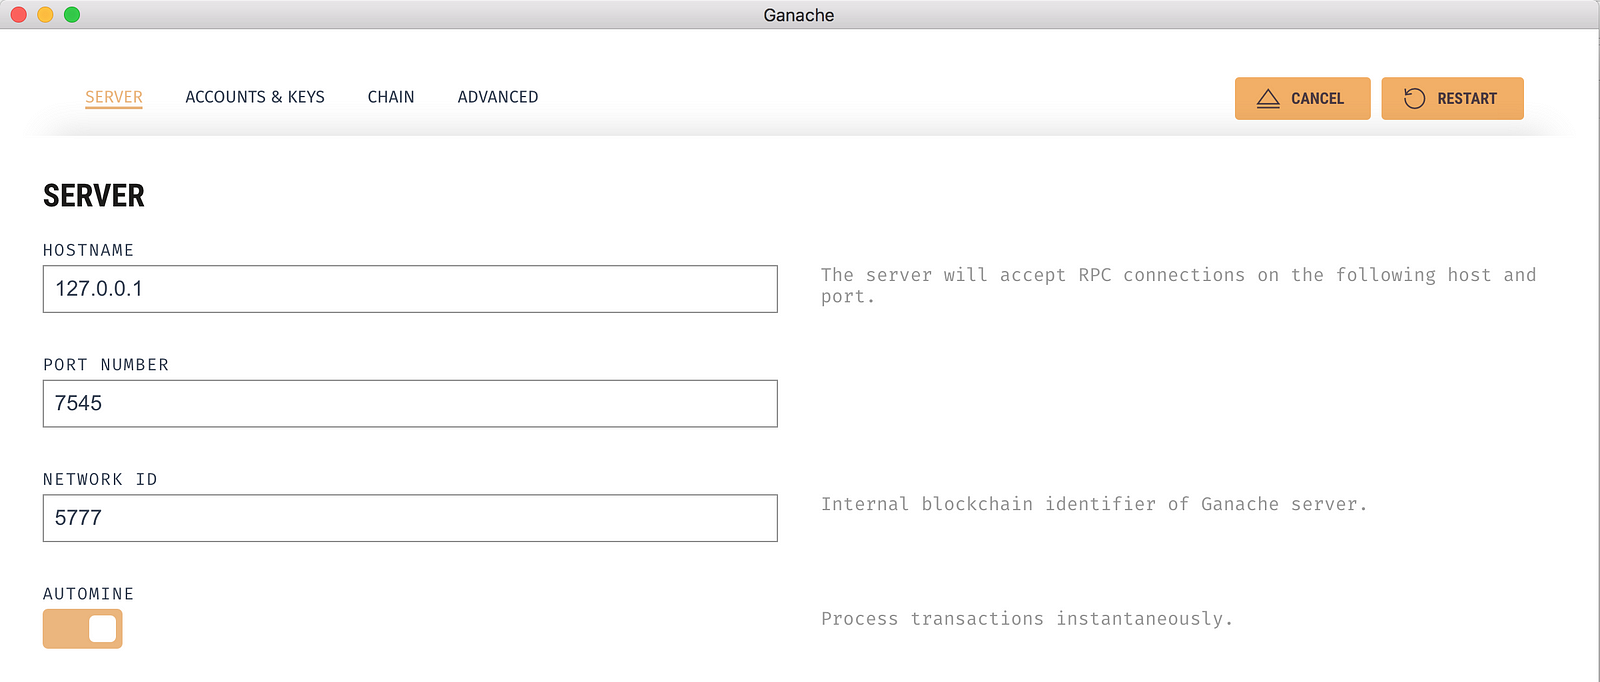
Open truffle.js in Atom, and add the details in the file, like below.
module.exports = {
  networks: {
    development: {
      host: "127.0.0.1",
      port: 7545,
      network_id: "5777"
    }
  }
};
Once we’ve defined the network settings, run the following commands in the Terminal:
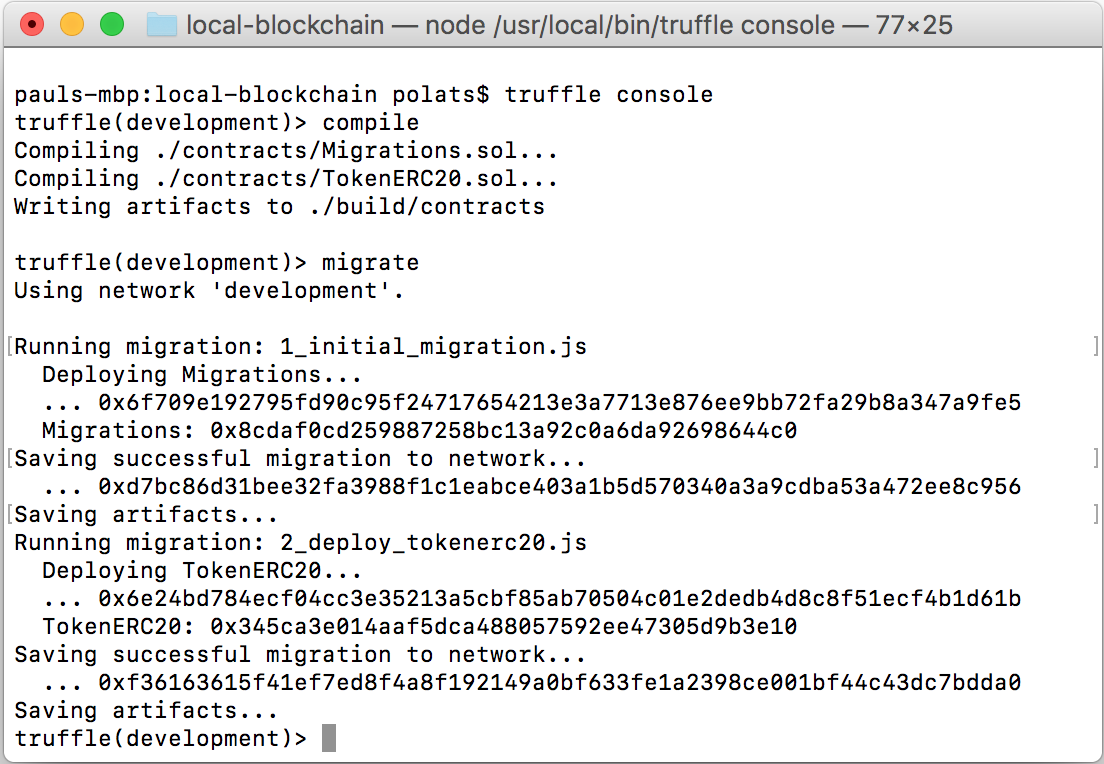
truffle console
compile
migrate
We start the Truffle console, then use it to compile and then migrate (deploy) our contract code. A successful run is shown below:
We can also verify the contract creation on Ganache by going to the Transactions tab:
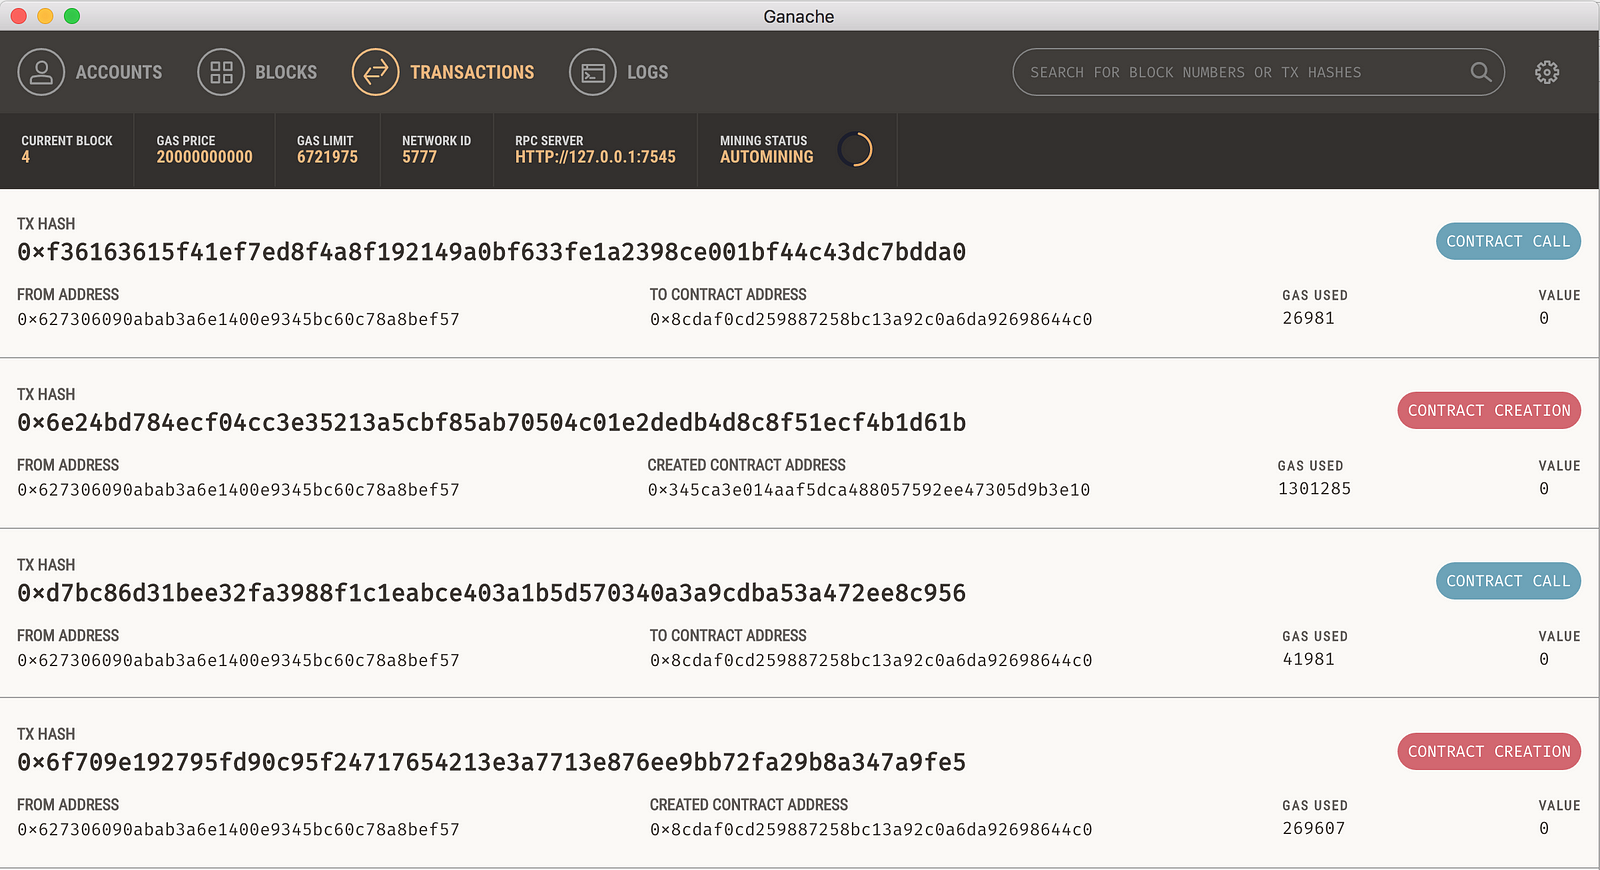
The contract creation transactions as seen in Ganache. To verify a successful deploy, we can also check the Blocks tab to see the mined blocks with the transactions, or the Accounts tab by checking the first account’s ETH balance and TX count. Truffle uses the first account by default when deploying contracts.
Before going to the next step, let’s retrieve the Token contract’s address by using the Truffle console. In the console, enter the following command:
TokenERC20.addressThis should output the contract’s address on the Terminal. We can see that aside from deploying contracts, the console can also be a useful tool for checking blockchain variables as well.
4. Verify the Token via unity3d-blockchain-wallet
If we’ve done the previous steps successfully, it should be simple to view our private blockchain token’s details in Unity via unity3d-blockchain-wallet.
We should have the unity3d-blockchain-wallet Unity project checked out from Part 1. Let’s open up the WalletUI scene in the Unity Editor, select the [ManagerComponents] GameObject and change the following variables:
WalletManager | Network URL — replace this with the RPC network details from Ganache. By default it will be http://127.0.0.1:7545
Token Contract Service | Token Contract Address — replace this with the address that we retrieved from Truffle console.
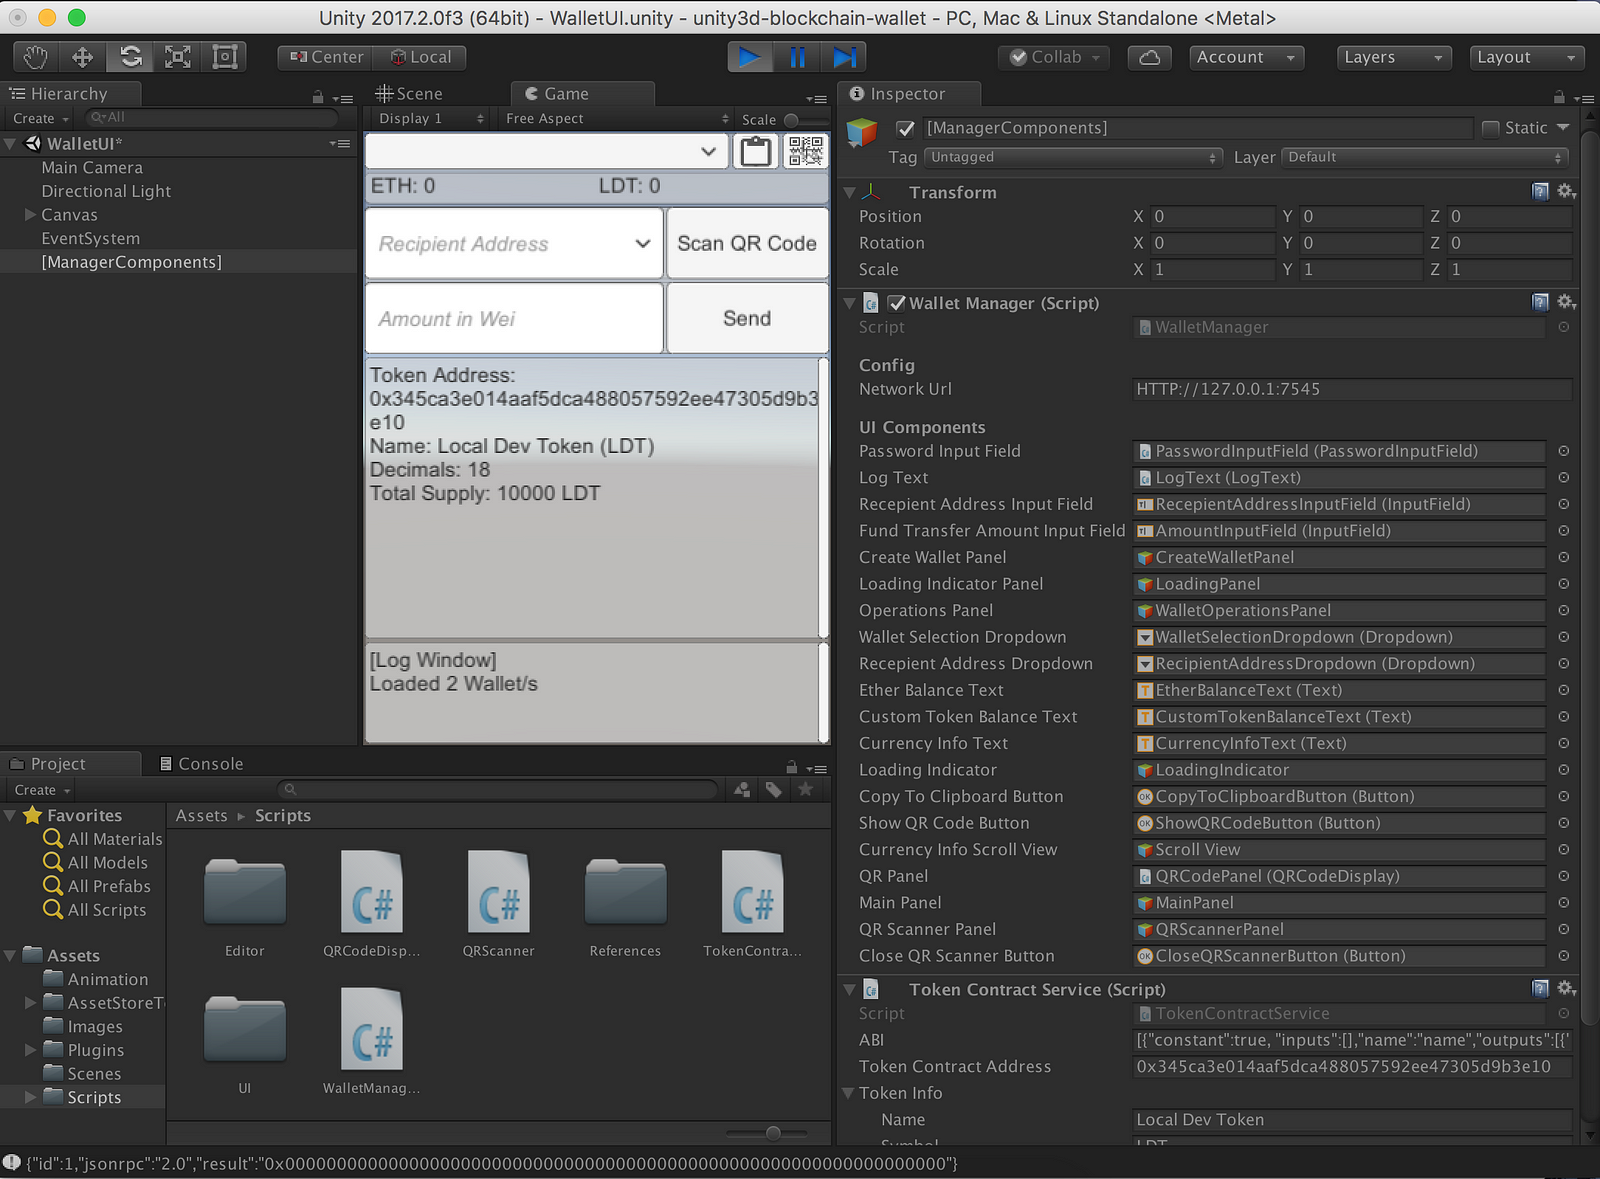
If everything works as expected, we should be able to see the token details that we defined in our deployment script appear on the Unity game view.
Congrats! You have now created an ERC20 token on a private blockchain.
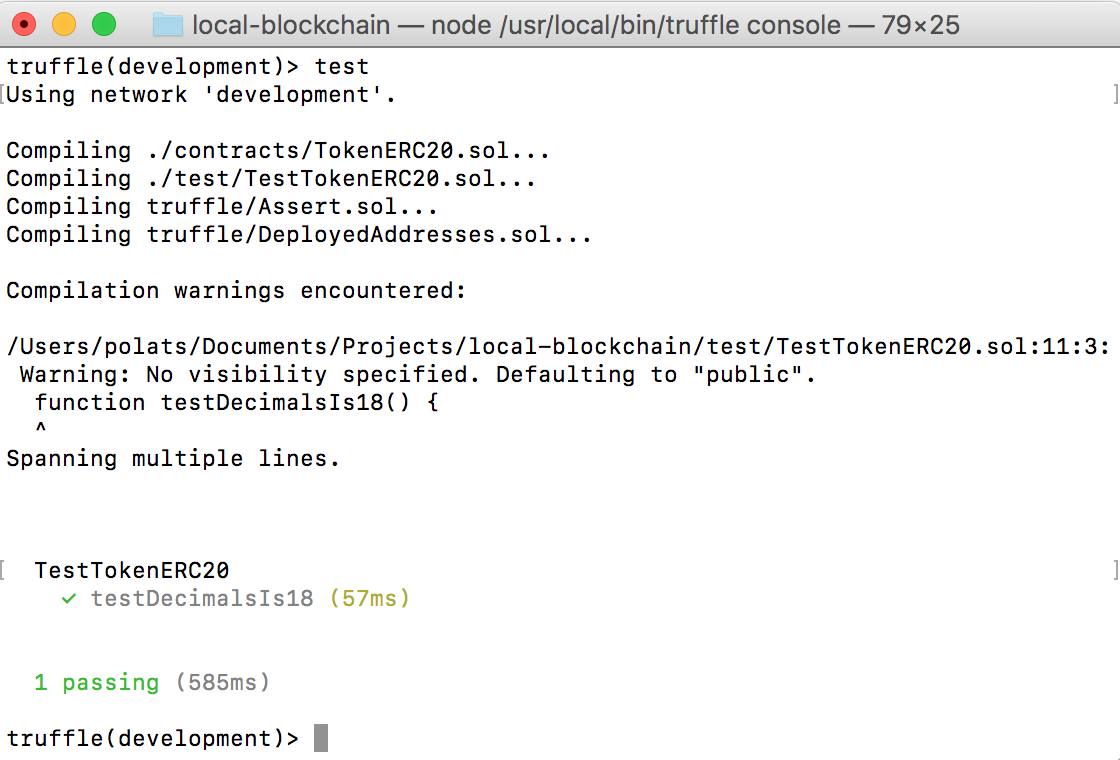
5. Run test scripts using ‘truffle test’
As a bonus, let’s see how we can use Truffle to create test scripts for testing our contracts. Similar to unit tests, we can assert certain values and ensure they’re true by running ‘test’ on the the truffle console.
Create a file called ‘TestTokenERC20.sol’ in the test directory, and copy-paste the following code:
pragma solidity ^0.4.16;

import "truffle/Assert.sol";
import "truffle/DeployedAddresses.sol";
import "../contracts/TokenERC20.sol";

contract TestTokenERC20 {
  TokenERC20 tokenerc20 = TokenERC20(DeployedAddresses.TokenERC20());

  // Testing the create token variables
  function testDecimalsIs18() {
    uint decimals = tokenerc20.decimals();
    uint expected = 18;

    Assert.equal(decimals, expected, "expected decimals is 18");
  }

}
The above code runs a test which checks that the decimals variable of our contract should be 18. Running ‘test’ on the truffle console will show the result of all tests found in the project test folder.
Example output of ‘test’ (or ‘truffle test’ if run from outside the console)
More info on tests can be found on the Truffle documentation.
Congratulations and Next Steps
Thanks for making it this far! If you were able to run through all the steps, you should now have a local development environment using Atom, a private blockchain using Ganache, and the information you need to interact with the blockchain using unity3d-blockchain-wallet and the Truffle Framework.
In the next part of the series, we’ll look at deploying other Solidity smart contracts aside from the standard ERC20 token we’ve been using, while still integrating our new contracts with Unity via unity3d-blockchain-wallet.
Thank you for reading! Please leave questions and comments, as well as any suggestions on what you want to know more about on the next article.
Read more about:
BlogsAbout the Author(s)
You May Also Like