

Daily news, dev blogs, and stories from Game Developer straight to your inbox
Sponsored By
Featured Blog | This community-written post highlights the best of what the game industry has to offer. Read more like it on the Game Developer Blogs.
Building a Scalable Online Game with Azure - Part 4
In the previous part of this series, we learned how to persist state to a scalable database. Next, we'll be creating the frontend, a small Universal Windows Platform game that accesses our backend.
5 Min Read

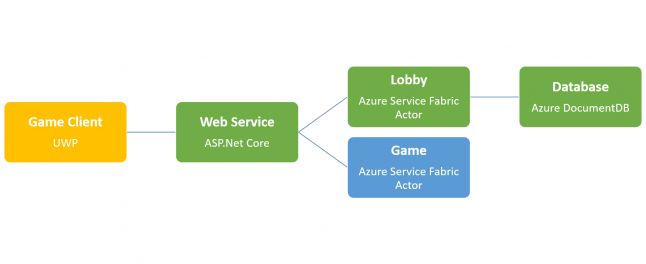
Welcome back everyone! As this blog series is approaching completion, we've learned a lot about the general architectural design of online games in the cloud, added the web service that acts as interface between the frontend and the actual backend services, and learned how to persist state to a scalable database.

Next, we are creating the frontend, a small Universal Windows Platform game that accesses our new backend.
As always, if you've missed the previous part(s) and/or are just interested in how to create the frontend, you can catch up by grabbing the source code that we've written so far from GitHub.
Creating the Frontend
We are creating a small DirectX 11 game application that connects to our backend through old-school HTTP.
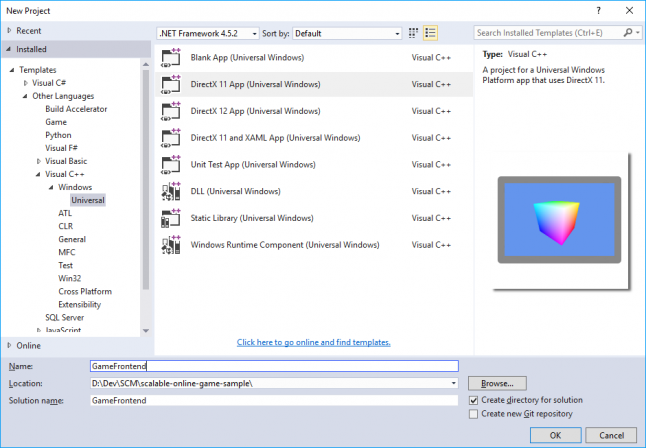
In Visual Studio,
Click File > New > Project ...
Select Visual C++ > Windows > Universal.
Select DirectX 11 App (Universal Windows).
Choose a name and location for the frontend.
Click OK.
Visual Studio will create a small application with the obligatory vertex color interpolation cube for us - the Hello World of graphics programming.
Click Debug > Start Debugging or press F5 to build and run the sample.
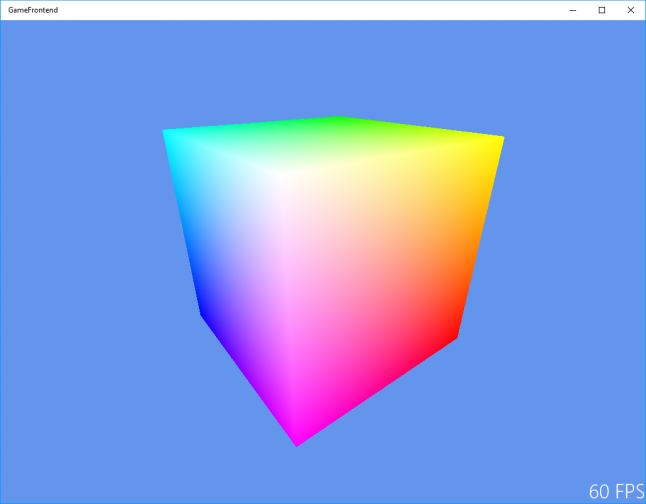
Beautiful.
Now, on to the real job.
Connecting to the Backend
We've got a publicly accessible web service in place, so all we need to do is send an HTTP request to that service and handle the response. In order to do so, we are going to hijack the SampleFpsTextRenderer, which already has all the code in place for rendering text to the screen.
In Content/SampleFpsTextRenderer.h, add private fields for our HTTP client and for remembering whether we already sent our request:
private:
	Windows::Web::Http::HttpClient^ httpClient;
	bool m_requestSent;
In Content/SampleFpsTextRenderer.cpp, in the Update function, remove the first two lines which would normally set the current text to the current frames per second value.
//// Update display text.
//uint32 fps = timer.GetFramesPerSecond();

//m_text = (fps > 0) ? std::to_wstring(fps) + L" FPS" : L" - FPS";
Instead, add code for creating our HTTP client, and sending the request to our backend:
if (!m_requestSent)
{
	m_requestSent = true;

	// Update UI.
	m_text = L"Sending request...";

	// Send request.
	httpClient =
		ref new Windows::Web::Http::HttpClient();
	Windows::Foundation::Uri^ uri =
		ref new Windows::Foundation::Uri("http://localhost:8707/api/login/npruehs";);

	concurrency::create_task(httpClient->GetStringAsync(uri))
	.then([=](Platform::String^ s)
	{
		m_text = std::wstring(L"Response: ") + s->Data();
	})
	// Always catch network exceptions.
	.then([this](concurrency::task<void> t)
	{
		try
		{
			// Check for errors.
			t.get();
		}
		catch (Platform::Exception^ ex)
		{
			// Details in ex.Message and ex.HResult.
			m_text = std::wstring(L"Error: ") + ex->Message->Data();
		}
	});
}
First, this code sets the text to "Sending request...", indicating that we should wait to the network response. An HttpClient instance is created, and the request URL is built. Then, we send a request to the URL, without any payload - the important part of the request, the user id, is already part of the URL. Finally, if the request is successful, we're showing the response text. Otherwise, an error message is shown.
If we run the application again now, Visual Studio might show an exception window. This might happen especially in the case of us not having the backend up and running.
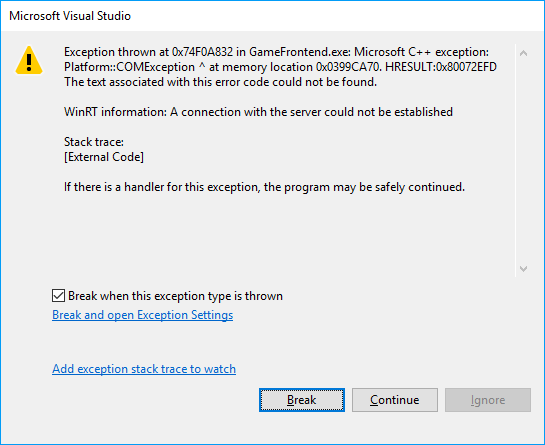
The window tells us that the program may be safely continued, if there is a handler for the exception - which, in our case, there is. Click Continue.
Storing the Client ID
In most modern mobile games, the client ID is stored locally on the device, identifying the user and serving as prerequisite for authentication. While we'll be skipping the whole security aspect of authentication for sake of simplicity, we want to store the client ID so we can verify that our backend login counter is actually working.
Add the following code and update the code sending the request to the backend accordingly:
// Get client ID from local settings storage.
Platform::String^ clientId;

Windows::Storage::ApplicationDataContainer^ localSettings =
	Windows::Storage::ApplicationData::Current->LocalSettings;

if (localSettings->Values->HasKey("ClientId"))
{
	// Lookup in local storage.
	clientId = localSettings->Values->Lookup("ClientId")->ToString();
}
else
{
	// Create new client id.
	GUID guid;
	CoCreateGuid(&guid);

	OLECHAR* bstrGuid;
	StringFromCLSID(guid, &bstrGuid);

	clientId = ref new Platform::String(bstrGuid);

	// Store in local storage.
	localSettings->Values->Insert("ClientId", clientId);
}

// Send request.
httpClient =
	ref new Windows::Web::Http::HttpClient();
Windows::Foundation::Uri^ uri =
	ref new Windows::Foundation::Uri("http://localhost:8557/api/login/" + clientId);

// ...
We are using a Windows Storage ApplicationDataContainer for storing the client ID. If there is already a client ID, we are using that one. Otherwise, we create a new globally unique identifier and store it in our local settings container.
If you repeatedly start the application now, you should see an increasing login counter. If you don't, go a step back in this blog series and verify your backend is running as expected, e.g. by visiting the endpoint /api/login/anyId in your browser.

Congratulations! You've successfully connected your frontend to your cloud backend!
As always, the full source code of this part is available at GitHub.
In the final part of this series, we'll learn how to deploy our backend to the cloud.
References
Microsoft. How to Draw Text. Last accessed March 2017. https://msdn.microsoft.com/en-us/library/windows/desktop/dd756692(v=vs.85).aspx
Microsoft. Networking and web services - HttpClient. February 2017. https://docs.microsoft.com/en-us/windows/uwp/networking/httpclient
Microsoft. Store and retrieve settings and other app data. February 2017. https://docs.microsoft.com/en-us/windows/uwp/app-settings/store-and-retrieve-app-data
Read more about:
Featured BlogsAbout the Author(s)
You May Also Like


