Daily news, dev blogs, and stories from Game Developer straight to your inbox
Sponsored By
Featured Blog | This community-written post highlights the best of what the game industry has to offer. Read more like it on the Game Developer Blogs.
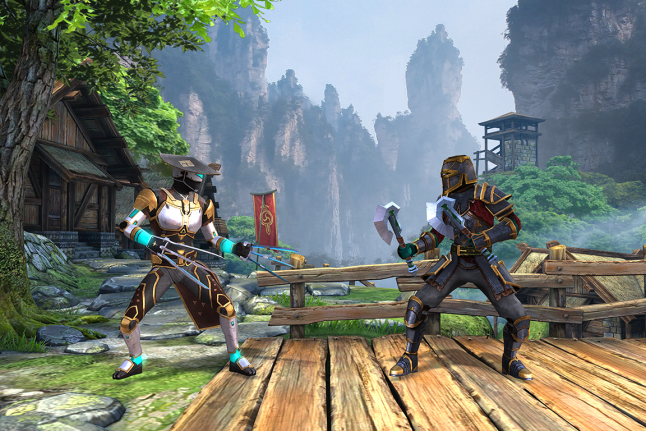
Rendering process in Shadow Fight 3
In the following essay, the leading technical artist of Nekki’s Russian development partner Banzai Games, Roman Tersky, describes the rendering process and the materials used for the characters' equipment in the mobile game Shadow Fight 3.
11 Min Read

In the following essay, the leading technical artist of Nekki’s Russian development partner Banzai Games, Roman Tersky, describes the rendering process and the materials used for the characters' equipment in the mobile game Shadow Fight 3. In addition, he reveals some of the tricks used for setting up the environment:
Shadow Fight 3 is an RPG action game developed on the basis of the Unity engine. The game was released on iOS and Android in November 2017, and since then the number of installations has exceeded 50 million.
To reach such a large audience, the development team had to perform well in optimizing the game - and as a result of their efforts, the game runs at 60 frames per second on most modern devices.
Journalists and players often praise the visuals of Shadow Fight 3. In this article, I will give you insight under the surface of the game and reveal how we managed to achieve this visual quality.
Rendering a frame
There are many factors that directly affect the performance of the game and the number of frames it can display per second. One of the most important factors for us was the number of draw calls used per one frame in the game. Let’s take a closer look at the concept. During the rendering of a game frame for each static group of objects sharing the same material, Unity uses draw calls and overlays them on each other. Each draw call requires CPU resources, so an important step in optimization is to reduce the number of these calls. Our goal was to minimize the number of calls to 100 per game frame on average.

The first step of rendering in Shadow Fight 3 is drawing the dynamic shadows of the characters and the glow effects for the luminous elements on the armor and weapons of the characters. Both of these processes have their own peculiarities and they should be explained in detail.
Shadows
In addition to the main camera used for the main frame, an additional orthographic camera projector is installed on the scene, designed to draw the shadows from the characters onto a separate surface we call a “ShadowReceiver”. This camera follows the midpoint between the opponents and creates their projection onto the plane based on their current position.
The result takes the form of an alpha texture which replaces the same texture with the render result of the previous frame in the dynamic material of the “ShadowReceiver” object. This approach helps us to avoid the need to calculate real shadows and draw them on all models in the location, which would have a significant effect on the overall performance.

For this frame, the process took 20 render calls.
Glow
The process of creating a glow effect on the armor and weapons of the characters is similar to the process of creating dynamic shadows. A “BlurCube” is created around the model with luminous elements. Glow effects are projected on it every frame, based on information stored in the blue channel of the RGB texture of the material of the glowing object. That means the blue channel acts as a “mask” for projecting the glow — you will see more about this below, in the section about character materials.
Then a blur is applied and the information is saved as an alpha texture, which replaces the texture with the result for the previous frame in the dynamic “BlurCube” material.

In this frame, the glow process calculation took 15 draw calls, plus two more to blur the effect.
Meshes drawing
First of all, the parts of the armor and the weapons of the characters are rendered. Then we render all parts of the location of the foreground, then the background objects, and then the background itself, which is a plane with a texture size of 1024x512.
They are followed by particle systems, some small details of the foreground, and, finally, models using a vertex animation (more on this below). Eventually, in the next two draw calls, the calculated and previously drawn shadows and glow effects are applied.
UI
In addition to the cameras mentioned above, we use another one during our rendering process, which is intended to render the user interface. Unlike the main and orthographic camera-projector, it is not unique for each scene. It exists permanently during the entire game session.
Thus, after rendering the scene, the characters, and all of the visual effects, a UI is rendered and placed on top of the main frame, all along with the dark vignette around the screen edges.
 Main camera render
 UI camera render
 Final frame render
In total, the rendering of the final frame of the scene required 92 draw calls.
A character's equipment material
To create the material of the character's armor, a few textures with a resolution of 512x512 are used: Diffuse, RGB masks, MatCap, an additional Diffuse map for the shadow form, as well as a small noise texture MorphMask used to create the effect of the character's transition to the shadow form.
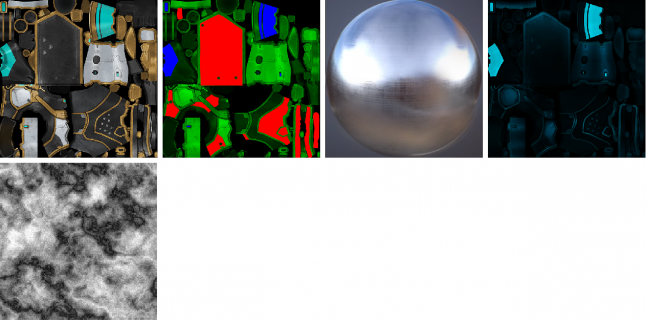
Diffuse map is just a texture of the armor itself, so let's discuss the rest.
RGB masks texture
Since the RGB texture conventionally consists of three color channels defined by the value 0 or 1 for each pixel, it is convenient to use it for storing various data about the material at each specific point of the UV map of the object.
In our case, the RGB-texture channels (masks) contain information for the following processes:
· Red channel indicates which elements of the material will change their color if the opponent’s character is wearing the same armor. We use this system so that the player doesn’t confuse his character with the opponent; certain parts of the armor set in the red channel are repainted to the opponent alternative color, which was set by our artists.
· Green channel is used to indicate which elements of the armor the MatCap texture is applied. For us, MatCap texture creates a metallic surface effect, and the magnitude of the effect is stored in Green channel as well (the lighter the texture, the stronger the metallic shine).
· Blue channel contains information on which parts will use Glow to simulate a luminous surface.
Matcap
In order to create a reflection effect for the metal elements of the armor and weapons of the characters, a unique MatCap texture with a resolution of 512x512 is created for each location, based on a processed screenshot of the location with all the features of its structure and lighting.
Depending on the location of the battle, the corresponding MatCap texture is applied to the material of the characters’ armor and weapons. The application of the effect of a metal surface occurs on certain areas of the material, based on the information in the green channel of the RGB mask texture.
This approach is cheap and easy to process, and creates the effect of realistic metal surfaces with reflections, with all the details of the current arena.
Shadow form
When a character enters the shadow form, the diffuse texture of the material is replaced by an additional one, created specifically for the shadow form.
For a smooth transition from one texture to another, we use a Morph noise mask to achieve a gradual transition.
Location lighting
All of the lighting and shadows on the location are baked into lightmap textures with a resolution of 2048x2048, which eliminates the need to calculate the lighting in realtime and significantly increases the performance.
The only directional source of lighting is used to illuminate the characters in accordance with the general atmosphere of the arena in which the battle takes place. However, with this approach, the illumination of the characters at any point in the location would be the same, regardless of whether they are standing in the shadows of the tree canopy or directly exposed to sunlight.
This issue could possibly be solved by calculating the dynamic shadows from the objects of the environment and projecting them onto the character models. But, this would have hurt the game performance.
As an alternative, we use a separate, unique gradient shadowing map for each location: in fact, this is a texture with a resolution of 1024x1, which is a lighting gradient based on a screenshot of the location storing the value of shading in each part of the background.

When a character moves around the arena, the color of his armor (after applying directional lighting) is multiplied by the gradient color corresponding to his current position on the location. Thus, in shaded places, the applied lighting appears to be darker than in open areas.


As a final touch, a Rim Lighting technology is used to highlight the edges of the character model, which can be clearly seen, for example, at a location with a burning village. This technology allows us to outline the characters so that they clearly stand out from the background of the arena.
Dynamic arena effects
An important role in “breathing some life” into Shadow Fight 3 locations is played by FX effects and dynamic objects such as flags, moving leaves on trees, grass, and so on.
FX
Most of the FX (fire, rain, sunshine, etc.) in SF3 are based on the principle of applying animated material to static low-poly models. However, there are also some effects built on a particle system.
Dynamic objects
In all SF3 locations, there are two types of dynamic objects: physical - driven by simulating tissue and applying impulse imitating gusts of wind to them, and 3D models with vertex animation. For objects with vertex animations, a looped animation track is created, setting vertices of the 3D model in motion.

Reflections
Locations in SF3 are built much like a theatrical scene. Like the audience in a theater, the game camera is rotated only in one direction and doesn’t change its angle much. The objects of the environment are also set according to the principle of theatrical scenery: there are only ones that the player can see. On the sides and behind the camera there is nothing, and all models have geometry only in those places that can get into the camera's field of view.
Reflections on locations
To address the issues of reflection with maximum performance in arenas where we have reflective surfaces (marble floor, water, etc.), those elements that should be reflected are duplicated, and their size along the Z-axis is set to a negative value.
The position of the duplicate is aligned in a way that both objects look like a reflection of each other. The material of reflective surfaces has a transparency with a magnitude that depends on the nature of the surface. This approach not only improves the performance of the game, but it also gives a very realistic result.
Conclusion
The issue of rendering optimization for mobile devices is very important right now. What you saw in this article are the solutions we worked out specifically for our project called Shadow Fight 3. Lately, Banzai Games has begun to develop two brand new games in which we will try to make the graphics even better, using our current developments but also adding something new.
I hope this has been an interesting reading for you! If you have any comments or additional questions, please ask them in the comments section below. Thank you!
Read more about:
Featured BlogsAbout the Author(s)
You May Also Like