

Daily news, dev blogs, and stories from Game Developer straight to your inbox
Sponsored By
How We Design Maps for Our Match-3 Game
Our entire team, including non-artists works on creating the map from concept to final markup. Since involving large number of people usually creates mess, we have documented the process. Obviously, it can be easily used for other game types as well.
4 Min Read

Each game uses different terms for level sets- from zones and areas up to themes and worlds. In Pet Savers we use the term "Map" for these groupings. Our entire team, including non-artists works on creating the map from concept to final markup as we believe in liquid knowledge. Since involving large number of people usually creates mess, we have documented the process. By now the process is logical, clearly defined and simple in implementation. Obviously, it can be easily used for other games as well.
I would like to go through the process specifically introducing one of our maps- The Great Wall.
Concept Development Stage
We start with the concept development stage. First we brainstorm for the main theme and story that the map has to tell. The team gets inspiration from real-life objects, as well as scrolling around web and viewing items on Pinterest and Instagram. After all ideas are recorded, we are carefully choosing a topic and start working on large items for the map. The main items for our maps are buildings, so the team has to come up with up to 12 main constructions. The main rule here is that the building has to be realistic but creative.
So for The Great Wall we have come up with a mixed concept of an Eastern Culture and Chinese Symbolism. The following buildings and constructions were included here- Blacksmith, Dumpling Cafe, Sushi Bar, Tea House, Chinese Hotel, Mini Shop for Local Handcraft, Lantern Store, Buddhist Temple, Kung-Fu School. As a result our team learned a lot about China!
Layout Integration Stage
The map layout is basically the same for all maps with its pre-defined elements, such as map format, nodes, entrance and exit points. Note that these elements repeat throughout the game and it's important to have a thorough design for each of them. So by now we have a preset which is used for all the maps. Let's see what it is included in the pack.
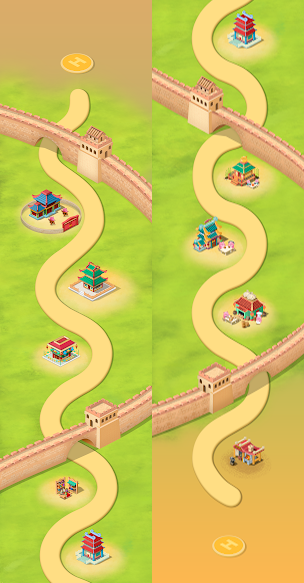
The game uses vertical scroll map with identical entrance and exit points marked with an H. This stands for Helicopter station. The shift from one stage to another is done with a drone flight, which lands on those stations. The level nodes continue with a preliminary road. We use dimensions which feel comfortable for all devices and the map doesn't feel too crowded. For our maps we give preference to 27 degree camera view angle, since flat layout seems to be a bit boring and no longer popular. The main items for our maps are buildings. The density of the main object is 10-12 items per map.
With The Great Wall we have used the layout with greenish brown color transmitting sand and added up Chinese Wall as a contrasting element. So the same road looks quite different with the background changes and specifically colorful elements.
Sketching Stage or Line Art
The main question here is the general scale of the elements and degree of elements clutter. This basically refers to the stage main elements. The process starts with thoroughly sketching of the elements. We avoid skipping small elements since with line art you can see how well it goes with the overall map concept. So you will end up with a well defined design, which is ready for coloring stage.
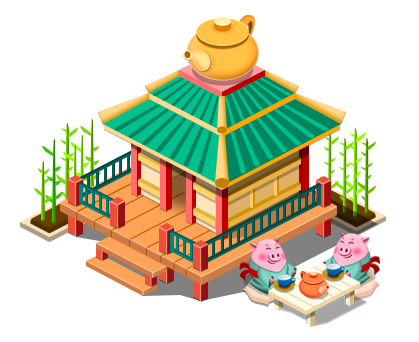
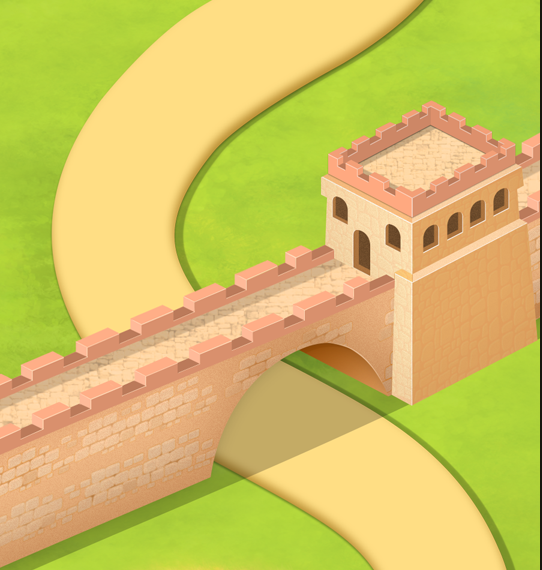
For The Great Wall we have added a few small elements, such as Chinese lanterns, oak barrels and baskets. All of this is done to make the traditional buildings more comprehensive and appealing to the users. And still this was not enough to make the map looking complete. The sketch of a Chinese Wall with detailed brick design did the trick for finalizing the map.
Color Design Stage
Here each object is being treated separately and then being added to overall design afterwards. This is important since messing with details might create unclear or blurred images for larger desktops. The same is true about light and backlight. Object separation allows each object to have a separate layer, so you can add up styles if you decide on global changes.The designer conveys softness, adds a few gradient elements and the map is ready.

Those final steps add unique artistic flavor to the map. Since the main theme of the map was China, we had to do some backup research on the main Chinese colors and it turned out that the basic colors for them are red and green. So the artists used a lot of those during the coloring stage.
Sometimes we go over the final map to see if it fits well with the game. A few minor changes might be done at this step. When the map is confirmed by all team members, it is being added to the game. The user feedback is also important for us.
Luckily, so far we have received only positive remarks about our maps. Plan to continue keeping up with our user needs.
Read more about:
BlogsAbout the Author(s)
You May Also Like
Latest News


Trending


Featured Blogs


