


Daily news, dev blogs, and stories from Game Developer straight to your inbox
Sponsored By
Featured Blog | This community-written post highlights the best of what the game industry has to offer. Read more like it on the Game Developer Blogs.
Analyzing Core Character Movement in 3D
Some tools and tips for analyzing core character movement in 3D, along with some source code to get you started.
9 Min Read

This post was originally published on Ryan Darcey's blog, Making Moves.
While working at 343 Industries on Halo 5: Guardians, my time was largely spent developing the new Spartan Abilities. Naturally, as I press on with the development of my new independent project, character movement continues to be an area where I focus a lot of my time and energy. In doing so, I've developed some tools to help analyze exactly what's going on, frame-by-frame, and thought I'd share them with y'all. In addition, I'll call out some guidelines I use for tuning the core components of 3D character movement.
DISCLAIMER: I'm developing my current project with Unreal Engine 4 and I'll be referencing some engine specific functions and classes, but I don't imagine it'd be difficult to port the ideas to another engine. Also, I'm nowhere near ready to show/announce my project, so apologies in advance for limiting the screenshots to debug output. When the time is right, I have a follow up post planned that'll showcase a more advanced movement feature/tool I'm developing and maybe I'll be ready to give a little peak behind the curtain at that point :)
INTERPRETING ANALOG STICK INPUT
So, first things first. You have to get your analog stick input sorted. Luckily, Ryan Juckett already wrote a brilliant blog post about how to do this. Check it out here and then come back...or save the link and follow up later. It's not necessary reading to understand the rest of this post, but for total character movement mastery it's required at some point. Also, it was a bit of an inspiration for this post, so I wanted to call it out!
MAX ACCELERATION
Once you've got your stick input sorted, the next thing you might want to start thinking about is the acceleration for your character. When you're tuning the acceleration, you should be thinking about it in terms of how responsive you want the character to feel. In general, players are going to respond more positively to a more responsive tuning, but as a designer you have to think a little deeper about how that tuning is going to affect your gameplay.
For example, maybe your game is going to benefit from a less responsive acceleration tuning. Having drag on your character can be really engaging; forcing players to analyze the environment more closely and plan their next move just a little further ahead. Twitch (not the streaming service) focused games like Call of Duty aren't going to work with an acceleration model like this, but you can go as far back to games like Asteroids for an example of how an unresponsive acceleration tuning can be a prominent feature of the game. Or, maybe you're prioritizing animation fidelity over character responsiveness like in Assassin's Creed. One could make an argument that Assassin's Creed would "feel better" if the character was more responsive, but there are tradeoffs like animation popping.
You can look back at previous Halo iterations to examine this, as well. Combat Evolved had a much lower acceleration value for the player, making it easier to line up shots on your enemy. Then, Halo 2 cranked up the acceleration WAY high and competitive players loved it, but it's arguably a lot harder to play for less advanced folks. For Halo 5, we leaned closer to Halo 2's acceleration value with the renewed focus on esports. Here's one of many videos out there demonstrating how important strafe acceleration becomes at higher levels of play.
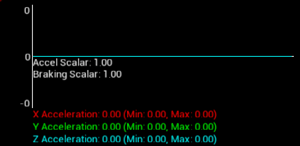
As you're tuning/debugging your this value, something I find SUPER helpful is keeping a history of the character's recent acceleration values and displaying them in a graph over time. UE4 provides some functionality for this with DrawDebugFloatHistory, but I found that drawing the values in screen space was much easier to read compared to a histogram in world space. Also, I found myself wanting to draw multiple float values on the same graph, so I wrote a new version of this function to make these changes.
Here's an example of what my acceleration debug graph looks like in game. Note that the acceleration values are all relative to the player's input transform. That means, X = Forward/Backward acceleration, Y = Right/Left acceleration and Z = Up/Down acceleration; all in the character's local space.
In general, you should make sure these curves are looking super smooth and that you're not introducing noise from a bug in the input processing or maybe your networked movement (two areas I had problems). Also, notice that I'm displaying "Acceleration Scalar" and "Braking Scalar" values. If your character is going to be altering their default acceleration value with something like a sprint, I've found that it's better to define it as a scalar on the default value rather than an explicit acceleration value. This allows you to adjust the default value while still maintaining the same relative scalar for your modified movement modes.
BRAKING DECELERATION
As I just briefly touched upon above, there's a second acceleration component you have to consider; braking deceleration, or how quickly your character comes to rest when there's no acceleration input from the player. For the most part, this is only going to be relevant for flying characters or characters on a slippery surface like ice. That said, super quick stops can feel jarring and conserving some momentum might feel more natural if your game doesn't require super high precision movement. Ultimately, you have to consider the same factors I covered in the Acceleration section above when tuning this value, but I did want to explicitly call it out as part of the core variables to consider.
MAX SPEED
 Next, onto your character's max movement speed. This is something you're going to want to lock pretty early on in your project since it'll have such a huge impact on how your levels are built. For the most part, adjusting an enemies movement or projectile speed in response to a change in the character's max speed isn't going to be that big of a deal. However, if you've exited the greybox phase of your level development process, adjusting max speed is going to totally screw up your level scale, cover density, jump distances, etc and some (maybe a lot of) work will need to be redone. Of course, some redoing of work is to be expected, but it's your job as a designer to minimize it...and be ready to take the pain when you inevitably need to make a change in the middle of the project. Just be mindful and pick your battles.
That said, the biggest initial factors I look at when tuning the player's max speed are all of those level building metrics I listed above (scale, cover density, jump distances, etc). I don't think there's any general "too fast" or "too slow" rules to apply here. It's whatever suits the level building metrics you want for your game, because everything else should be tuned around your max speed value after it's locked...ormostly locked. Let's be real. You're gonna tweak this stuff 'til the very last minute :P
Just like with character acceleration, I added another speed history graph to help refine the tuning and debug weird hiccups in speed values. Again, velocity is represented in character's local space and note the speed scalar value for changes to max speed during modified movement modes like sneaking and sprinting.
LOOK SPEED
Look (or turn....or maybe just rotation? I thought about this for too long...) speed is the last of what I would consider the core character movement components. This is probably the most difficult aspect to try and give general rules of thumb for. It's SO dependent on the type of game you're making. For example, in a first person shooter, this is going to be all tangled up with your aim assist settings. You can't just evaluate look speed on it's own. Friction, magnetism & bullet bending are going to have a giant impact on what speed players are going to determine as too fast or too slow. That said, there are a couple of recommendations I do have.
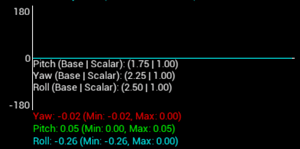
First, assuming you're developing your game with landscape screen orientation, you're going to want to make sure your pitch look speed is slower than your yaw look speed. This is because the player can see more to the left and right, therefore enabling them to react to a faster yaw look speed. The pitch speed has to accommodate the more limited view angle.
Second, you're probably going to want two stages when interpreting your look input; normal & pegged. When input is in the "normal" range, you pass the values directly to your input handler. When input in a specific direction is determined to be pegged, or its analog input value is greater than the specified pegged value, you start applying a scalar on the look input that increases over time. This allows the player to make micro adjustments to their look direction in the normal range, but still make longer, sweeping turns in a reasonable amount of time while the input is pegged.
Again, here's a graph that I use to help evaluate my look speed tuning & implementation. It's a little different than the previous two graphs in that I'm just displaying the character's rotation in world space. Also, notice that the yaw and pitch scalars will start to increase over time when my input is pegged.
ALL TOGETHER NOW...

Lastly, I highly recommend binding some debug key presses to increment/decrement time dilation by factors of say 10%. Sometimes you need to slow the game down to read these graphs better and I'm sure you'll find this helpful when analyzing or debugging other features in your game.
That's about it for this post. Thanks for making it all the way to the end and hope you found something in here useful!
 @Ryan_Darcey
Read more about:
Featured BlogsAbout the Author(s)
You May Also Like