

Daily news, dev blogs, and stories from Game Developer straight to your inbox
Sponsored By
Featured Blog | This community-written post highlights the best of what the game industry has to offer. Read more like it on the Game Developer Blogs.
3D Printing for Game Characters (and more)
This blog covers insights on 3D printing (of game characters and other 3D content), based on my personal experience with Formlabs latest Form1+ Stereolithography printer.
21 Min Read

3D Printing 101 for Game Artists and Producers
I’ve taken an interest lately in 3D printing as a “new form of rendering” for 3D content.
I realize I am not alone - just check out Bloomberg News or walk the floor at GDC and you’ll find lots of company. There’s a lot of hype (remember 3D TVs?) And though there’s also a lot of information and experience out there already, it is pretty dizzying; you may not always want to believe what you hear from vendors, depending on the source and intensity of the hype.
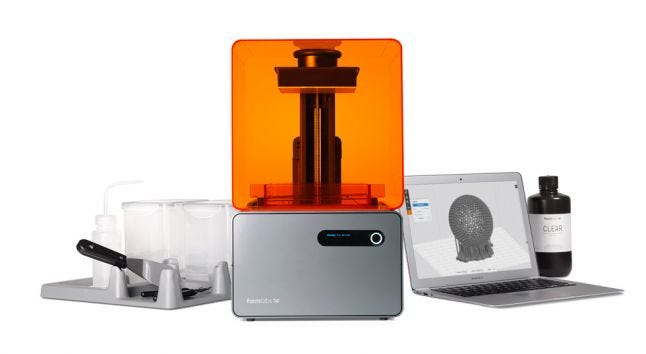
Nevertheless, I recently took the plunge and went somewhat ‘up market’ in the desktop 3D printing world and got my own Formlabs Form1+ printer.
It is pretty cool stuff, but with caveats that I’ll share along the way. The good news is there are a lot of choices and services you can utilize if you have a character or object you want printed.
Given the number of questions, pitfalls, and costs, I thought my personal trials could be great fodder for a Blog. Especially considering how many incredible character artists I know out there who would not mind having some of their amazing work realized in physical form.
In this first installment, I’ll lay out the space very generally: what you need, how to get something printed, and what issues may lie ahead. Hopefully you’ll know pretty quickly whether or not this is something you want to pursue.
Next, I’ll dive into geometry issues more explicitly: what you need to do to your character to get it generally ready for print, how that affects prices, and for the more adventurous, how you can push the envelope a bit so you do not need to compromise too heavily on your creative vision.
Then I’ll talk about pricing, and sources for help. Since not everyone wants to own a printer, you’ll want to have some sense of where to go, and the reality of what that may be like. And you probably want to have a sense what that will cost - in terms of time and money.
From there, who knows. I’ll try to keep it organic and helpful. All comments are of course welcome.
Last thing before I dive in - Although 3D printing is relevant across a domain of content types (architecture, scientific visualization, mechanical assemblies, chemistry, and more), I have a great affinity for characters, so I thought I’d pursue a character-centric track to help keep things relevant and interesting. But most everything I’ll cover below and in future installments will be general enough to apply to all of these domains.
With that said, here we go…
Installment One: Getting your Bearings
As mentioned above, this is going to be a brief pass over a number of global issues. I’ll dive into much greater detail in installment two on Geometry prep in particular. But here’s a high level view of the topics I’ll be covering:
Your Geometry
As you may guess, just because it renders or moves in a game engine does not mean it will print. Aesthetic design issues and physical size aside, today’s printers have a range of requirements that your character may not be quite ready for (or which may just exceed current state-of-the-art printer tech). Different printers use different materials and print processes that are not as pain-free and magical as you may have heard… even though they are pretty flippin’ cool when you get right down to it.
At a high level, your character geometry needs to be topologically clean, comprise a closed volume (with caveats below), and resolvable into Triangles. It also needs to be structurally sane. Stuff that renders in the game or in beauty shots may very easily fall apart or collapse during a print. Or simply fall over.
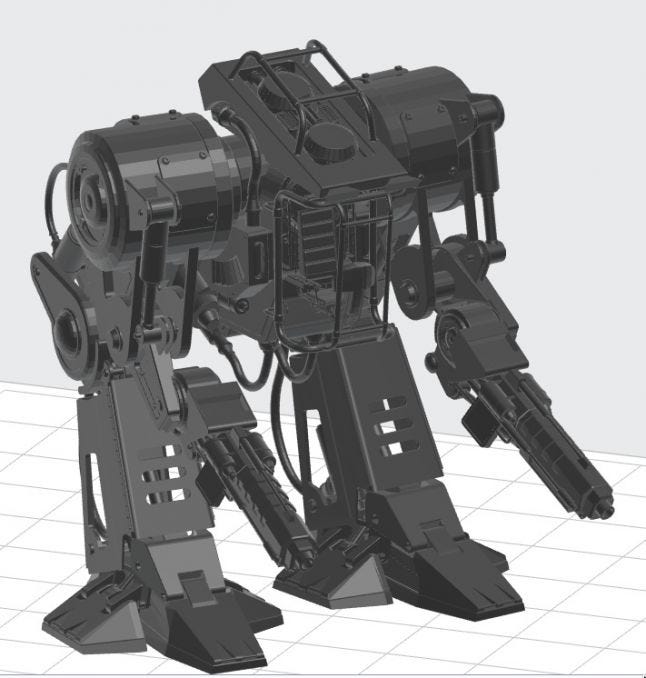
Print nightmare Example (above): This Mech above is off-the-shelf from an on-line model shop. While I would love for it to "just print", its geometry was not constructed with enough integrity to hold together. Nor was the mesh "light tight" in all areas. As such, getting a print of this complexity represents a sizeable about of remodeling work. And even then, most 3D printers would struggle with the fine details.
But if you are building somewhat organic characters that deform in-game, and you have built them with resolution-independence in mind, you may have a continuous mesh that is dangerously close to being printable (and cool). The good news about 3D printing is that you can go crazy (er) with geometric details, assuming your tool of choice will take you there. Think upwards of 500K-1M polys (go Zbrush!) I’ll dive into more geometry details in my next installment.
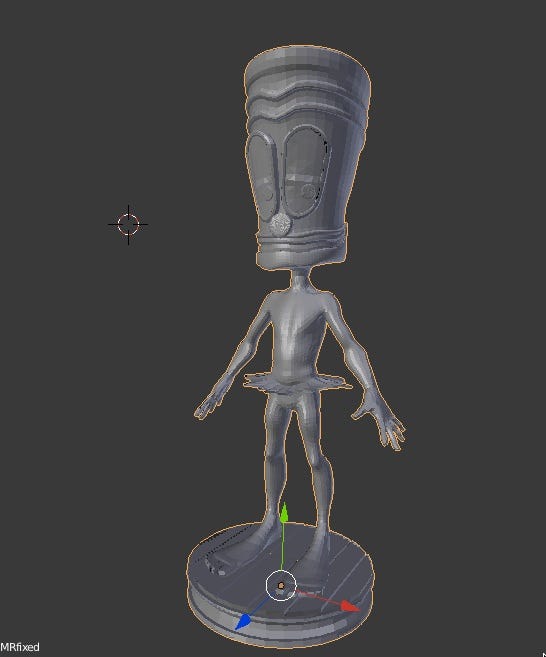
28K Triangles... lots of room to go up, especially for surface details. - Artist: Shawn Nelson
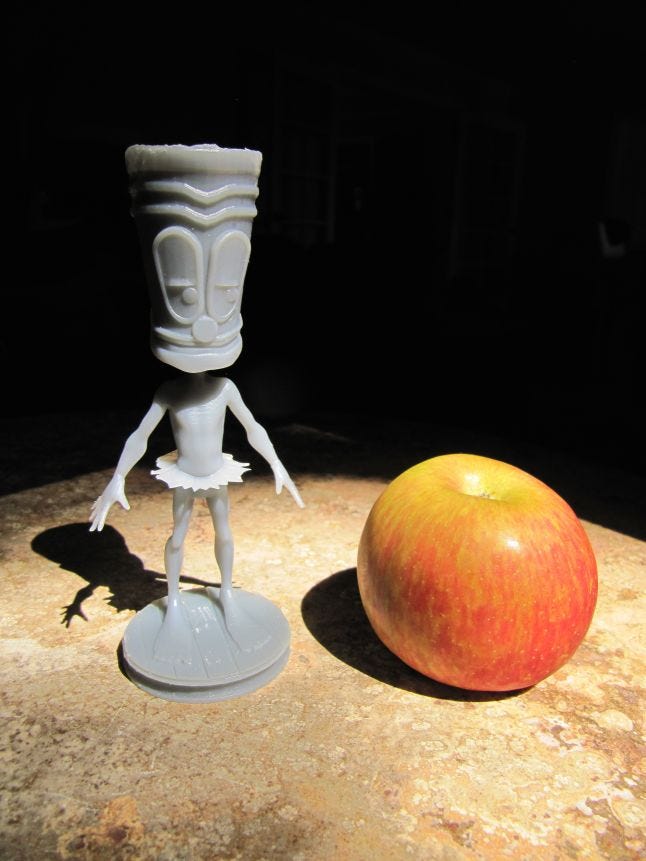
“Tiki contemplating apple contemplating Tiki”
Regarding volume, since a large component of price is based on material used, you may find that hollowing your character becomes necessary to control costs and reduce print times. You still need to maintain closed-mesh topology, but you’d need to introduce an inner wall to your character and ‘escape holes’ to let air and material filter out. More on hollowing below in the section on Size - and in my next installment.
But definitely keep volume and hollowing in mind, because it is potentially the hidden gotcha in the mix.
Quality
No doubt as an artist or game developer. you have become accustomed to pushing the limits on quality as far as you can, to realize your creative vision. When it comes to ‘accessible’ 3D Printing (based on price), however, we are still in the “Playstation 1/2” Era. Meaning: at-home printers that are affordable to hobbyists are still pretty modest on the quality scale. You can get amazing stuff from the Pros (and you may very well want to do that), but what you can “print at home” or via a 1-off printer service has limitations you should know about. Here are a few:
Printer Resolution: depending on the printer you have access to personally, your print may have quite a few rough edges when printed. Generally speaking, hobbyist printers cannot print smoothly and handle details much smaller than a millimeter. That may sound like good enough quality, but without textures and bump maps (right!), things get edgey pretty fast on hobbyist printers.
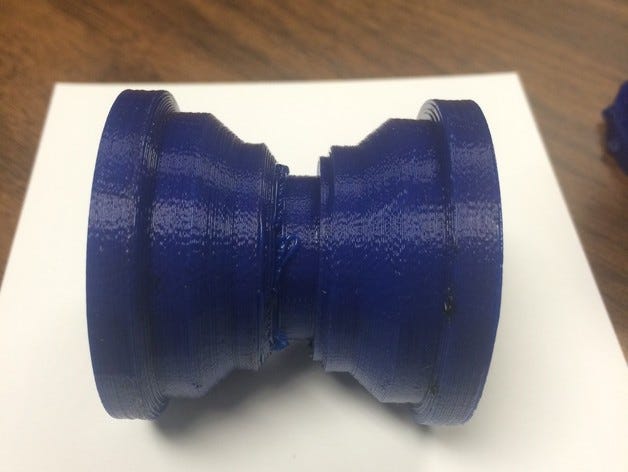 Here's a random print pic grabbed of a print site (above): This is typical for most desktop/hobbyist printers - since they print in layers, one key to quality is layer thickness (inherent in the machine itself). A typical layer thickness would be 100 microns (0.1mm).
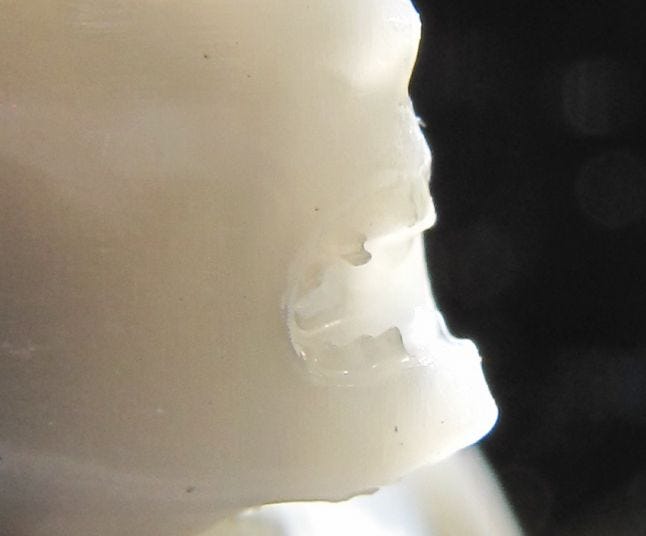
Here's a close-up of the teeth from that same print. Not bad.
Clean up: Many (if not all) printing processes require some amount of clean up. Many services will do this for you (for a price), but sometimes the remnants of what was required to build your print remains. And if you print at home, or order a print and do the clean-up yourself, you have a bit of work ahead of you. The final quality then really depends on you and your efforts and skill in sanding, smoothing, and potentially sealing your print.
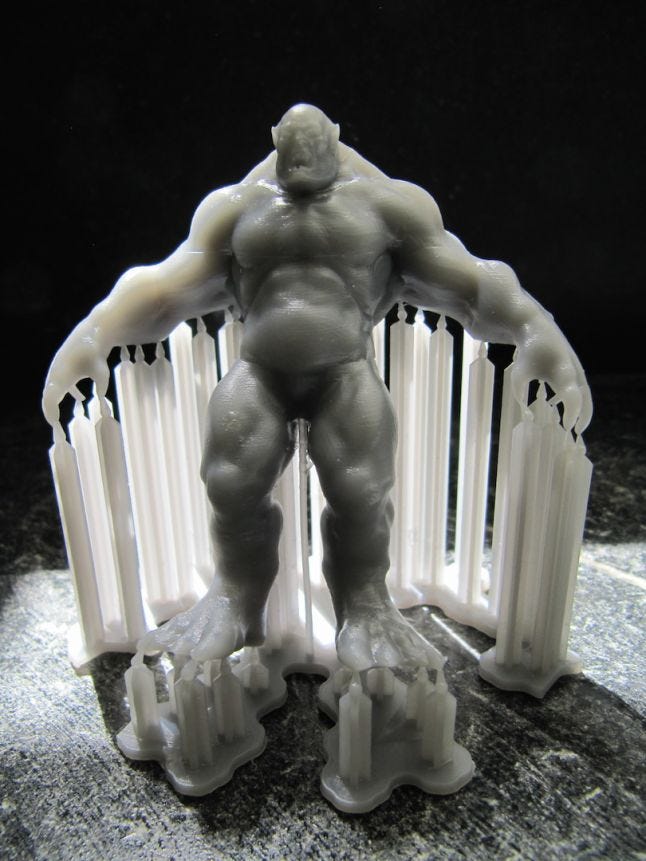
This Troll was printed on my Form1+ printer. Plenty of detail (down to .025 mm per layer). But this particular kind of printer requires supports during the printing process. This results in some cleanup (and potentially sanding) to get a paintable surface. But the potential for detail is quite impressive.
Color: Color is still pretty much in the dark ages. Though multi-color prints are coming of age, the choice of colors and quantity are pretty modest until you get more into the high end printing space. You may choose to leave your character in its natural single print color - which will depend entirely on the type of material you select. Or you may choose to completely paint and finish your print by hand. Most materials respond well to acrylic or model airbrush and spray paints.
Material Choice: Print Materials range in strength, stiffness, color, and translucency. So you will benefit from experience or being able to see finished prints up front first to determine what kind of material you want to use for your final look. Note also that certain printers only offer specific material types. You’ll often be able to select your material when you order a print from a service bureau, and the number of materials available will depend on the type and range of printers they offer. The bigger the provider, the more options they may have.
Price
Having a printed version of your characters is potentially very cool, but many folks are in for a sticker shock when they first dive in to this domain.
The reality is that 3D printed characters of even modestly high quality and larger size (6-12 inches tall) are expensive. We are talking potentially over $50 and/or days or weeks of production time from a service shop.
Here are three main approaches to pricing a print:
Home Printing: If you own a printer and are willing to print smaller (under 6 inches), you can bring that price down significantly ($1-$25 range). But even raw materials tend to add up, depending on your quality requirements and printer type (and the number of failed print attempts you may encounter!).
Service Bureau: If you outsource your printing to a general service bureau, you can expect to wait perhaps a week or more. And even a small sized character print can run you in the $25-$50 range. But get ready for surprises if your character has issues. Those prices can go up if a provider needs to fix things for you. Or, a more hands-off service bureau might just print “as is” and what you get is what you get.
Pro Shop: If you want it ‘tomorrow’ and go with a high-end print shop, that price can climb into the hundreds of dollars ($50-$500), but you will get a full service experience including help with geometry tweaks as necessary, and final print cleanup.
Quantity
Regarding quantity - If you only need one or two copies, and you are happy with something that will fit easily in a 12x12x12 inch space - 3D printing is probably the way to go. Especially if you want to prototype before you move to larger production.
Otherwise, if you are looking for a cheap way to mass produce parts or characters, more tried-and-true commercial solutions like injection molding are the way to go. You may still consider 3D printing as a means of getting your original mold, but it will not likely be the path you take to produce more than a few copies.
Time
If you are unlucky enough to remembering day long rendering times for a basic image, you may have a sense of what it takes to print a character. The process is very cool to watch for about the first 20 minutes, but then you pretty much want to leave it alone and get back to your day job. If you are sending your print off to a print shop or service, you are still likely in for a bit of a delay - days or weeks. (Unless you go with a top notch print house that turns stuff around in days rather than weeks). Most of the time, a print at home will be your fastest option (though quality becomes an issue depending on your printer). Followed by a top-end shop. At the moment, most service bureaus turn prints around in a week or so (including shipping), but it could be longer. It really depends on the issues your character may have during the process, and how busy that particular service is for the printer assigned to your character.
If timing (or learning from a short feedback loop) is paramount, you will want to go with a high-end service print shop or your own printer at home, at least for now.
Size & Hollowing
A 12 inch character on your desktop would be pretty cool. But most low-mid range printer build volumes cannot accommodate a character over 6 inches.
If you can settle with something under 6 inches, a single pass prints is going to get you your print the fastest (assuming no structural issues or post-assembly required).
Alternatively, you can consider breaking your character into parts that get assembled afterwards. More on that later.
So the first thing out of the gates is knowing roughly how big an affordable build volume might be. At home ‘affordable’ printers generally top out around 300 mm for the largest dimension (Z, up). With x and y dimensions falling well below that (125mm). That’s just under a 12 inch character, which is pretty big in the world of 3D prints (and you are probably talking hundreds of dollars, depending on your choices of services and printers).
Pro-level printers go up from there, with the xy dimensions (the build platform), growing quite a bit, which is especially helpful for architectural prints.
So printing smaller may not be your first choice, but something around 2-3 inches is not a bad place to start.
One other issue to consider, relative to the hollowing topic mentioned above, is that as you scale down your character to fit a price or build volume, the THINNESS of what was an ok section of your character can enter the danger zone. Sadly, digital models are not trivially scalable in print!
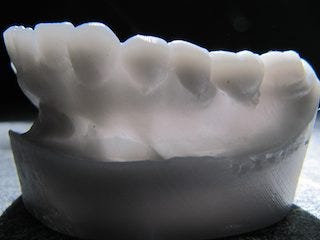
This scan of a lower jaw & teeth needed to be holloed out for my printer to help save resin and improve final print quality. (Some printer software automatically provide non-solid fill as part of their pre-print process)
For fingers and legs, etc, you can go pretty small depending on the printer you are using. Maybe just a few mm thick, if the appendage is NOT hollow. And as for explicit hollowing of parts.. it becomes much less of an issue as you approach figurine sized character. Because price drops dramatically with smaller sizes, you have the option of just leaving your character fully solid and saving headaches on remodeling costs. Double bonus!
All said, I still plan to take on a larger-scale character print, though I’ll probably attempt to do that in pieces and assemble/glue after the fact. Once I get there, I cover that topic explicitly in a future installment.
Pose and Structural Integrity
This is one of those creative compromise topics that is directly related to how much pain you may want to take on to realize the true vision you have for your character. Thin, wiley appendages or borg-like wires and tubes could drive you and your printer (or your service provider) to an early grave. But more power to you. I personally would like to see the limits totally pushed on this kind of thing. But starting out, you may want to pick a character that is a bit more structurally sound and/or a pose that stays far away from the classic “T” position. (arms and fingers tucked - thick appendages, solid stance or planned attached base).
Doing otherwise is fine and possible, but may result in more print failures along the road to wisdom and the material costs can pile up along the way. Again - if you go with a high-end print shop they may be able to help you avoid some pitfalls themselves or give you some guidance on choosing a different pose, or dropping some crazy antennae attachment for your alien. Just be aware and ramp up gradually if you can stand it.
Wrap Up
That’s just a brief intro. If you are not totally turned off, check on my next installment for more details on geometry prep. Chances are you are already close with your current character.
END INSTALLMENT ONE
Read more about:
Featured BlogsAbout the Author(s)
You May Also Like
Latest News


Trending


Featured Blogs


