Daily news, dev blogs, and stories from Game Developer straight to your inbox
Sponsored By
Featured Blog | This community-written post highlights the best of what the game industry has to offer. Read more like it on the Game Developer Blogs.
This article will go over how photogrammetry was used to scan a castle inside out with a minimum of equipment, a minimum of funding, and a minimum of man power.
14 Min Read

Introduction
I was working on porting a historical site into Unreal Engine 4 to use in the upcoming game World Void, and I was in charge of scanning a castle. I was waiting for a funding that kept being delayed, until I decided to finally just go out and do it, with no funding, and I did it, I scanned the castle! A few month has passed and I am still pumped about it! This article will discuss how I managed to do it. But first, I would like to take a moment to thank Milos Lukac, Jeffrey Ian Wilson, and the 3D Scanning User Group, who without their helps none of this would have been possible. And finally a special thanks to Faisal Naamani for correcting some of my grammar mistakes.
What's photogrammetry?
In short, photogrammetry is the process of creating 3D models from multiple images of the same object taken from different angles.
I will not be covering how to 3D scan an object, it is a topic that has been already covered a lot.
If you want to get started with photogrammetry, I would recommend this short YouTube video by James Candy. Although this video mentions Agisoft Photoscan, the explained concepts should work with any other photogrammetry software solution out there. You can also check The poor man’s guide to photogrammetry
A lot of artists have been using photogrammetry as part of their workflow, it has been used in the Kite Demo from Epic games, and in Star Wars Battlefront, and many countless others. However most of these studios have been scanning rocks and trees. Epic games wrote a blog post about how they created the assets for the open world demo. They even wrote a blog about the choice of equipment, and another explaining their delighting process. I would highly recommend checking them out if you haven't already.
Challenges
When scanning a large object like a castle, there are new challenges to keep in mind:
Picture count: A castle is bigger than a rock, therefore unless you want a low res scan, you will need to take more photos. Which means that you will need a bigger SD card. Once you get a bigger SD card, then you will start facing low battery issues, and it's a good idea to have an extra battery. This might sound simple, but it wasn't until I started taking 2k+ images in a session that I started facing battery issues. In fact the first time I faced that issue was in the middle of scanning the castle, luckily the security there was kind enough to let me charge the battery at his booth. Once the images were taken, you will need to make sure you also have enough storage on your computer. HDD right now are really cheap.
Longer time: It make sense, when you are taking more pictures, you need more time. The castle took me 8 hours straight to scan, which means you need a constant overcast/cloudy day that last for 8 hours. It's also a good practice to take all the required photos of one element of the castle before switching to the next one. That way if the sun light shifts a little, and make the software unable to align all the photos, you can always manually align each element using control points.
Processing power: With more photos to analyze you're going to need a lot of processing powers. Required computer specs do vary between different 3d scanning software, and I will go over that in a second, but here is what you need to know:
RAM, and lots of it, 64GB or more is good idea, however some 3d scanning software uses a cache system which enables them to process a scan even with a low amount of ram, but I would not recommend going lower than 32GB.
GPU, the faster the better. You don't need a lot of VRAM, 4GB is enough. I would recommend an NVidia GTX card, because some software do not support AMD.
CPU, the more core you have the better.
Hard to get angles: When scanning a rock you have the advantage of being able to take an image from every angle, however with a huge castle there are places that are hard to reach. Using a drone, would be a good idea, however I did not have access to one, and I had to get by without one, which I will discuss later in this article.
Complex structure: Unlike rock a castle have more complex shapes, not to mention that rocks do not have interiors? This made it even more challenging, and I had to make sure I covered everything. How did I do that? By pre-planning, and using on-field verification.
Know your target (Preplanning)
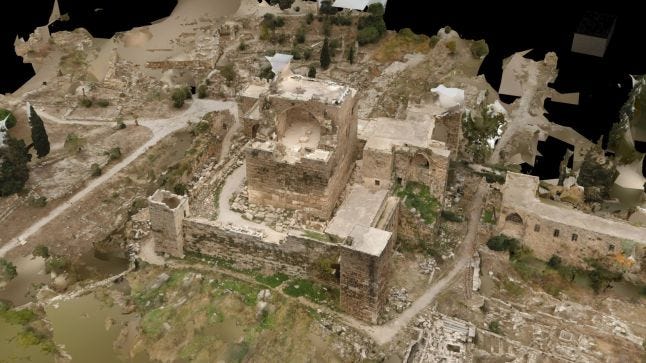
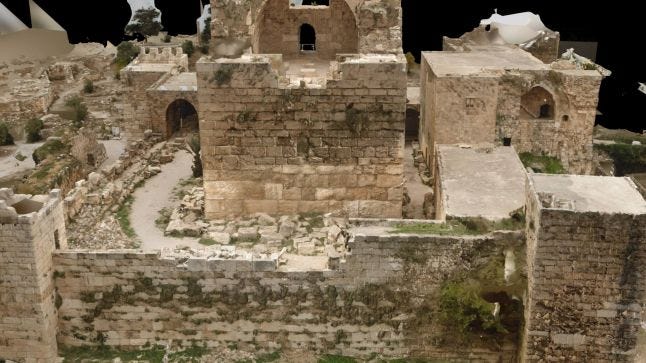
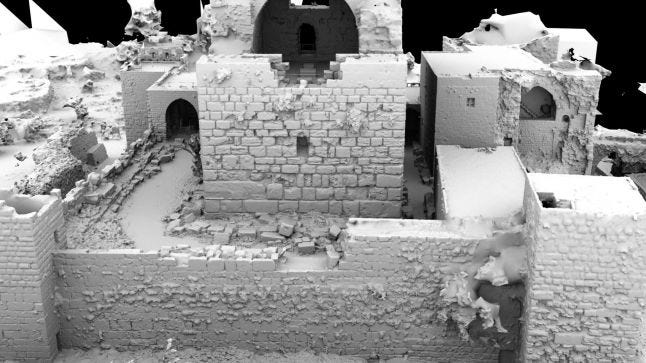
I am working on the Historical site of Byblos, a city in Lebanon that has been constantly occupied for over 10000 years. However the Castle itself dates back to 12th century. It is a relatively small castle compared to newer ones found in some European countries, however each wall of this castle is made of highly detailed rocks crafted by time itself.
But what I meant by knowing you target is that you need to take a pen and paper, sketch a top and side view of the castle, and try to split it into multiple element, try to figure out the order in which you will be taking the pictures, and mark down areas that requires more images.
Also errors during the scan can accumulate, and can create some shifted geometry, therefore always make sure to take a full circle around your target which forces the scan to correct itself. Open geometry might not be as accurate.
I also took the opportunity and took multiple images of the surroundings from the castle’s ledges, which resulted in adding the landscape to our scan.
Tip, please do not take multiple images of different angles from the same spot (panoramic images). This will mostly result in undesired errors.
A useful way of scanning small tunnels where it is hard to take images of all the angles due to the tight space, is to walk in a straight line, and take an image each step while facing the forward direction. However this technique provides less resolution, which might be fine depending on how much resolution you need.
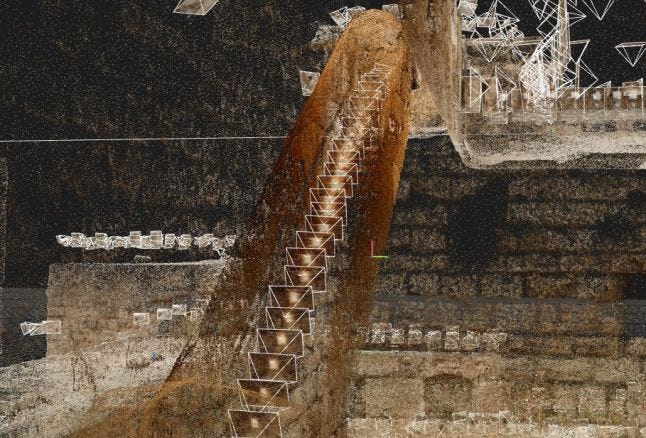
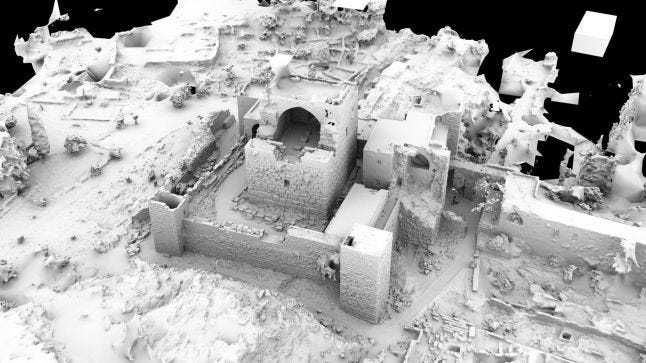
Finally, it is highly likely that you miss a few angles when scanning, causing low overlap, which will lead to low resolution areas in your scan, therefore I would highly recommend an on-field verification. Reality Capture for example is a 3D scanning software that can check the overlap of huge numbers of images on a laptop in less than a minutes, and it will let you know which areas need more images, which is extremely useful.
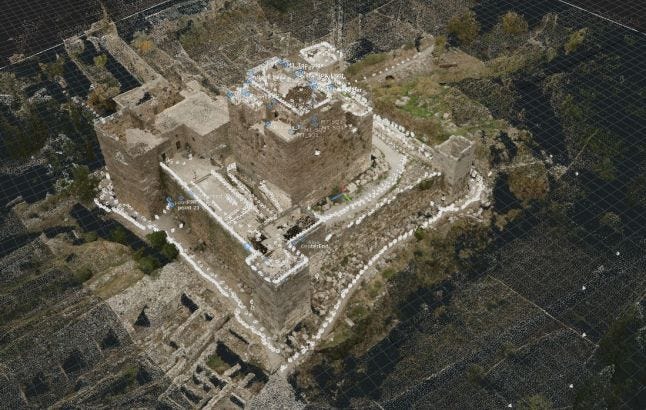
The white dots represent the locations from which the photos were took. The blue dots represent the manually added ground control point that helps aligning some elements that the software was unable to align automatically. Notice how the castle's roof has multiple ground control points that is normal, since I did not have access to a drone, I wasn’t able to take images enough of the roof. Luckily I was able to manually align it, which might not be the case for larger castles. The software aligned 4000 photo in total.
What do you need?
If you are trying to keep the budget as low as possible, this is what you will need:
Camera (duh), a DSLR is a must, however, new smartphones like the Galaxy S7 have some pretty good camera, however, unless you have been doing 3D scanning for a living, stick to a DSLR. I did not have a DSLR, so I borrowed one from my aunt. It was the Nikon d3200, and since I was scanning a castle made of rocks, I did not need a sharper camera.
Lens, the camera came with a variable 18-55mm lens, while a fixed lens is recommended, as long as you use the limit range (18 or 55) and you stick with it during the entire scan, you should be fine.
Tripod, yes you need one, especially when you are in some low light situations like the inside of the castle, and you can't use a flash, and you have to take long exposure images.
Monopod, it's useful, but if you don't have shaky hands and with the right shutter speed you might get away without one. However it only cost 10$, so why not?
SD Card, I used a 64GB SD card. I also had me laptop with me on field just in case the card was full, I can just empty it on the laptop's hard drive.
What I didn't use
Battery, I did not have one, but if you are going to take a lot of pictures, a secondary or even a third battery is recommended.
Drone, it would make your life a ton easier, and if it’s an option you should definitely consider it. I did not have access to a drone, so I had to climb, and take images from some tricky locations. Luckily it worked, but how much are you willing to push your luck, especially with bigger castles?
Chrome Ball and Grey Ball, this rig is used to get the perfect color accuracy and accurate delighting process. It is tempting to want to use every technique out there to create the perfect scan. But first you need to ask yourself is it worth it? There are other delighting techniques that don't require this rig, and that can deliver decent results. In my case this rig would have added a thick layer of complexity to the project, which was not worth the boost in quality.
Color checker, those things are expensive, but are useful to calibrate your camera. I did not use one for the scan
Software
I tested multiple photogrammetry software, and while any of the following software will work fine for small scans, I had to make sure that they can handle large amount of data (4000 24MP photos).
Agisoft Photoscan, Agisoft is the most used software in the entertainment business. It has a friendly user interface, and the resulting scans quality is superb. The standard version cost 180$, however if you need the ground control point option, which a very useful feature when it comes to large scan, you need to get the professional version which cost 3500$. Nonetheless, Agisoft consumes a lot of the computer resources, and if you want to process a large data set, you will require an unbelievable incredibly powerful computer to process it. Not to mention Agisoft is a little slower than its competitors on this list.
Pix4d, this software is mostly spread in the industrial and agriculture industry, due to its specialized set of tools. It can handle large datasets on powerful computer, and is slightly faster than Agisoft. It cost 350$/month to rent this software. However, I was not quite satisfied with the resulting texture quality.
Autodesk Recap, this is a cloud based solution that has a free option and can create scan good quality scans. Unfortunately, it is limited to 250 images, and being a cloud solution it would take forever to upload large datasets.
Reality Capture, this is a new comer, and it is taking the market by storm. This software is blazing fast, it can handle large data set, and can run on a regular computer as long as it has an NVidia GPU. It can even run on a laptop, however I would not recommend doing so, even if you have a well ventilated gaming laptop, stressing your laptop for long periods of time will shorten its lifespan. A cool feature that reality capture excel on it the quick align features, which allows you to align images in a matter of seconds on your laptop, which is an awesome tool to test your dataset on site, and make sure you have enough images. Also this software does result in slightly less noisy scans then Agisoft. It cost 99€ for 3 month, however this version only handles 2500 images max, if you need to get the CLI version which costs 7500€ for a year. Luckily, when scanning the castle, Reality Capture was in beta, and was released for free for 60 days, which was more than enough time for us to finish our scan.
Cost
This where it gets interesting, I borrowed the camera, the software was free, however I still needed to process the scan because my laptop could not handle it. Here is where Milos Lukac stepped in, and he offered to process the scan, I can't thank him enough for that. He also helped me during the data alignment process, and showed me a trick or two on how to fix some of my beginner's mistake. So that leave us with the tripod, monopod, and the SD card, which is a total of 70$ + Shipping. So yeah I scanned a castle inside out for 70$! Proving that when there is a will there is a way. I got lucky, but did not become lucky until I started talking to people, and making connections.
Can you do it?
Six month before I scanned the castle, I knew nothing about scanning. And while it is tempting to say that one person scanned the castle, that is not true, I got help, and lots of it from the community and industry professionals. As of how did I meet with them? Well simply on a Facebook group, the 3D Scanning Users Group. First I joined the group, then I explained what I was trying to do, and I received a ton of feedback from the community. A particular member of the group, and industry professional named Jeffrey Ian Wilson, even went the extra mile of PM me, and we had an interesting conversation where he set me on the right pass, he also saw that I had my heart set on a challenging project, and he urged caution. He also advised me to take anything he says with a grain of salt, and that is also my advice to you, if you are reading this, the truth is, I only have 6 month of experience in 3D scanning, and I did mess up a little while scanning the castle, luckily it wasn't something major and it was fixable, and while I was able to scan the castle that doesn't mean that I am the best person to give out advice on how to scan the castle. I am just sharing my experience, and it's up to you to do the research and try it for yourself. To answer the question, yes you can do it if you're determined there is nothing you can’t do.
Conclusion
I really hope that our experience might come to a use of some of you, and if something cool came out of it, send me a tweet, or share it on the Facebook group, I'd love to see it.
As for how this 1 Billion polygon scan was processed and used it in a game engine, well that is another story for another Gamasutra post.

Read more about:
Featured BlogsAbout the Author(s)
You May Also Like