Daily news, dev blogs, and stories from Game Developer straight to your inbox
Sponsored By
Featured Blog | This community-written post highlights the best of what the game industry has to offer. Read more like it on the Game Developer Blogs.
Making an isometric game is far from being an easy task, at least if you're trying to keep your code organized in case you need to support new features. After over a year I've picked up a couple of helpful tricks to improve your workflow.
8 Min Read

I'm the programmer at AlPixel Games (currently developing "A Place for the Unwilling"). We have been working hard for more than a year on this project, and I thought it would be a cool idea to share part of the technical process we have gone through.
These last few months have been full of challenges that required experimentation and learning by trial and error. Here are some of the lessons I learned along the way.
What I learned from trying to make an Isometric game in Unity
Unity is an amazing tool for developing games, and since the inclusion of its 2D tools, it has become an even better one. The problem with building 2.5D games, isometric or otherwise, is that we want depth to move objects along 3 axis (x, y, z) while sprites only have 2 (x, y).
When I started looking around forums and blog posts for detailed ways to build an isometric game with 2D sprites in Unity, I couldn’t find a clear, solid method that served my purposes. That’s why I decided to put together this handy little guide to get your Isometric/2.5D project up and running in no time, without the hassle of having to gather all this information yourself.
Let's start by taking a look at the end result:
_-_Central_g4_unity_2017-02-28_00-23-27.png/?width=610&auto=webp&quality=80&disable=upscale)
The first part we are going to focus on is on how to dynamically make sprites move around other sprites (behind and in front of them), giving a sense of real depth. The SpriteRenderer component has 2 properties that allow us to change the rendering order of sprites in the scene.
Sorting Layer
Order in Layer
To be able to change the rendering order of multiple sprites in real time, we need to modify some values so that when objects move around the scene, they always render correctly. We could modify the “Order in Layer”, but it only accepts integers, and we have a better option. We are going to use the Z axis.
The priority order when rendering a sprite in Unity goes like this, from highest to lowest:
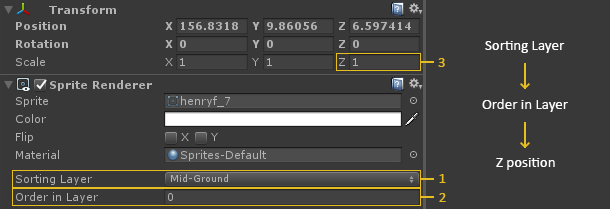
If two sprites share the same “Sorting Layer” and “Order in Layer”, the one closest to the camera (in 3D World coordinates) gets rendered first.
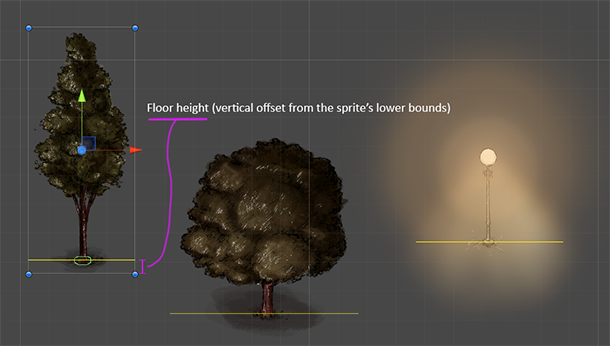
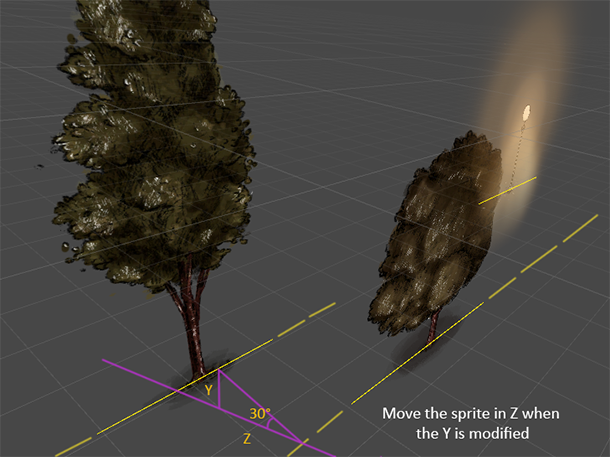
Knowing this, we just have to write a small script that modifies the Z position a fixed amount relative to the Y position, right? You’re close, but first let’s explain a small concept crucial in understanding how to set a sprite’s ground floor. This “floor” is where the sprite would be touching the ground if it were a 3D object. Here are some examples:
What we have to do now is modify the Z position of the sprites when the Y position is modified. Let’s take a look at this in 3D:
With this in mind we can finally write our script:
[SerializeField] private float m_floorHeight;
private float                  m_spriteLowerBound;
private float                  m_spriteHalfWidth;
private readonly float         m_tan30 = Mathf.Tan(Mathf.PI / 5);

void Start()
{
    SpriteRenderer spriteRenderer = GetComponent<SpriteRenderer>();
    m_spriteLowerBound  = spriteRenderer.bounds.size.y * 0.5f;
    m_spriteHalfWidth   = spriteRenderer.bounds.size.x * 0.5f;
}

// Use this condition for objects that don’t move in the scene.
#if UNITY_EDITOR
void LateUpdate()
{
    // Use this condition for objects that don’t move in the scene.
    if (!Application.isPlaying)
    {
        // Update the position in the Z axis:
        transform.position = new Vector3
             (
                 transform.position.x,
                 transform.position.y,
                 (transform.position.y - m_spriteLowerBound + floorHeight) * m_tan30
             );
    }
}
#endif

void OnDrawGizmos()
{
    Vector3 floorHeightPos = new Vector3
            (
                transform.position.x,
                transform.position.y - m_spriteLowerBound + floorHeight,
                transform.position.z
            );

    Gizmos.color = Color.magenta;
    Gizmos.DrawLine(floorHeightPos + Vector3.left * m_spriteHalfWidth, floorHeightPos + Vector3.right * m_spriteHalfWidth);
}
_-_BuildingConstruct_2017-02-28_11-45-12.png/?width=440&auto=webp&quality=80&disable=upscale)
The first thing we are going to need is the “Floor Height”. This is going to determine the Y height offset from the sprite’s lower bounds. In the 3D world position, it's what sets its Z depth in the scene. If a sprite’s floor is higher than another one, it’s going to be rendered behind it.
After that we store width/2 and height/2 of the sprite to do some simple math with the Z position.
I used the tangent of 30 degrees because it’s the isometric angle we are using in our game, but you can just set the Z axis to be equal to the Y axis, and it will work just fine.
Two small things. First, the OnDrawGizmos method is being used to draw a line at the current floor height, so that you can set it in the editor to the exact value you want. The other thing to take into consideration is that you are going to have objects that never move once the game is launched. In that case, to make some optimizations, we can use the “if (!Application.isPlaying)” and the”‘#if UNITY_EDITOR” conditions to save calculations in runtime (you may have hundreds of sprites with this script attached simultaneously).
With this setup you can already have stuff moving around and rendering in the correct order depending on its Y position, but there are still two situations where this is not enough.
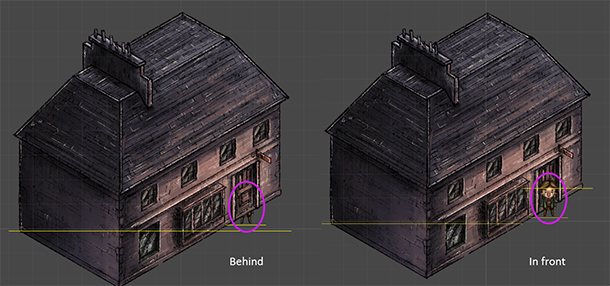
When dealing with sprites that aren’t centered in the middle, we need to split them. Take this building for instance. Due to the fact that it has a rectangular base, if we just used one floor height for the whole building we could be walking along its front side and be behind it at the same time! To solve this we need to cut the sprite in two, and set a different floor for each slice, like this:
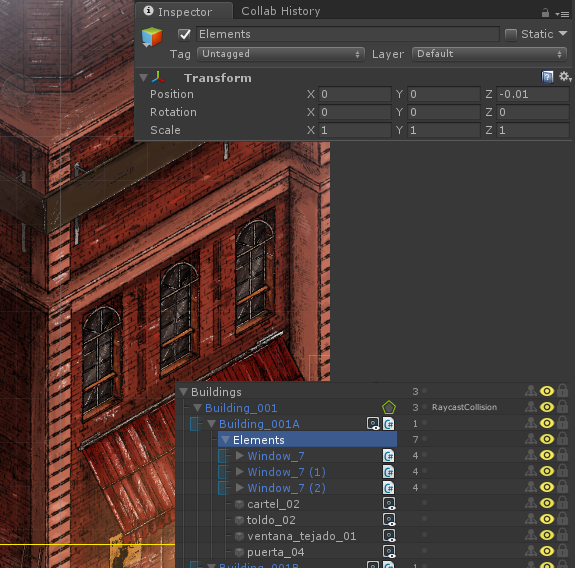
The other case is when we want other sprites as children of another one. Following the building example, let’s imagine that we want to add windows or signs to it. To do that we can’t use the same script we were using with the building, because some windows would be behind it (the ones more at the top). Thankfully, this one is very easy to solve. We just need to make a child object and reset its transform position, but leaving the Z = -0.001. After that just drag and drop all the elements you want to use to decorate your building inside that empty gameobject, and be sure to set their Z = 0, so that they stay 0.001 units separated from the actual building sprite and closer to the camera.
And in case you were wondering, this is how a full scene in 3D looks like:
_-_Central_g4_unity_2017-02-28_11-23-18.png/?width=610&auto=webp&quality=80&disable=upscale)
And that’s it! You already have a pretty flexible toolset to work with, but let’s take a look at some of the limitations of this approach, as well as some extensions and add-ons that will improve our workflow.
Probably the most notorious limitation this approach has is making thin walls. This is because you actually have to split the sprite into multiple slices that have to be the as thin as the wall’s width to allow the other objects of the scene to move around it. Here’s an example:

Flying stuff may give you some headaches as well, but if you are careful with their placement, you should be fine. You can also play around with modifying the Sorting Layer so that they are always in front, or behind, the main objects of the scene.
Finally, I would like to mention some examples of how you could expand this approach and have more versatility.
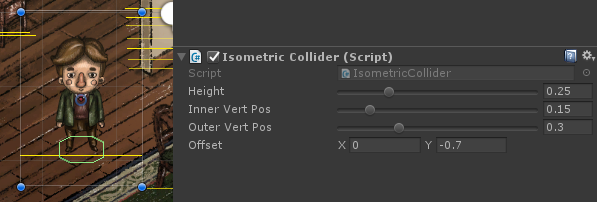
Isometric Colliders: depending on how your characters move in your game, you may want to implement a small script that creates a collider with the exact angles of your art perspective.
IsoVector Class: it can be really useful to have a class that contains shortcuts to all the vectors you would generally use (N, W, E, S, NE, NW, SE, SW), as well as methods that allow you to get a vector from a custom direction (and vice versa), or getting the opposite direction to the one given (South -> North), etc.
This has been an interesting learning experience. The first thing I came up with was the script to move the sprites along the Z axis to render everything correctly, that solved the immediate problem of building our world. As I continued expanding the code base, I found myself longing for those other custom classes to facilitate the introduction of new features and, at the same time, be able to maintain a structured project at the same time.
I hope this is useful to someone that is currently developing an isometric game with Unity, and if that’s the case, or you just want to tell me what an awful approach this is, I would love to hear from you!
Feel free to hit me up on twitter (@Tayx94), or in the comments ;)
In case you were wondering, the images used are from the game “A Place for the Unwilling” (by @AlPixelGames) that we are currently developing. The game is a narrative sandbox set in a victorian city where time is always running and the ending keeps drawing closer. Read more about the game here.
Read more about:
Featured BlogsAbout the Author(s)
You May Also Like