Daily news, dev blogs, and stories from Game Developer straight to your inbox
Sponsored By
Featured Blog | This community-written post highlights the best of what the game industry has to offer. Read more like it on the Game Developer Blogs.
Everything’s fine, until you realize your lack of optimization is killing your game!
18 Min Read


INTRODUCTION
As everyone working with Unity, on Android or iOS project, you are, at some point confronted to performances issues, FPS drops, latency, lags and so on, that disturb your game or even ruin it...
You can be sure that the time has come to dig into your project and optimize it!
Here is a summary of this guide to help you navigate better:
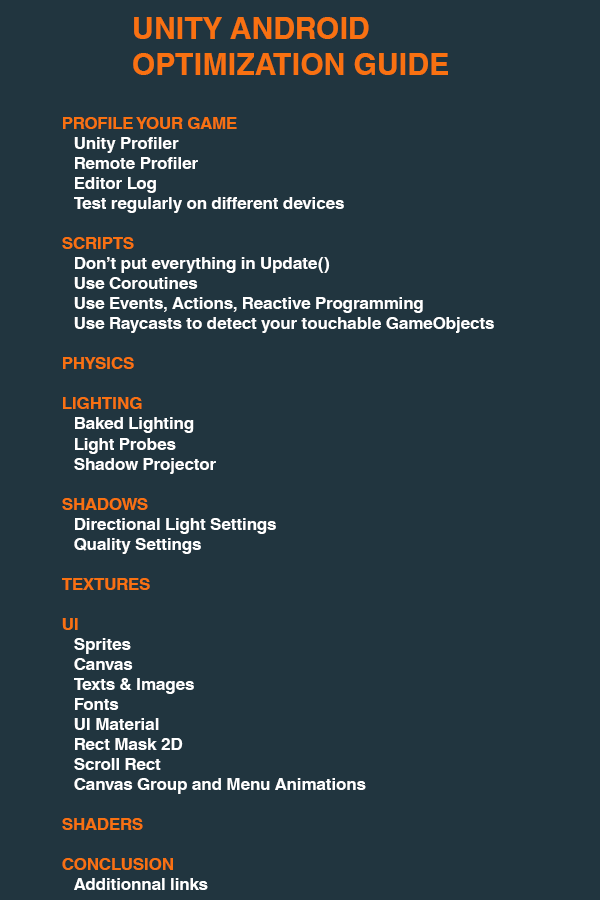
PROFILE YOUR GAME
Unity Profiler
In order to watch and analyze your project performances you must use the Unity Profiler (Window > Profiler). It allows you see graphically how your game is doing, what takes time to compute, how long is the rendering per frame, what is sucking all your performances.
It is really easy to use, you just have to click on the graphic, on spikes for example, to get details on the frame computing. Unity shows you the processes that take the most time. In order to understand those processes don’t hesitate to just google their names, you’ll find a forum post talking about it.
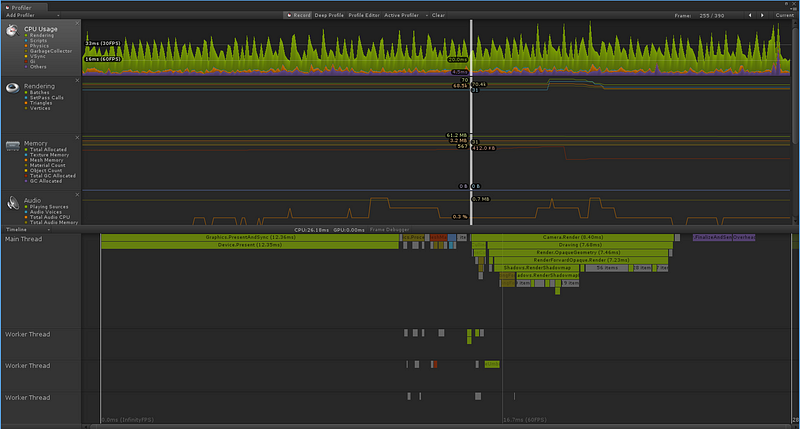
The Unity Profiler works in the editor and shows you how your game is doing in it, but be aware that it doesn’t represent your game’s real performances. The Unity Editor is dealing with other processes than just the game, thus it runs slower than a simple build of your game.
Remote Profiler
That’s why you must build your game and profile it from your android device!
Once you’ve configured the Android SDK and JDK to build you project, you can use the remote profiler.
In the build settings (File > Build Settings…), you just have to check “Development Build” and “Autoconnect Profiler” and be sure that in the Editor Settings (Edit > Project Settings > Editor) that “Device” is put on “Any Android Device”.
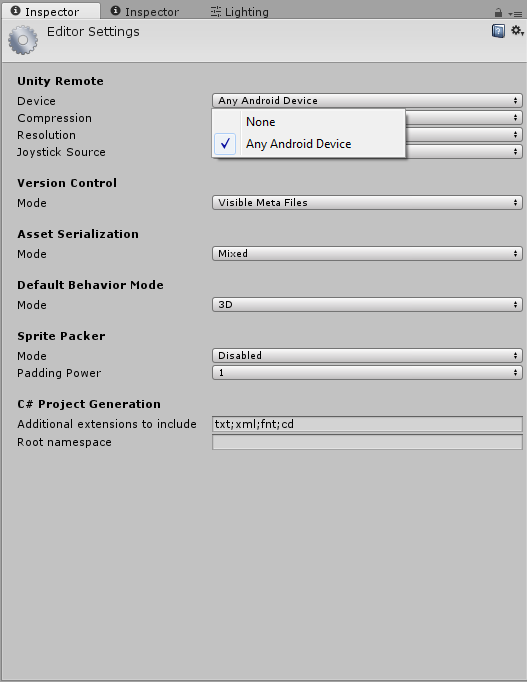
Now, you have to launch your game on your device, while plugged to the computer, and normally you’ll see in Unity the Profiler window show up with your device’s stats.
If not, open the Profiler window and in the “Active Profiler” dropdown button, select “AndroidPlayer(ADB…)” something. That’s your device.
Profiling directly your device will give you so much more accurate information on your game performances, so prefer this method.

Select your device as “Active Profiler”
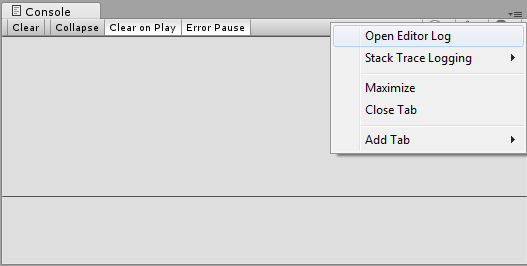
Editor log
One other great tool to get information on your build, is to open the Editor Log. Just after building your game open the Console window (Window > Console), and on the top right you have a button that you can click on to select “Open Editor Log”.
It will open you a document with many informations on your build, especially information on your build size and the assets that take space. Just scroll down the document until you find something that looks like this :
Test regularly on different devices
The plurality of android devices is a big difficulty for android development, as one problem or performance issue can appear on one device but not on the other.
That’s why you must test your game on different devices to prevent problems and to be sure that it is compatible with a large number of phones.
Of course, it’s tempting to do the optimization at the end of the project, but you’ll find yourself sinking under many performances issues. It’s preferable to regularly profile your game, at big milestones for example.
Indeed, with lesser modifications on the game you’ll find what is sucking your performances quicker.
SCRIPTS
Before getting into the big stuff with rendering optimization, we want our scripts to be beyond reproach. Indeed, if like me you’re a programmer and you’re working with artists, it would be preferable to check your scripts performances before blaming the artists (Even if everything is surely their fault!).
Don’t put everything in Update()
One of the biggest mistake of Unity beginners is to rely too much on the Update() function. It’s quite easy to just put everything in it, check this or that state and to react accordingly, but if every GameObject in your scene has an Update() function checking many things and realizing complex actions this could be heavy on android performances.
So, before using anything in the Update() function, reflect on your needs. Does it really need to be called every frame?
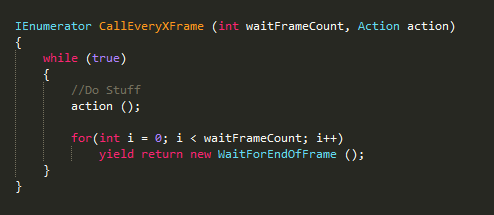
Use Coroutines
If it doesn’t, then you have several options to be more efficient.
You can use Coroutines to call a method only every second for example, using the instruction: “yield return new WaitForSeconds (1);”
It could be used to refresh some UI display:

Or you can wait every two frames and call your method, with:
“yield return new WaitForEndOfFrame ();”
for example to process a complex calculations, but not every frame.
Use Events, Actions, Reactive Programming
What could be really efficient is to call your methods only when you need it, for example when this variable changes, this method is called, or when that event occurs display and UI pops up …
This is the principle of Reactive Programming, to work with Events, where an action calls reactions.
In C# you can use delegates:
https://docs.microsoft.com/en-us/dotnet/csharp/language-reference/keywords/delegate
Action delegates especially:
https://msdn.microsoft.com/en-us/library/system.action(v=vs.110).aspx
They allow you to create events, that you have to call when they occur, and those events call all the methods that have subscribed to it.
For example you create an event “OnPlayerJump”, that you call every time in your code you make your player jump, and you subscribe to this event a method creating some dust fx or an event playing a jump sound. That’s just a very little introduction and you should look into it if you don’t know about it.
if you’re interested in Reactive Programming, go check this Unity Asset :
https://www.assetstore.unity3d.com/en/#!/content/17276">UniRx - Reactive Extensions for Unity by neuecc
Reactive Extensions for Unity that allows LINQ to asynchronous and LINQ to multithreading and LINQ to events and more…www.assetstore.unity3d.com
Use Raycasts to detect your touchable GameObjects
In Unity, except for the UI, there aren’t any easy way to detect a Tap touch on a GameObject on the screen. You can use the OnMouseDown() functions, but Unity prevents its use on smartphones.
So what you can do, is to use Raycasts, starting from the camera and going where the finger touched the screen, and if you touch a certain object type you call a method on it.
That’s what I do, I have a Touchable Class, a Touchable Layer, and when a Touch occurs on the screen I use the method :
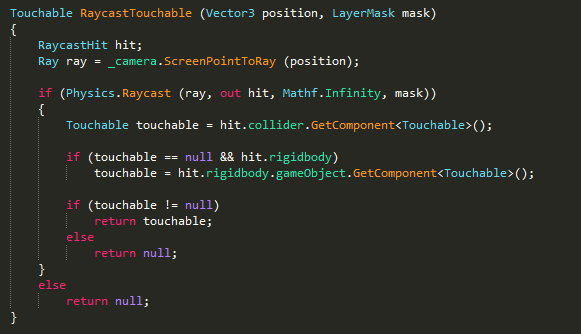
It detects if the touch is on a Touchable GameObject and if it’s the case I then call the OnTouchDown () method on the GameObject.
PHYSICS
Now that you checked your scripts, you’ll surely want to check how you manage the physics interactions if you have some. On mobile it would be better to have none but it you have to, you must be careful on certain simple things.
Try to have the least dynamic Rigibodies as possible, because they demand a lot of performance to compute.
Use simple primitive colliders instead of mesh colliders that are so much more complex to process.
Try to keep the “Collision Detection Mode” on “Discrete” if possible, as “Dynamic” demands more performance.
And lastly, you can go to the TimeManager window (Edit > Project Settings > Time), and tweak the “Fixed Timestep” value. This value represents the duration between two calls of the FixedUpdate() method.
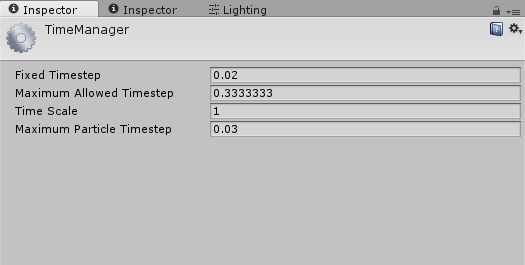
So if you lower the Fixed Timestep the physics calculation will be called more often, leading to a more accurate simulation but taking many ressources. On the other hand, rising it up could maybe reduce your physics simulation time, especially if you don’t need a very accurate simulation.
LIGHTING
Now let’s get to the rendering optimization part! First of all, the lighting!
If possible don’t use dynamic lighting and prefer unlit textures, as lighting calculations take much resources, especially with many objects to render.
Baked Lighting
You can use Baked Lighting, if it suits your project, as it calculates and “paints” the lighting directly onto the textures once and so it won’t process it any more during the game.
https://docs.unity3d.com/Manual/LightMode-Baked.html
It allows you to put many lights, to create complex lighting scenes without thinking about the performances as everything will be baked onto the textures.
But of course you’ll lose all the advantages of a dynamic lighting, like the dynamic shadows and your moving objects could feel out of place when progressing through the level without light changement.
Light Probes
You can somewhat counter this problem by using Light Probes : https://docs.unity3d.com/Manual/LightProbes.html
Those probes also store light information during the light baking, not on textures but on empty spaces. This way when objects move around light probes areas there are falsely lit by the light previously baked.
Shadow Projector
Another thing you can do is to fake the dynamic shadows under the main characters.
You could just put a round dark shape texture moving around with your character to represent his shadow, like old animated movies, if it suits your game.
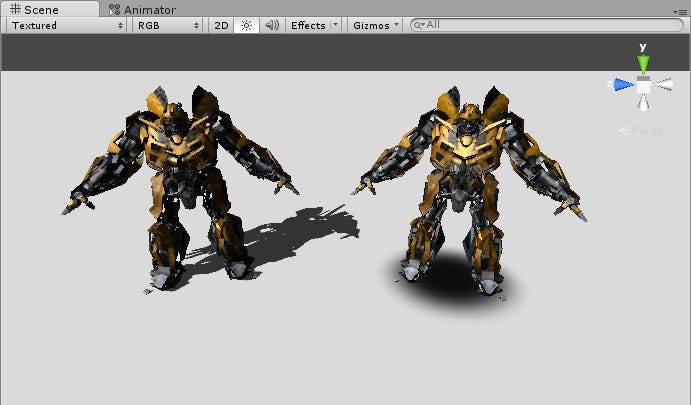
Right: Original shadow — Left: “blob shadow” texture
Or, you can use a shadow projector, that uses the object mesh to project under it a fake shadow that isn’t as realistic as one with dynamic lighting but maybe it would be enough for your project and it takes less resources!
Here’s an Unity asset doing this shadow projection :
https://www.assetstore.unity3d.com/en/#!/content/20094">Fast Shadow Receiver by Nyahoon Games Pte. Ltd.
Shadows are very important aspects in 3D space. However, shadow rendering is GPU intensive process. Fast Shadow…www.assetstore.unity3d.com
SHADOWS
If you have to use a dynamic light, be sure to use them as least at possible and to use only one Directional Light for your whole game.
Of course what is important when using dynamic lighting, especially in a 3D world, are the realistic shadows, but that’s what takes the most resources to render in the lighting process.
Nevertheless there are some values we can play with to get the shadows we want, without sacrificing performances.
Directional Light Settings
On your only Directional Light, you can begin by setting the culling mask with only the layer of GameObjects you want to project light upon, as we don’t want unnecessary calculations.
Play with the Shadows Resolution setting to see which one is satisfying enough, of course a lower resolution takes lesser resources. But be aware that what you see in the editor doesn’t represent what will be displayed on your device, so for example a Low Resolution Shadow setting could be perceived as really pixelated on your computer but could be enough on your device. Always build and test directly.
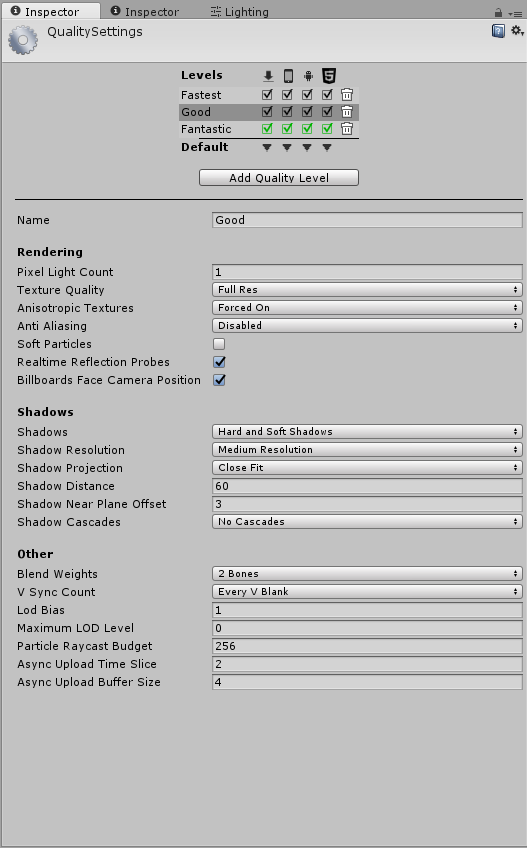
Quality Settings
Now, open the Quality Settings (Edit > Project Settings > Quality), and let’s dig into those advanced settings.
Here’s what your window should look like for now :
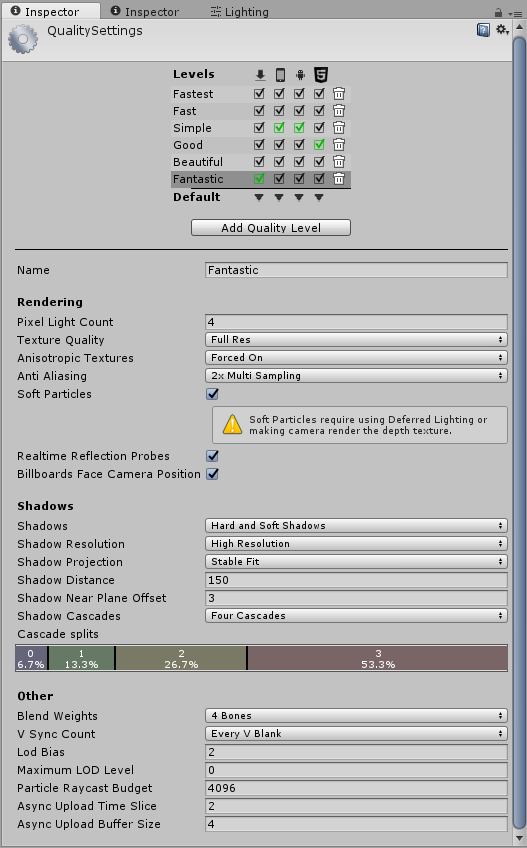
Those settings really influence your game performance so try to get familiar with it.
Pixel Count:
In order to reduce the light calculations, lower the “Pixel Count” to 1, or 0 if you don’t have any lights.
Antialiasing:
Disable the Antialiasing if possible because it takes many resources on mobile.
Soft particles:
If you don’t have a specific use of Soft Particles, also disable it.
Shadows:
Now the shadows are the real important settings to play with.
As Soft Shadows demand more resources you can select “Hard Shadows Only” option.
But with this option, at a very low resolution the shadows are really pixelated and edgy. So, what you can do is pass the option “Shadow Projection” from “Stable Fit” to “Close Fit” and you’ll see that the shadows are now less pixelated.
Don’t worry if it seems ugly on your computer screen, remember to build and directly test on your device!
Now, set the “Shadow Cascades” to “No Cascades”.
Then finally, tweak the “Shadow Distance” value, reducing it slowly. You’ll see at some point that far shadows are disappearing. Indeed, this value represents the distance at which the shadows are processed. Shadows beyond this distance aren’t calculated. So reduce this value until you’re satisfied with your shadows while having a lower “Shadow Distance”.
So, now your Quality Settings window should look like this :
TEXTURES
When you’ll look into your Editor Log, you’ll surely see that your textures are taking the most memory in your game. Indeed too often they are way too big for their purpose.
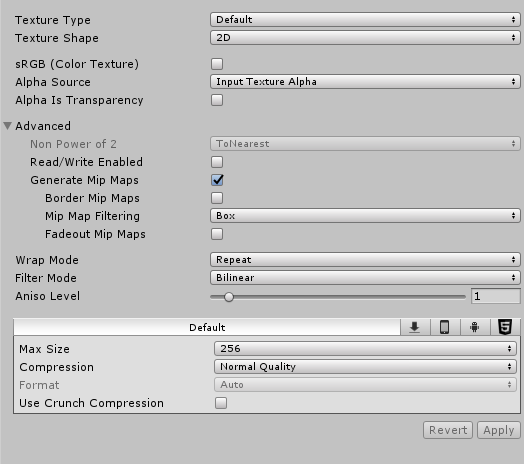
So what you can do before you start complaining about your artists, is to go in your textures “Import Settings”, just click on your textures in your “Project” window.
Click on the “Advanced” arrow, and now check “Generate Mip Maps”, Unity especially recommends it for faster texture loading time and a lower rendering time.

Then you can play with the “Max Size” option, that compresses the texture in order to reduce its memory footprint. Indeed, the textures are often too big.
Take in account their purposes (Character texture, UI sprites, Environment texture etc), you should try to reduce the “Max Size” as low as possible, as long as the visual aspect suits you.
Finally to reduce the draw calls, you can use textures atlases. Atlases are big textures files containing several or all of your game textures. This can really lead to great performance gains!
UI
Another big chapter in Unity Android Optimization, is the UI optimization. Because as you’ll see, the Unity UI system isn’t really well optimized, but luckily, you can find smart ideas to get the best performances!
Sprites
When using Sprites for your UI, be sure that your Sprites have as less transparent areas as possible, because those create overdraw and reduce performances.
Like the Textures, you can put all your UI Sprites into an atlas while reducing their “Max Size” to a minimum acceptable.
Also, check “Generate Mip Maps” option, it is really important for your UI as it will not only take less time to render but also make it smoother on your screen.
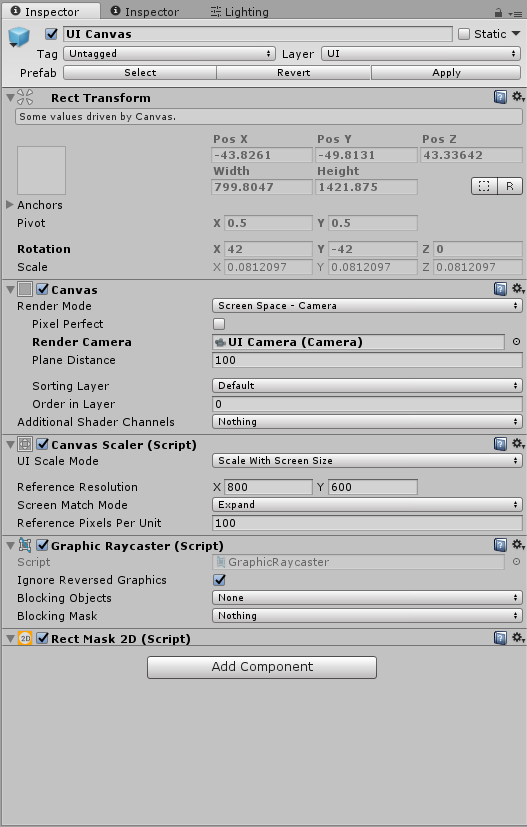
Canvas
In Unity, the UI works with a Canvas, try to have as less Canvases as possible, because a Canvas represents extra calculus for the rendering process.
Maybe you have Canvases that are only used in a display purpose without need for interaction. In this case remove the “Graphic Raycaster” component on it, as it implies that the Canvas will be interacted with and has to check for interactions.
Also, to gain in performance just uncheck the “Pixel Perfect” option! You’ll see great results especially with Scroll Rects.
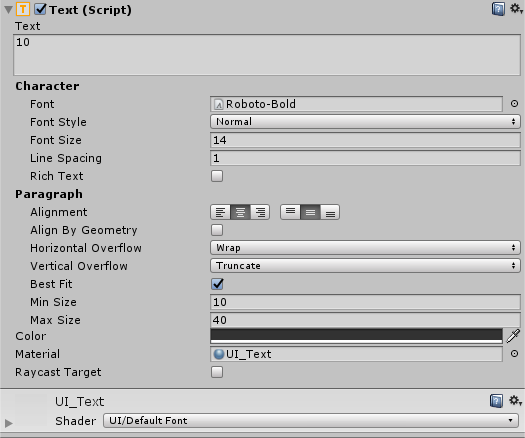
Texts & Images
The Text components can be really resource-demanding on mobile!
So what you can do, is disable “Rich Text” on it.
On Image and Text components that aren’t interacted with you can uncheck “Raycast Target” on it, as it will remove them from any Raycast calculus.
Unity recommends not to use the “Best Fit” option on to many Texts, but I haven’t tested this yet so I can’t say if this is really a bad habit.
Fonts
With your Texts you’ll surely use custom fonts, but be careful because with some bad quality fonts found on internet you could have performance issues.
Try to keep a small font count, and if you have performance issues try to disable the “Best Fit” option on all your Text components.
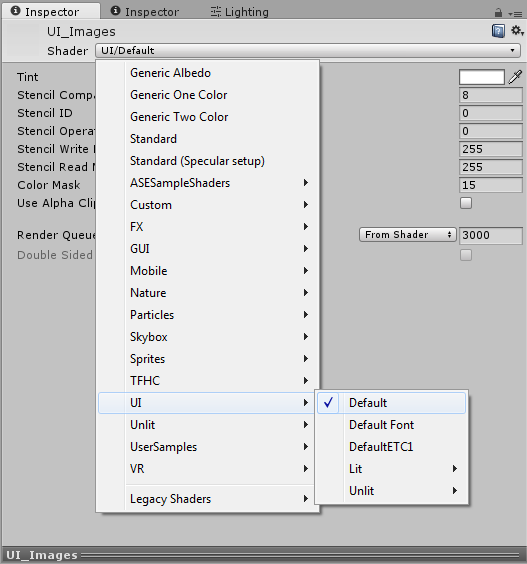
UI Material
I saw this tip on a forum and I confirm that when you leave the “Material” empty on Image and Text components your performances are slower.
So what you can do, is create a new Material in your project and set its Shader to “UI/Default”, and put this material on every Image and Text.
Rect Mask 2D
The Rect Mask 2D is a UI component, similar to the Mask Component, but it has the advantage of disabling UI elements when they are outside of the mask area and thus aren’t rendered. This can help improve the performances.
Scroll Rect
Another UI component, the Scroll Rect, is used to display a lot of content, hiding a part of it and scroll through it. It is really cool and nice to interact with it, but try not to use too much of it because it really isn’t optimized for mobile.
You can also use the previous component, the Rect Mask 2D to improve the Scroll Rect performances.
Canvas Group and Menu Animations
When animating the menu elements, naturally you would enable and disable the elements when showing on and off off the screen, but this isn’t the most optimized way.
Indeed, disabling and enabling can restart some processes on certain GameObjects. For example, the previous Scroll Rect component repopulates and reloads its content when enabling, which can cause lag spikes.
The other possibility is to let the GameObjects enabled but to use Canvas Group.
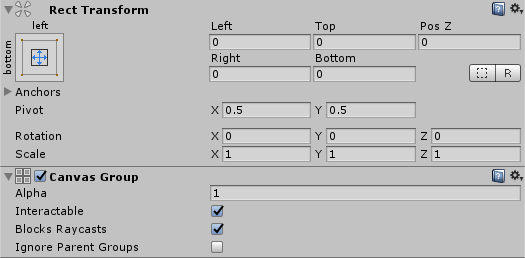
Those components are really useful, they allow to group elements up and control their behavior as a whole.
You can play with the opacity, “Alpha” of the group, and disable their interactivity with the “Interactable” and “Blocks Raycasts” options. So use these options to make sure that hidden menus can’t be interacted with.
SHADERS
Last but not least, your game’s shaders. Those can be pretty magic in terms of rendering but on mobile they can really sacrifice your performances, so you must watch out for them.
I’m really not an expert on shaders, so I can just warn you about how optimizing shaders on mobile is important and recommend you to take a look on the internet how to do so.
I just know that the keyword regarding mobile shaders is to stay simple. Few shaders, that aren’t complex but efficient.
What I can surely say is that post processing shaders are really expensive in resources, so try not to use them on mobile or optimize and test them to be sure that the game doesn’t suffer too much from it.
Conclusion
That’s about pretty much everything I have learned working on my last android project.
I wanted to put it all in one article, to be able to share it and help other Unity developers.
As the process of searching and testing your optimization takes so much time, I also wanted to make myself some kind tutorial / reminder, for future projects.
Hoping that you’ve learned something from it!
Here’s some links that can lead you towards other good tips and tricks for android optimization:
Unity documentation on optimization:
https://docs.unity3d.com/Manual/OptimizingGraphicsPerformance.html
Other articles:
https://divillysausages.com/2016/01/21/performance-tips-for-unity-2d-mobile/
http://www.paladinstudios.com/2012/07/30/4-ways-to-increase-performance-of-your-unity-game/
We hope this guide will be useful!
Get in touch with us if you want more clarity on a point, or would like to request another subject for an article.
Follow us on Twitter and Facebook!
Read more about:
Featured BlogsAbout the Author(s)
You May Also Like