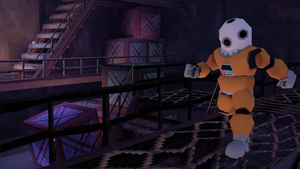
Brief overview of The Agency Engine, my game engine I'm building Alaska on. This is reprinted from my development blog post http://www.ratusapparatus.com/blog/the-anatomy-of-the-agency-engine/


I’m putting together a new video of some of the features I’ve been working on since October, it should be done this week. In the mean time I wanted to write a post about the architecture of the Agency Engine (Agency is the name of the engine I wrote to build Alaska in) firstly to let people know how easy it is to roll your own engine by using the open source, free for commercial use libraries out there. The benefits to rolling your own engine are pretty comprehensive, but the most important things to me are, primarily you don’t have to worry about letting licenses lapse and therefore losing the right to maintain, improve or update your applications and the ability to see exactly where your code is falling down with a native debugger.
So what does the agency engine consist of?
Firstly the library links against the following libraries to provide their respective utilities;
Direct 3D 10
(rendering is abstracted and will soon be optionally replaced with open gl support for Linux)
Direct Input
(deprecated by Microsoft they laughably haven’t made anything to replace it, one of the many areas Microsoft have neglected in windows)
Bullet
(the free and best physics library available)
Tiny XML
(All non binary assets are in xml format and i’ve known & loved tiny xml for years, using xml in a release build is frowned upon because it’s costly, i might switch if i get the time)
Lua
(for scripting)
LuaBind
(for object orientated scripting)
Recast & Detour
(for dynamic navigation meshes)
Then there’s my main engine classes;
BSP loader
(for loading my proprietary bsp format, I originally used valve BSP’s but it turns out there’s no explicit license for the source sdk which means I’d have to license it from valve)
Vector Math library
(stupidly i reimplemented something that’s been done a million times before, probably the biggest mistake of the project)
2D library for menus
(uses scripts and xml and so is completely scriptable without touching native code)
Model loader
(probably my second biggest mistake in this project i wrote my own collada loader before finding out there is an open source library called assimp that would’ve done it for me the collada format is a complete mess, as is blenders implementation of it, and the loader took a long time)
Resource template
(everything loaded from disk inherits this class template which implements reference counting to prevent redundant assets)
Finally the content creation pipleline;
Models are created in blender.
Maps are created in quark proprietary bsp tools although valve bsps will continue to be supported as it’s the levels that are under a non commercial license, not the code.
Almost all textures are created in the trial version of filter forge, although I have no qualms about buying a license for this as it’s what’s enabled me to build the game without an artist.
Renderer
The renderer is quite complex and warrents more detail it’s loosly broken down into 9 steps & is a pre pass lighting renderer first defined here by Wolfgang Engel:
preProcessLights();
pBsp->update(*((Vector3 *)&pCamera->getEye()));
drawNormals();
drawLab();
drawHDR();
drawBloom();
drawToneMap();
drawHud();
drawDebugHud();
pBsp->update uploads the new bsp indices to the gpu, ensuring only the visible parts of the map are drawn
preprocessLights figures out closest lights that are within 1 bounce from the player renders their static shadow map if it is just added this frame & renders it’s dynamic shadow map, as long as thiers shadow maps available and it hasn’t rendered too many this frame already.
draw normals renders the world space normals of the geometry to a render target and the depth information to a depth buffer.
drawLab iterates through each active light accumulates all the lighting information on a pair of render targets, this step is very fill rate intensive, so it uses a stencil buffer to encapsulate the depth buffer in the lights radius.
drawHDR renders the lit geometry using the light accumulation buffer and the normal buffer from the previous steps to a high dynamic range buffer, i.e. colour values go from 0 to something like 8000 (depends on the gpu & other factors).
drawBloom down samples the HDR buffer ignoring pixels bellow the bloom threshold & then draws those buffers back to the hdr buffer with a blur filter.
drawToneMap renders the HDR buffer to a low dynamic range buffer by mapping the 0-8000 values non linearly down to between 0-1 (lending more detail to more mid range colour values)
drawHud & drawDebugHud are fairly standard 2D forward renderers.
Read more about:
BlogsAbout the Author(s)
You May Also Like


