Daily news, dev blogs, and stories from Game Developer straight to your inbox
Sponsored By
Featured Blog | This community-written post highlights the best of what the game industry has to offer. Read more like it on the Game Developer Blogs.
Ludum Dare 37 was the first time I’d really, truly built a finished product in RPG Maker rather than tinkering, and I learned a lot. If you're a casual RPG Maker user, here's what you need to know to dive into Ruby scripting.
9 Min Read

Ludum Dare 37 was the first time I’d really, truly built a finished product in RPG Maker rather than tinkering, and I learned a lot. Given that RPG Maker scripting doesn’t seem to be a well-known topic among more casual users, it seems like a good idea to try to summarize a lot of what I picked up.
Credit where it’s due: I would probably never have gone this deep if I hadn’t teamed up with John, who suggested it; I’d probably have just made the same old 2D Unity game I usually make and learned very little.
I’ll admit, I’m a bit of a code snob. I’ve done no-code-programming before (SharePoint workflows), with questionable results. And data that I can’t directly write code against isn’t really really real. So my general attitude towards RPG Maker has been that it’s great for learning, but it probably isn’t my thing.
Well, turns out I was wrong. You can write real code in RPG Maker. Lots of it. In fact, it looks like you can customize almost everything in the game through code, if you’re willing to dig into the default project library.
Basic Concepts
RPG Maker VX Ace uses Ruby for its scripting language. If you’ve ever written Python, like me, it’s easy to pick up (when you get stuck, just Google to see what the difference is). As an aside: RPG Maker MV uses JavaScript, which might be a more recognizable language, and I assume the game structure similar.
Before you do anything in RPG Maker itself, I’d recommend playing with a few Ruby tutorials to get a feel for things. You’ll need to know some basic programming concepts, like classes, methods, and arrays/dictionaries.
Getting a feel for Ruby syntax is rather important, as VX Ace doesn’t have nice features like syntax highlighting and checking. You won’t figure out you made a typo until you build and the game doesn’t run.
I’d also suggest installing Ruby for Windows alongside RPG Maker so you can try out your code in irb (an interactive command-line utility that allows you to write and run Ruby code a line at a time). I found this helpful when trying to work out non-obvious syntax errors.
I would strongly suggest making a backup of your game before you do any tinkering. (You might even consider a source control solution like Git or Mercurial, which can make snapshots of your project.) One typo and your game could very well become unplayable (unless you can figure out what you did).
I also found it helpful to create a “prototype” project–I could write code for the specific feature I wanted, test it in isolation until I got it right, and then copy-and-paste it into my real project. If I screwed anything up, it was easy to restart from scratch.
Code structure
There are three ways you can use code to interact with your game:
New/modified classes
Most game concepts, windows, and scenes are represented by classes (for non-coders: a template that defines a thing in the game world or on-screen; specifically, what data it tracks and how it can interact with itself or other things).
You can modify existing classes to “hook” in new functionality to the existing flow of the game, and create new classes that add new windows or game logic.
Methods
Events in RPG Maker can call Ruby methods to set a variable or as part of a general script block. (For non-coders: a method is a set of steps; typically, they accept a set of parameters to customize how they behave and/or output a value.)
Instead of building out your process in RPG Maker’s point-and-click interface, you can simply write a method that performs all the same steps. This can be harder if you’re trying to do something complex or not well-documented.
It can be easier if you want to build a process that is reusable or can vary greatly based on the current state of the game.
Switches and variables
Whether you modify classes or call new methods from Events, you’ll usually need some way of getting data generated by those changes back out of your Ruby code. The easiest way to do this is set switches ($game_switches[n], where n = the switch number) or variables ($game_variables[n], where n = the variable number).
This is especially useful when you’re trying to affect enemy behavior in code; you might have a Troop Event call Ruby code which sets a switch, and then use that switch to determine what actions the enemy might take.
Which approch(es) should I use?
If you’re just doing visual or UI tweaks, you’ll probably stick to modifying existing classes–for example, you might add a new command to an existing window. When RPG Maker goes to run that function, it’ll find your code, including the new definition for the window.
If you’re actually using code to perform game logic, then you might write new methods that get fired in Events and set Switches to change basic game functionality. You’ll still need to know about the classes that define game data, so that you can check or set that data as necessary.
RPG Maker’s library of classes
Most of the game functionality in RPG Maker actually exists as (or at least is defined in) Ruby code. And there’s a lot of it.
Fortunately, it’s organized in such a way you can find what you want. There are five main groupings of classes:
Modules, which define global variables, ways of interacting with game assets and files, and major systems (like scene management and battle management)
Game Objects, which define game mechanics and stats for characters, and reusable commands and visual elements
Sprites, which define how graphics are displayed
Windows, which define menus and text displays
Scenes, which define game phases and screens (e.g., menu, combat, etc.)
Most classes are named in the format “(TypeOfObject)_(PurposeOfObject),” so it’s easy to get a general idea of what they do.
For example, Game_Actor defines the game object (mechanics, sprites, etc.) that represents an actor (a character in the party). It extends Game_Battler, the game object which represents a character involved in combat.
Window_BattleStatus defines the window that shows the party’s status in battle.
Once you get a feel for the naming conventions, it’s relatively easy to find a starting point for the function you want to modify. Then, you simply work your way up to the code that creates that object, or down to the code that the class relies on.
Two worlds
While you can do a lot of the same things in Ruby scripting and Events, it’s important to remember that you’ll need both of them to make a working game.
Here’s my mental model of what’s going on: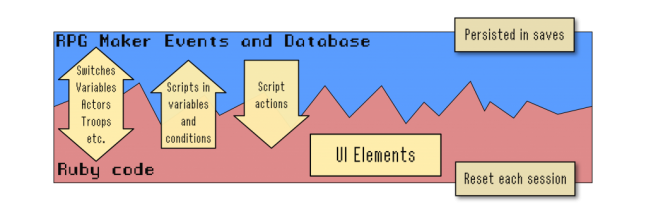
An RPG Maker game isn’t a blank slate; there’s a lot of pre-written logic in there for characters, combat, and inventory/skill management. In that sense, the Events and Database is the “real” game. It’s going to be the starting point for most of the code you write in Ruby, and it’s going to be what uses the results of your (non-UI) code.
Switches, variables, actors, troops, etc.
Just about every bit of data that exists in Events or the Database is accessible in Ruby code. You can use this to determine the current state of the game, or to modify the existing state of the game. Essentially, it’s the way that the two worlds “talk” to each other.
For example, let’s say we want to create an enemy that detects when a character casts Shield, and retaliates by casting its own Shield Break ability to dispel it. You might use the following logic:
In Database > Troops, you create an event that runs at the end of the turn.
This event calls a Ruby method that checks each member of the current party ($game_party.all_members.each do |character| …)
If a member has a particular State ID (that is, if character.state?(17) is true), then set a switch (e.g., $game_switches[5] = true)
In Database > Enemies, you give an Enemy the shield break Skill, but only allow it if the Switch (in the example above, switch 5) is true.
Scripts in variables and conditions
A more direct way of interacting with code is with the Set Variable and Conditional Branch Event actions, which can call a method and then use the result.
For example, let’s say we wanted to create an event that tests whether the party knows a particular Skill. We might add a Conditional Branch that calls a Ruby method to check each character’s skills, and then return true (the main condition) or false (the else condition).
It might be easier to use this approach rather than setting switches and variables directly in code if you’re only going to be setting one switch or variable at a time.
Script actions
Events also have a general “Script” action that can run free-form Ruby code. Note that this doesn’t return any data back to the Event in the way that Set Variable or Condtional Branch does. It’s a good way to kick off code that sets multiple switches or variables, or that executes processes that are easier to code than build in the point-and-click interface.
UI Elements
As stated above, every window that’s shown in the game is defined somewhere in code. (Note that the code isn’t actually creating the window on the screen–you won’t find actual graphics code–it’s simply defining how that window is laid out and behaves.)
If you want to add new menus, remove visual elements, or add new commands or displays, odds are you’re modifying a Scene_ or Window_ class. Because you can modify commands on the screen and what those commands do, you can also significantly change the flow of the game by changing this code.
Most of this functionality isn’t exposed through Events and Database settings.
Saving data
One important consideration is that Save Games don’t save the state of the Ruby “world.”
For example, you create a new variable in code (not “Variables” as defined in Events, but rather: $number_of_wins = 0) that tracks the number of times the player has won a battle. A player wins 10 battles, and your code works flawlessly. But then the player saves the game, stops playing, and loads that game sometime later. Now, the game shows they’ve won 0 battles.
The simple fix is to make sure you save any important, permanent state to $game_switches and $game_variables, which are properly saved.
More (?)
This is a brief overview of the general concepts–actually making it work will require some practice, especially if you haven’t written code before. Hopefully, I’ll actually write some more blog posts on what I learned. I’ve also submitted an “RPG Maker Scripting Crash Course” panel to several cons this year that covers some of what I outlined here in a bit more depth.
While you might not be interested in writing your own RPG Maker code, or might not even feel confident if you haven’t coded before, it’s helpful to know what your options are, and to be able to skim code snippets you find online.
This post was originally published on my personal blog at dylanwolf.com.
Read more about:
Featured BlogsAbout the Author(s)
You May Also Like