Daily news, dev blogs, and stories from Game Developer straight to your inbox
Sponsored By
Here's a blog where I discuss Raymarching. It's a different way of rendering things, and can be used to add some cool effects to a game!
13 Min Read

Introduction!
I'll be giving my opinion on Raymarching for games, and some code I've written to integrate raymarching with games! Before I talk about anything hower, let's look at some 'old-school' games, because raymarching is fairly 'old-school', so it's some nice review
Tennis for Two, '58, William Higinbotham.  Widely considered one of the earliest video games, Tennis for Two is a game that was built to be played using an Oscilloscope! Very cool and innovative!
Donkey Kong, '81, Nintendo Research and Development 1
") From the Golden Age of video games, Donkey Kong is an arcade game. It features Jumperman (now known as Mario). It is considered one of the first videogames with a plot that you can watch unfold on screen like a movie. You watch in horror as the princess is kidnapped, over and over again.
From the Golden Age of video games, Donkey Kong is an arcade game. It features Jumperman (now known as Mario). It is considered one of the first videogames with a plot that you can watch unfold on screen like a movie. You watch in horror as the princess is kidnapped, over and over again.
Now, Back on Topic!
We've looked at some older games, each very innovative. They pushed the limits of computer hardware and software. Video games have shaped computers into what we know, use, and love today. Recently, I've been teaching myself about Raymarching, and I would like to share what I've learned, because I feel like it should be pushed a bit further as well.
Raymarching is a way of rendering computer graphics, but it's still not used to it's full potential. Similar to the examples above, it was once quite new, innovative. It don't feel as if it has taken off, like it should have. There's no need for a graphics pipeline with raymarching. It is commonly used to render volume textures, heightmaps, and analytic surfaces. Today, most games use OpenGL or Direct3D (DirectX) to use hardware acceleration from the graphics card to draw polygons. This is crazy impressive! Computers can render millions of triangles, 60 frames each second. Raymarching is not as well known as these graphics APIs. But how much detail can we get with just 2 triangles?
The goal my post is to show you that this older technique of rendering, can be brought back to games! And optimized using parallel processing, and compute techniques! The GPU is so powerful now, it's used for physics acceleration, and even deep learning AI. It's time to use it for more than just the graphics pipeline!
2 Triangles, infinite detail
Raymarching is a mathematical way of rendering. It is done with distance fields (distance from a point to a primitive), constant-steps (typically used with volume rendering), and root-finders (a math approach).
Normally, creating a scene like this requires tools for geometry (Maya, Blender, 3DsMax), tools for textures (Photoshop, Gimp, MSPaint). This scene was created with math, and is rendered using raymarching. You aren't limited by (even if it's hardly a limitation anymore) how many triangles you can render. HOWEVER, raymarching is not the solution to all of our problems. It is slow, in it's own way, and I think it should be used alongside polygons. Allow me to explain, in code.
How to add Raymarching to your games!
Combining two methods of rendering isn't hard. But you need to understand the differences first.
Raymarching isn't 100% accurate. Using distance fields will bring us close to the surface we're trying to render, but we almost never get the true ditsance we're looking for.
Rendering polygons (with perspective) involves using a projection matrix. This is depth, not distance.
In order to combine the two, it's usually easiest to start with polygons, and end with raymarching, for various reasons. It's hard to do depth testing with a distance buffer, and you're limiting yourself to solid objects. The raymarching-phase should be performed after all rendering has finished (Sort of like, how you draw solid objects before transparent ones). Let's talk about preparing the depth buffer, and turning it into a distance buffer!
Sharing is caring! ❤️ Here's a camera depth buffer, to a distance (Shader written in Unity) |
float GetDistanceFromDepth(float2 uv, out float3 rayDir)
{
    // Bring UV coordinates to correct space, for matrix math below
    float2 p = uv * 2.0f - 1.0f; // from -1 to 1

    // Figure out the factor, to convert depth into distance.
    // This is the distance, from the cameras origin to the corresponding UV
    // coordinate on the near plane.
    float3 rd = mul(_invProjectionMat, float4(p, -1.0, 1.0)).xyz;

    // Let's create some variables here. _ProjectionParams y and z are Near and Far plane distances.
    float a = _ProjectionParams.z / (_ProjectionParams.z - _ProjectionParams.y);
    float b = _ProjectionParams.z * _ProjectionParams.y / (_ProjectionParams.y - _ProjectionParams.z);
    float z_buffer_value =  tex2D(_CameraDepthTexture, uv).r;

    // Z buffer valeus are distributed as follows:
    // z_buffer_value =  a + b / z
    // So, below is the inverse, to calculate the linearEyeDepth.
    float d = b / (z_buffer_value-a);

    // This function also returns the ray direction, used later (very important)
    rayDir = normalize(rd);

    return d;
}
|
What's happening here is - I use the inverse of the projection matrix, to figure out where the UV coordinate (transformed to be [-1,-1] -> [1,1]) lies on the near plane (x, y, -1). At this point, I haven't used a view matrix, so it's assumed the camera is at the origin ([0,0,0]). The length of this coordinate is will differ with the various UV coordinates. With UV coordinates [0.5,0.5], it should be identical to the nearPlane distance.
After getting these numbers, I set normalize the rayDir variable. This is important. Raymarching works by casting rays.
How raymarching works! Probably should have started with this.
So we now have everything we need to get started. With the distances from the depth buffer, we can handle intersections. With the inverse projection matrix, we calculated the correct rays to match the field of view of our in-game camera. What's left? Positioning the camera, and then we're done. Thankfully, this is easy.
Some more code! 🙌 This will hook into the current cameras position (Unity) |
fixed4 frag(v2f i) : SV_Target |
So I've highlighted the function we wrote earlier in Purple. We've store distance in a float. We passed through a float3 as an out variable. So it comes out of that function with the right FOV. It is missing the rotation of the camera however. We can get the position with a standard Uniform variable (_cameraPos). We multiply the rayDirection with the view matrix. The reason I use 0.0 as the w parameter, is because we don't want the position of the camera stored in this variable as well. We've only rotated it.
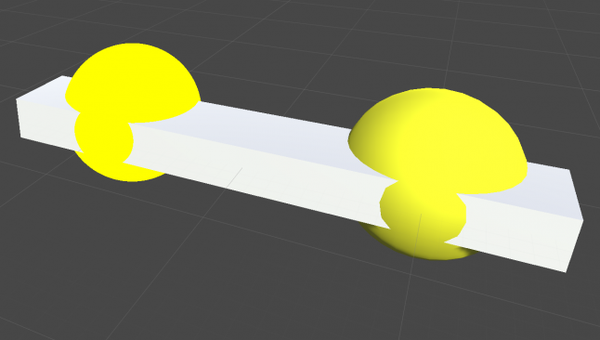
Here's what it looks like in Unity! Below, you see two yellow spheres, and a scaled cube. One of them (on the right) is using Polygons. It intersects the cube exactly as you would expect. The left sphere, is using our setup to calculate the correct FOV, position, and rotation information from our game camera.
Also, notice how smooth the edges on the front face of the cube are, where it intersects with the sphere that was rendered with raymarching. Compare it to the relatively high-poly sphere on the right.
What's next on the list? Let's render something!
Rendering with raymarching requires a serious understanding of math, OR, a really good cheat-sheet. There aren't too many resources, even online. So here's an article, with distance functions for every shape imagineable: http://iquilezles.org/www/articles/distfunctions/distfunctions.htm (Inigo Quilez - a real raymarching legend)
Let's use a difference shape, not the sphere. Something crazy... something out of this world!
Yep. A #Torus 🍩 |
float sdTorus( float3 p, float2 t )
{
  float2 q = float2(length(p.xz)-t.x,p.y);
  return length(q)-t.y;
} |
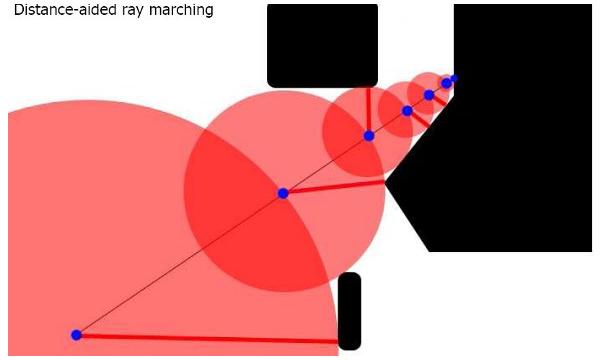
This is a distance function, for a torus. If you're unfamiliar, scroll down to see a torus! The distance function returns the distance from a point, to the closest point on the primitive. This is what we will use to render our doughnut. In the image below, you see black shapes, red circles, blue dots, and red lines. The blue point at the bottom left is the camera. The blue point at the top right is the point it's looking at. We don't have information about anything except the distance to the nearest surface (that stubby black line in the bottom center). Therefore, we use that distance, to move forward. And repeat the process, until we reach the surface we want! Then, we are left with the distance to the surface we were looking at. Simple, right?
First, let's take a look at what else we need to program. Because this function returns a distance to the torus, we're off to a good start. Here's the TODO list:
Get the ray origin (camera position)
Get the ray direction (camera FOV, aspect ratio, and rotation)
Add a distance function to our code (Torus)
Cast a ray towards the shape
Get the distance to surface of the shape, on that ray
We're basically done. What we will first do is calculate a point. This uses the standard point-along-a-vector equation, to move a certain distance along the ray we made. We then check the distance to the primitive. We increment the distance that we used to move along our ray, using that distance we just calculated. Then we repeat the process. So we will be controlling this in a FOR loop.
Here we go! 👻 Let's raymarch this Torus! |
// Let's store the distance we're going to be calculating here |
Here's the results of that. Another yellow primitive (again, in Unity). Maybe it's time we lit these things?
What we actually did above was, iteratively march along a ray until we had a distance to work with. If only repeated the loop once, you would just be returning the first distance estimate. So that's why we need to repeat the code.

Right now, everything I've been rendering is pure Yellow. We've successfully created a Torus, and you can try any of the distance functions here to see how they work. We'll finally cover something a bit more advanced.
Getting G-Buffer style information.
In order to use any lighting model, we need some more information. Right now, we're left with just the distance along a ray. To do more with our shape, we need:
3D Coordinates
Surface Normals
Fortunately, they're both pretty easy to get!
How to get Position, and Normals! (and more emojis from me in captions 😘) |
// This is pretty self explanatory. We have the distance. We just need to move that
//... |
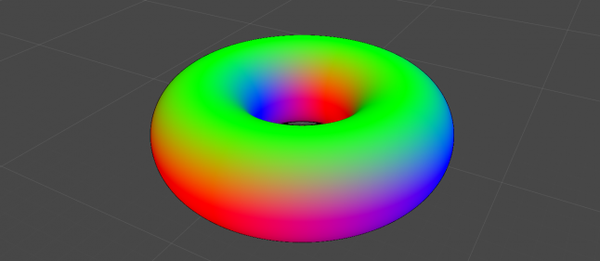
And here's the result! A torus with normals, and world space position. Let's light this guy.
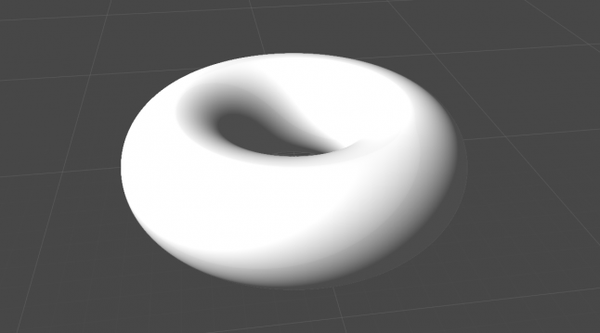
In order to light it, we just use the standard lighting equation for phong (which can be found here on Wikipedia)
// Let's create some variables to work with |
This is looking good! Still missing textures however. Unfortunately, there is no way of getting UV's. Which brings me to the last part of this blog! I will talk a little bit about projection mapping.
Intermission
Before continuing with the donought, I thought I would share another cool demo from Shadertoy. Here is another scene you can interact with. It features refractions, primitives, and some other cool things raymarching is capable of. The penumbra effect on the shadows comes at basically no cost. The combination of shapes is simple to implement (add, subtract, difference). Deforming space (twisting, deforming, bending) and instancing are also simple to add.
Projection Mapping
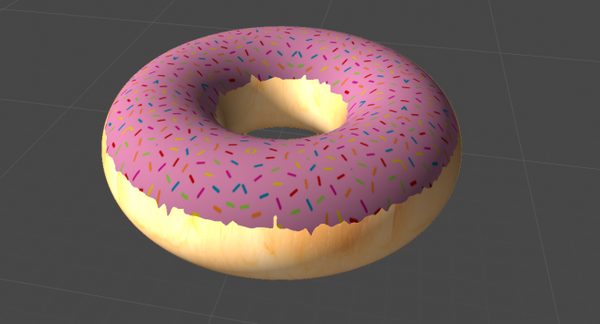
Let's put some sprinkles on our doughnut! Here is the sprinkles texture I will be using. Here is the dough texture I will be using. The goal is to get this as edible-looking as possible. Let's jump straight back into some code for the last time!
Tri-planar projection mapping. For a doughnut! 👌 |
fixed4 frag(v2f i) : SV_Target |
And the final final result. Hopefully, this hasn't made you too hungry. And even more important, I hope you've learned something new today. I have been dabbling with raymarching for only a few months now. If you're reading this and you see anything incorrect, please let me know! I am also still learning.
Conclusion
If I get this blog featured, I will soon follow up with a blog about volumetric rendering. That has the most potential in games today. It is used for smoke effects, massive particle simulations, clouds. The reason I covered this application of raymarching first, is because that's the order in which I learned. I figure, if it worked well for me, it can work well for others. Anything that is a volume, can be rendered with very similar techniques to what I've discussed above, so I will try to get a blog up about that soon!
Image Sources
Tennis for Two - https://commons.wikimedia.org/wiki/File:Tennis_For_Two_on_a_DuMont_Lab_Oscilloscope_Type_304-A.jpg
Donkey Kong - https://en.wikipedia.org/wiki/Donkey_Kong_(video_game)#/media/File:Donkey_Kong_Gameplay.png
Distance Based Raymarching - http://hugi.scene.org/online/hugi37/sphere_tracing.jpg
Read more about:
BlogsAbout the Author(s)
You May Also Like