Daily news, dev blogs, and stories from Game Developer straight to your inbox
Sponsored By
Featured Blog | This community-written post highlights the best of what the game industry has to offer. Read more like it on the Game Developer Blogs.
A big amount of games is using procedural techniques to fill their games with replayable content. This post shows how to think when planning a procedural feature, how to avoid the trap of over-engineering, and how to make racetracks procedurally.
18 Min Read


The original post can be found here: http://blog.meltinglogic.com/2013/12/how-to-generate-procedural-racetracks/
The amount of procedural games nowadays is very big. From Minecraft to Canabalt, the replayability that this form of random game gives is very appealing to a lot of players; And to developers too, that sometimes doesn't have enough time or skill to create levels good enough to keep players entertained for long time spans.
Subjects like procedural terrain and procedural events are well covered in a lot of sites in the web, some other subjects are covered in PCG wiki and some other forums. Even though, if you want to create some new type of procedural content, you have to venture and empirically test methods to create this content. We'll treat here my adventure on creating procedural racetracks.
Thinking of it
Before we start to shape any idea, we have to know well what is the content that we want to create. We can look some photos to help on this:
TopGear:


MarioKart:


Real life:


We can see on these photos that a racetrack (not all of them, but the kind we want to create):
Is a perfect loop. That is, the start and the end are the SAME point, this way the player can lap;
It can be very straight (though it should have at least 3 curves, to form a looping polygon);
But it can be very curvy too;
It can either be concave or convex;
It can have intersections, preferably, in a transverse way, so it will avoid the track going over itself;
One curve can be very open(that is, their angle is closer to 180), or very closed(angle closer to 0);
But not that closed, otherwise the track will get over itself.
7 simple traits that define for us what a racetrack is, and what characteristics define them.
For you that want a walk-through on how to create any procedural content, I didn't have an epiphany and came with all of these traits just by looking at images. I only noticed 3 or 4 traits, the others were being noticed while I was testing. If while testing the generated content doesn't resemble what it actually is in real life, then try to come with a new rule that will make it fit in.
Implementation
Ok, mathematically, we can start with a simple statement: a racetrack is a polygon.
Yes, I know, polygons don't intersect themselves, but we'll get there. We need to start from somewhere, and starting from an easy point that we all know since the first years of school helps a lot.
Recently, I hear a lot of people saying that Perlin/Simplex noise is the answer to most PCG, and by the way, when I posted a #ScreenshotSaturday that I was working on these tracks, one guy asked me if they were generated with Perlin noise. Of course interpolated noise is useful in a lot of areas, but sometimes trying to fit them in every place can be very hard to you and your time. For example, taking a polygon from a map generated with Simplex noise can give us a very cool result, but this isn't something simple to do, and it isn't very easy to visualize for a lot of people. If you want to create your own kind of procedural content, you have to try to start with the easiest method to visualize the generation, which will be better for you during the development. This time, generating a 1D noise with your own language `rand()` function was chosen.
We'll use a method that will give us a polygon with no martyr. I show you the Convex Hull. In short words, a convex hull is the smallest polygon that can be obtained that contains an entire determined set of points. This seems very interesting for us!
We'll start defining the medium size that our track should have. I defined 250x250, which would give us (aproximately) one track of 600m (roughly measured by the rectangle perimeter) You can define what you want too, even use other units, like miles instead of meters.
From this defined retangle, generate a collection of random points inside it.

 int pointCount = Random(10, 20); //we'll have a total of 10 to 20 points
 Vector2[] points = new Vector2[pointCount * 2];
 for(int i = 0; i < pointCount; ++i)
 {
   float x = Random(0.0f, 250.0f) - 125f;  // we subtract 125 to keep the square centralized
   float y = Random(0.0f, 250.0f) - 125f;
   points[i] = new Vector2(x, y);
 }
Well, this method works well to create random points, but these points are too random, they don't follow any rule of distribution and scattering as the described by Mick West in this GamaSutra post , but for our purposes, our points are fine. If you want more concise tracks, consider fixing this.
After generating a collections of points, we can generate the convex hull. I won't talk about details on how to calculate a convex hull, since there are tons of articles treating this on the web. You can try searching for the Monotone Chain algorithm if you want a simple and efficient way of calculating convex hulls. The implemention that I used (and probably the one you'll want to use) returns a new collection of points with only the ones that are part of the polygon, and they're already counter clockwise sorted.
Vector2[] dataSet = ConvexHull.computePolygon(points);

Very simple. At this point we already have a convex polygon that is very beautiful, the little problem that may trick us ahead: In some cases, some vertices can get very "cumpled", and when we apply a spline to the track, this causes a little cusp in the interpolation, it looks like this:
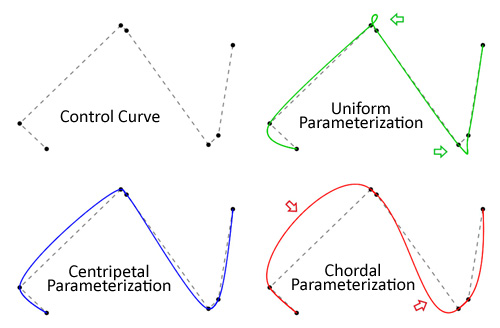
Notice how the green curve create some "little loops" where the points are too close. One way to fix it is to try using a centripetal catmull rom spline, but we will try to avoid this by creating a function that act on our dataSet and push the points that are too close apart. This seemed to be the simplest way to me.
 void pushApart(Vector2[] dataSet)
 {
     float dst = 15; //I found that 15 is a good value, though maybe, depending on your scale you'll need other value.
     float dst2 = dst*dst;
     for(int i = 0; i < dataSet.length; ++i)
     {
         for(int j = i+1; j < dataSet.length; ++j)
         {
             if(dataSet[i].dst2(dataSet[j]) < dst2)
             {
                 float hx = dataSet[j].x - dataSet[i].x;
                 float hy = dataSet[j].y - dataSet[i].y;
                 float hl = (float)Math.sqrt(hx*hx + hy*hy);
                 hx /= hl;
                 hy /= hl;
                 float dif = dst - hl;
                 hx *= dif;
                 hy *= dif;
                 dataSet[j].x += hx;
                 dataSet[j].y += hy;
                 dataSet[i].x -= hx;
                 dataSet[i].y -= hy;
             }
         }
     }
 }
Now we'll call this function some times so the points can stabilize. To me, calling it 3 times was enough.
 int pushIterations = 3;
 for(int i = 0; i < pushIterations; ++i)
 {
   pushApart(dataSet);
 }
If you want a simple and convex racetrack, you can jump to the end of the article, to the Interpolation and Mesh part, because we already have the basis for the track done.
As our definitions go beyond a convex map, we'll add some more points between the ones we already have, and these will be perturbed a little to increase the number of curves on the track and give it a non-convex form. We'll do this creating a new point between each 2 points, and for each one, choosing a length and direction and applying a displacement of these length and direction on it. Code speaks better:
 Vector2[] rSet = new Vector2[dataSet.length * 2];
 Vector2 disp = new Vector2();
 float difficulty = 1f; //the closer the value is to 0, the harder the track should be. Grows exponentially.
 float maxDisp = 20f; // Again, this may change to fit your units.
 for(int i = 0; i < dataSet.length; ++i)
 {
     float dispLen = (float)Math.pow(Random(0.0f, 1.0f), difficulty) * maxDisp;
     disp.set(0, 1);
     disp.rotate(MathUtils.random(0.0f, 1.0f) * 360);
     disp.scale(dispLen);
     rSet[i*2] = dataSet[i];
     rSet[i*2 + 1] = new Vector2(dataSet[i]);
     rSet[i*2 + 1].add(dataSet[(i+1)%dataSet.length]).divide(2).add(disp);
     //Explaining: a mid point can be found with (dataSet[i]+dataSet[i+1])/2.
     //Then we just add the displacement.
 }
 dataSet = rSet;
 //push apart again, so we can stabilize the points distances.
 for(int i = 0; i < pushIterations; ++i)
 {
     pushApart(dataSet);
 }
|
In brown, the added midpoints. |
Pay attention to the difficulty parameter, it makes the length of the vector be closer to 1 or maxDisp, this can help changing the difficulty of a track, putting more curves.
|
difficulty = 1f/20f |
|
difficulty = 20f |
Our map is ALMOST done, this last method we did add some cool curves, and also make it intersect itself in some cases. It just gives us one problem (that we already took note before), some curves are too closed. The track may go over itself when you try to create a mesh with thickness for it. I solved this by ensuring that the max angle of two adjacent points never get greater than 100 degrees.
Here is my function that fix the angles.
 void fixAngles(Vector2[] dataSet)
 {
     for(int i = 0; i < dataSet.length; ++i)
     {
         int previous = (i-1 < 0) ? dataSet.length-1 : i-1;
         int next = (i+1) % dataSet.length;
         float px = dataSet[i].x - dataSet[previous].x;
         float py = dataSet[i].y - dataSet[previous].y;
         float pl = (float)Math.sqrt(px*px + py*py);
         px /= pl;
         py /= pl;

         float nx = dataSet[i].x - dataSet[next].x;
         float ny = dataSet[i].y - dataSet[next].y;
         nx = -nx;
         ny = -ny;
         float nl = (float)Math.sqrt(nx*nx + ny*ny);
         nx /= nl;
         ny /= nl;
         //I got a vector going to the next and to the previous points, normalised.

         float a = (float)MathUtils.atan2(px * ny - py * nx, px * nx + py * ny); // perp dot product between the previous and next point. Google it you should learn about it!

         if(Math.abs(a * MathUtils.radDeg) <= 100) continue;float nA = 100 * Math.signum(a) * MathUtils.degRad;
         float diff = nA - a;
         float cos = (float)Math.cos(diff);
         float sin = (float)Math.sin(diff);
         float newX = nx * cos - ny * sin;
         float newY = nx * sin + ny * cos;
         newX *= nl;
         newY *= nl;
         dataSet[next].x = dataSet[i].x + newX;
         dataSet[next].y = dataSet[i].y + newY;
         //I got the difference between the current angle and 100degrees, and built a new vector that puts the next point at 100 degrees.
     }
 }
We need to call this function some times, and we also need to adjust the distances, because this function can clump the points together again.
 for(int i = 0; i < 10; ++i)
 {
     fixAngles(dataSet);
     pullApart(dataSet);
 }
10 iterations should be enough, and that is it! We have a track very well done!
Interpolation and Mesh
"Ok, but... what can we do with these lines and points? They really seem like a racetrack, but I don't think that we can play in a track like this..."
Well, be creative! Having a dataSet is enough to create more interesting things.
Here is one example that we have when we apply a CatmullRom spline:
|
CatmullRom makes it very smooth! |
And you don't have to limit it to points and lines, you can create a mesh from this.
|
Finished track |
|
With cars it can turn into a beautiful game |
As a tip, every vertice of the track can be found calculating a point of the spline and adding/subtracting it's derivative from it. Code explains it MUCH better:
 for(float i = 0; i <= 1.0f;)
 {
   Vector2 p = CatmullRom.calculatePoint(dataSet, i);
   Vector2 deriv = CatmullRom.calculateDerivative(dataSet, i);
   float len = deriv.Length();
   i += step / len;
   deriv.divide(len);
   deriv.scale(thickness);
   deriv.set(-deriv.y, deriv.x);
   Vector2 v1 = new Vector2();
   v1.set(p).add(deriv);
   vertices.add(v1);
   Vector2 v2 = new Vector2();
   v2.set(p).sub(deriv);
   vertices.add(v2);

   if(i > 1.0f) i = 1.0f;
 }
Calculate the indices, colors, ... shouldn't be hard, this is already good start.
And this is it! Make very good use of the algorithm, modify it to your needs, create a new wonderful next generation racing game and tell me!
Read more about:
Featured BlogsAbout the Author(s)
You May Also Like