Daily news, dev blogs, and stories from Game Developer straight to your inbox
Sponsored By
Featured Blog | This community-written post highlights the best of what the game industry has to offer. Read more like it on the Game Developer Blogs.
In this post I review the current methods for closed alpha distribution and talk about why I think Discord is a great, underutilized option. I then spend time walking through the distribution process itself as a guide for anyone interested.
17 Min Read

Background
Early on with my game Cantata, I knew that I wanted to do some style of closed testing. At the time there were only two real options (that I knew of) — either send out steam keys to closed testers to give them early access to builds, or use itch.io refinery to push new builds to your closed alpha users.
I knew initially I wasn’t going to go with Steam for this — especially as it felt like the “lift” was more heavy for delivery than I wanted for the game at this stage. I was also glad to not go with this option, as I recently found out via Tom Francis’ blog post that “giving testers a beta key takes the game off their wishlist”. This is BAD. Current pre-release knowledge dictates racking up wishlists for launch as you M.O., and if your most engaged fans are getting the game docked from their wishlist that’s extra bad. Tom’s solution is to make a separate app, but as much as I’m excited to release primarily on Steam, I don’t plan to initially leverage a lot of its features so it felt like too much.
Itch.io refinery was going to be my main choice, as it seems to really offer what I was looking for, namely, distributing my alpha in my own way, on my own terms. However, this also meant tying my game itself to the itch platform in a way that felt like a big choice I wasn’t trying to make. Users would need to either manually download new builds from itch, or use the Itch app to patch their builds. Because I suspect the Itch.io app also isn't yet ubiquitous, this also meant introducing platform friction for a user just to get the alpha. That said, I love Itch as much as anyone else and would have seriously considered using it anyways if there wasn’t a new kid on the block in early access distribution.
Why Discord?
Which brings me to Discord. As some people know, Discord now has a store. How effective that store is is hard to say, but what is true is that you can nearly guarantee any player of your game will already have Steam + Discord installed on their machine (sorry Itch). Traditionally though, Discord has only ever sold games directly through it’s store in ways that are similar to how Steam works, namely, via full releases to a storefront or releases tagged as “Early Access”.
What people likely don’t know is that Discord, in a smart move, has now moved their focus away from Steam's "single" storefront model and instead given Discord channel owners the ability to create “Store Channels” inside their servers. These pages function essentially like a listing in the main store and allow users to buy/access your game from inside your channel instead of in the main store.
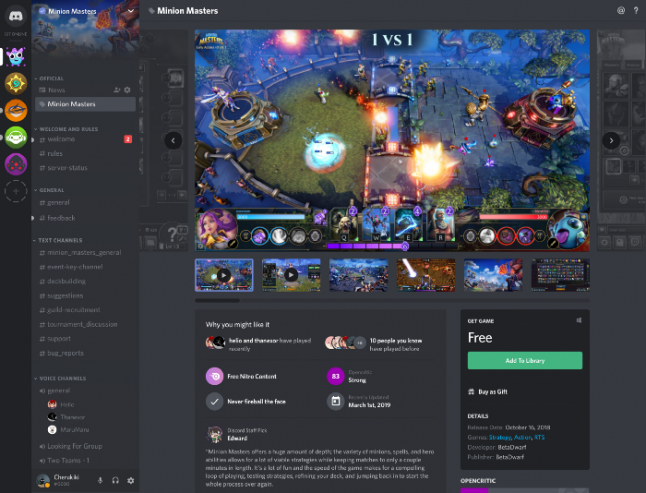
To those of you saying "Great, but I'm not trying to sell my game right now and I don't want everyone to have access to my game from inside my server," this is where it gets good.
There are three killer features Discord store channels have that make this, in my mind, be the ideal solution for Alpha Testing at scale:
Store Channel Listings Can Be Free
You aren't required to actually charge people anything in a store channel. If you do want to charge though, you can! Additionally, what's in a Discord store channel doesn't have to also be in the main Discord store. So if you have a store channel with a free alpha, you don't have to worry about that being mirrored somewhere publicly as well. Store Channels are separate from the main store.
Store Channels Can Have Role Access Limitations
This is a stroke of brilliance here on the side of the Discord team, and if it sounds like I’m gushing it’s because I am. For those who don’t know, Discord has a robust “Roles” system that allows channel moderators to define “roles” for people in their server. These roles can then be attached to various entitlements like posting in a server, posting images, joining servers, etc.
Why this matters for Closed Alpha (or whatever alpha/beta/etc.) testing is that you can essentially make an “alpha-tester” role and then require someone to be an “alpha-tester” to view your store page to download the game at all. Said differently, this allows you to invite people to your alpha by just inviting them to your Discord channel and giving them the alpha-tester role. No mailing keys, no zipping builds, nothing. Assign a role and be done with it.
One downside worth mentioning here is that Discord doesn’t currently have “Role-based Channel Invites”, which means that this is currently a two-step process (invite, and once they join, assign role), but I’ve talked to their team and it’s on their radar. This means inviting someone to your alpha will soon be as easy as just sending them a discord invite. Or having an ambient alpha opt-in somewhere on your site/etc.
For Cantata, I have an alpha-tester role I use that grants access to two channels — a store channel to actually download the game and a discussion channel meant only for people with alpha access to surface and bugs or feature requests. The role doesn't have to be store specific, and can easily integrate with any other role-centric Discord features.
Store Pages Can Track Non-Master Game Branches (and those branches can be nuked)
The other nice thing about store pages is that a store paged can be tied to a specific branch of your game that you’ve pushed to Discord. This works similarly to Valve’s system, but with the added benefit here that there is no overhead on the user to manually select a branch or opt in to an alpha. Because you can also create multiple store pages, nothing is stopping you from having separate store pages/roles to manage multiple branches at once, all inside your Discord channel. You could have an individual store page for your alpha, one for your beta, one for staging, etc. Then you could tie roles to those and separate access to each. Finished with a branch? Nuke it on Discord's end and make sure players don't accidentally play old versions of your game.
Discord also auto-updates like Steam, so you can ensure your players always have the latest builds. Discord also also offers a DRM solution, which means you can wrap your game and enforce Discord’s entitlements for a player to run your game. This is great as it means that alpha builds can’t easily slip around and you can ensure any delivered builds are getting patched.
All this and more is covered in Discord's developer documentation portal, but I wanted to highlight here what I think are some of the best bits.
But enough gushing, lets talk about how to actually do this.
Wrapping an Alpha to Push to Discord
If you read the last post, you know that as part of my build step with Unity I create a single build folder and then inside that nest a pc/osx folder that contains the proper builds. What I don’t mention in that is why. It's obviously not good enough to just build my game locally and Discord magically know I built it, so this next section goes into how to get your game uploaded to Discord. Which is what brings us to the next step in the build/deploy chain, working with Discord's Dispatch utility and creating a manifest.
Setting up Dispatch
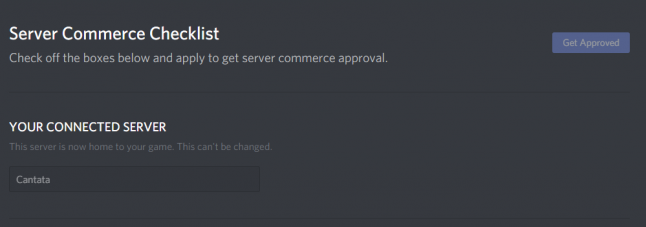
To get started, I'm going to skip the part where you setup a Discord developer account, an Application, and a SKU, as Discord has great documentation on how to do that here. One thing to note as part of doing this process is that, despite what it may feel like you're doing, your game will not appear on Discord's public store front until you explictly tell it to. Doing an alpha this way is still kind of un-tested waters, so the language on this page assumes you aren't doing that but are instead trying to publish on the public storefront. But don't worry, your game won't go live unless you explicitly tell it do on your developer portal here (notice that mine isn't even available because I haven't completed all checklist items):
So in lieu of spending time talking about setting up a developer account, the main thing we're going to focus on is Dispatch, Discord's command line application that bridges the gap between your game on your computer and your game being available on Discord. Before I really get into it, I want to point out that a lot of what I'm going to say is said in greater detail on Discord's documentation page "Branches and Builds," but I wanted to provide an MVP guide for people who want to get their alpha on Discord with the most direct path possible.
First off, download Dispatch from this page. Once downloaded, you need to make the program runnable from your machine on the command line. The linked Download page has guides on how to do this for Windows and OS X, but I'll assume Windows here for brevity.
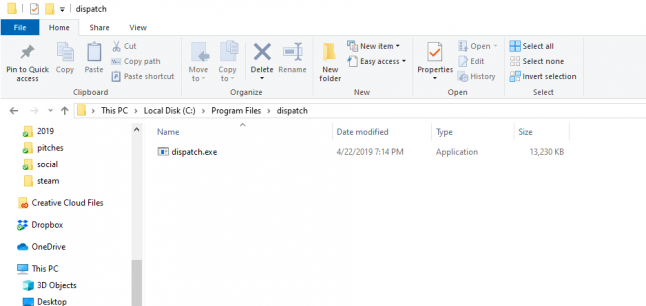
Once downloaded, place Dispatch somewhere static on your computer that can be easily referenced for use in your PATH (essentially, an index or directories who's programs can be accessed from anywhere on the command line). Because we're on Windows, I chose to just create a folder in Program Files called "dispatch" and placed the .exe in there:
Once it's in the folder, you'll need to update your PATH. To do this, press the Windows key and start typing in "Environment Variables". It should auto complete and show you this message:

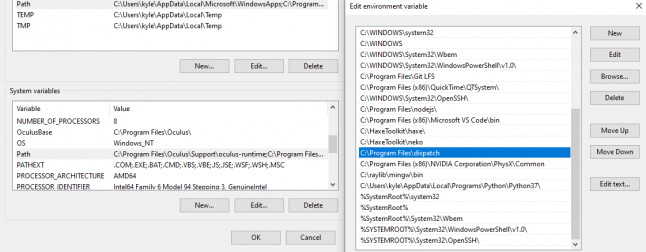
In the window that pops up, click "Environment Variables...", find Path in the System variables section, double click it, and you should already see a list of some variables in your Path. Click new, then add the folder path of Dispatch. For me, that looks like this:
After you do this and apply your changes, you should be able to verify Dispatch works on your command line by opening your command line (Win key + type "cmd" if you can't find it), and type in dispatch help and you should see something like this:
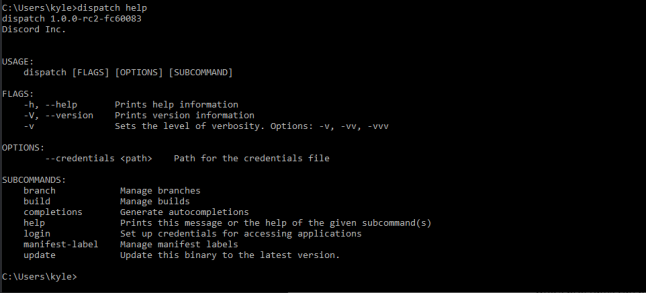
If you see this, congrats! Dispatch is installed! Run dispatch login in your terminal to log in with your Discord account (that your app should be setup with as part of the first part of this section), and you're all good to go!
Publishing with Dispatch
After Dispatch is setup, you'll need to do three things: create a branch for you game to live on, push your game to that branch with a manifest, and then publish that build for your users. Again, this is covered in much more detail here, but I want to get you going as fast as possible.
Create a Branch
Using the application ID you got from Discord when setting up your application, run this (substituting APPLICATION_ID for your application Id you got during developer setup and BRANCH_NAME to your desired branch name):
dispatch branch create APPLICATION_ID BRANCH_NAMEA sample command would be:
dispatch branch create 111111 closed_alphaAfter the branch is created, run the following command to get your BRANCH_ID:
dispatch branch list APPLICATION_IDPush an application to a branch with a manifest
A Manifest for Dispatch is essentially a config .json file that tells Dispatch where to find your game and how to handle your game's build. A Manifest can do a lot of things, but all we'll have ours do is push our built game to Discord's servers. Here's my manifest for pushing my game to PC and OSX. Feel free to copy it (changing out APPLICATION_ID with your idea and changing any path names) with the caveat below:
{
  "application": {
    "id": APPLICATION_ID,
    "manifests": [
      {
        "label": "cantata/osx",
        "platforms": ["macos"],
        "locales": [],
        "local_root": "./osx",
        "file_rules": {
          "mappings": [
            {
              "local_path": ".",
              "install_path": "."
            }
          ],
          "properties": [],
          "exclusions": [
            {
              "local_path": "**/*.pdb"
            }
          ]
        },
        "launch_options": [
          {
            "name": "Cantata",
            "executable": "cantata.app",
            "arguments": [],
            "platforms": ["macos"]
          }
        ]
      },
      {
        "label": "cantata/pc",
        "platforms": ["win32", "win64"],
        "locales": [],
        "local_root": "./pc",
        "file_rules": {
          "mappings": [
            {
              "local_path": ".",
              "install_path": "."
            }
          ],
          "properties": [],
          "exclusions": [
            {
              "local_path": "**/*.pdb"
            }
          ]
        },
        "launch_options": [
          {
            "name": "Cantata",
            "executable": "cantata.exe",
            "arguments": [],
            "platforms": ["win32", "win64"]
          }
        ]
      }
    ]
  }
}
This is about as sparse as it gets. Despite all the flaffing with curly braces and square brackets, this essentially says, make two versions of my game, one called cantata/pc and one called cantata/osx. The PC build is located at ./pc and the OSX version is at ./osx. The caveat above is that this manifest has to be run from a specific folder, with this specific platform directory structure, which is what I'll now do below.
If you read my last post, you may remember that when I build the game, I literally build it with this manifest's needed folder structure every time. So any build I do for Cantata looks like this:
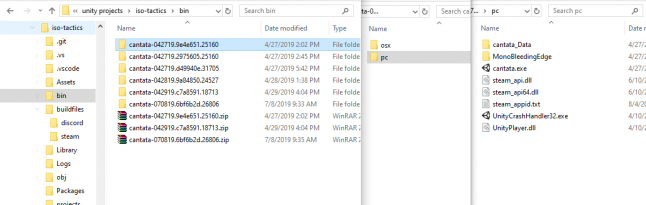
Can you guess where I run dispatch from? If you guessed "in the folder with the PC and OSX folders", you're right! This is also just me though. You could very well use absolute paths and run dispatch from anywhere, but I like having the paths be relative, the build structure pre-determined, and the manifest generic.
Assuming your setup is similar to mine (and you call your manifest discord-push.json), you would go to your build folder, and run this command:
dispatch build push BRANCH_ID /path/to/your/manifest/discord-push.json .The "." at the end specifies the folder specifies that the local root for the manifest to run in will be the current directory. For more info on Dispatch's command line flags, check out this page.
If you run that and it seems to go well, congrats! You're almost there!
Publish your pushed build
Once a build has been pushed to a branch, it isn't necessarily available for people yet until that build has been published. To get the BUILD_ID of the build you just pushed to be used in publishing, run:
dispatch build list APP_ID BRANCH_IDGrab the BUILD_ID that command returns, and then use it in the following command to publish your build to Discord:
dispatch build publish APP_ID BRANCH_ID BUILD_IDIf that works, hats off to you, you've published your build! If you build a new version of your game, you can step through this same process again, but skip the part where you create a branch (assuming you want to use the same branch). You just need to push and publish. Discord has also made it easier here: if you want to simply publish your pushed build after a successful push, you can simply pass the -p flag to your push command.
So doing the above again but skipping the explicit publish command in favor of auto-publishing, we would use this command:
dispatch build push BRANCH_ID /path/to/your/manifest/discord-push.json . -pEasy! But! Despite you publishing your build, your players can't access it until you create a Store channel for them to download the build from, so lets briefly touch on that.
Creating a Store Channel for an Alpha Game
After your game has been successfully published, you'll need to create a dedicated place for users to get that branch of the game from you on your server. To start, go to create a channel in your server like normal, but instead of creating a text channel scroll down and click Store Channel. Assuming you pushed a branch not named "Master" to Discord via Dispatch, you should see a "Beta Channel" option to toggle on in the store channel creation menu. If not, ensure your build was successfully pushed and published to Discord.
Select the "Beta Channel" option, select your branch name (this would be the name you used in Dispatch), and then, if you want the channel to be limited to only a certain group of people, select the "Private Channel" option and the role for people you want to have access to the channel. Putting it all together, the settings should look something like this:
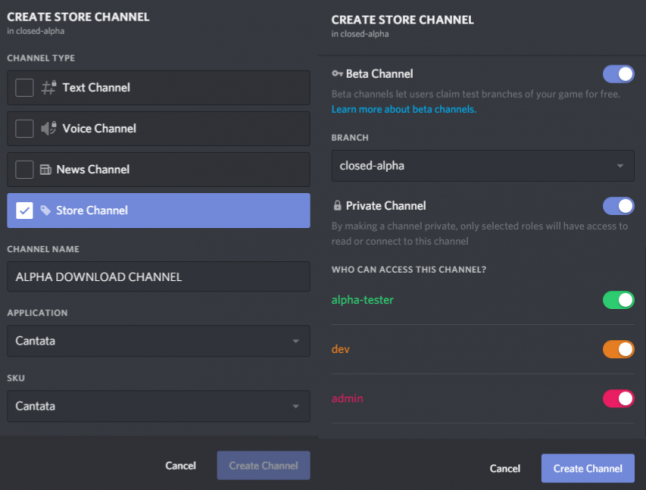
Click create, and you should see a new store channel and a big green button on the page that you (and your players!) can download your game from. Remember: if your store page is private, you'll need to assign Discord members the role to access that channel. As mentioned above, Discord still doesn't have role-based invites so this process may be tedious for managing a lot of users until they add in that functionality.
Where to go from here?
Now that your store page is setup, you'll likely want to upload a description of your game and some images to your page before starting to invite players. You can do all that (and more) from Discord's developer portal in your SKU settings.
You can also now make multiple store channels that track different Discord branches. Want to make a "Nightly" branch/page for builds from every night and a "Stable" branch/page for less error-prone builds? Go ahead! The beauty of having this all setup is that now the choice is really yours on how you want to get your game to your players!
Thanks for reading this! I'm really loving this setup and think it's a no brainer for people who want to test the waters of their game before even going really public with it. If you have any questions, feel free to hit me up on Twitter @kkukshtel. Additionally, I'd love it if you could wishlist my game Cantata on Steam! Thank you!
Read more about:
Featured BlogsAbout the Author(s)
You May Also Like