Daily news, dev blogs, and stories from Game Developer straight to your inbox
Sponsored By
Featured Blog | This community-written post highlights the best of what the game industry has to offer. Read more like it on the Game Developer Blogs.
In the previous part of this series, we added the web service that acts as interface between the frontend and the actual backend services. In this post, we learn how to persist state to a scalable database.
7 Min Read

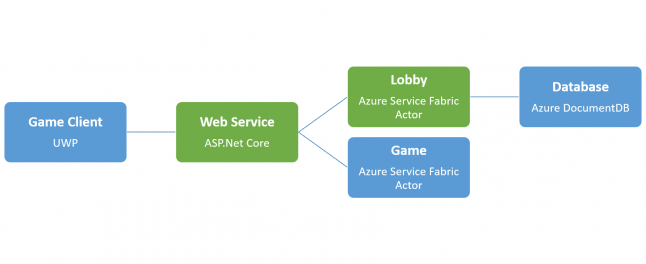
In the first part of this series, we've learned about the general architectural design of online games in the cloud. We created a new project with a single actor and deployed it to a local cluster for testing. Then, we added the web service that acts as interface between the frontend and the actual backend services.
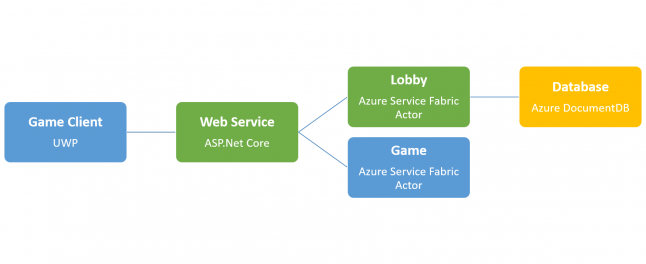
 Clearly, we want to do something useful with these services, such as granting our players a daily bonus for logging in. Now, we are going to learn how to persist state to a scalable database.
If you've missed the previous part and/or are just interested in how to setup the database, you can catch up by grabbing the source code that we've written so far from GitHub.
Local Database Setup
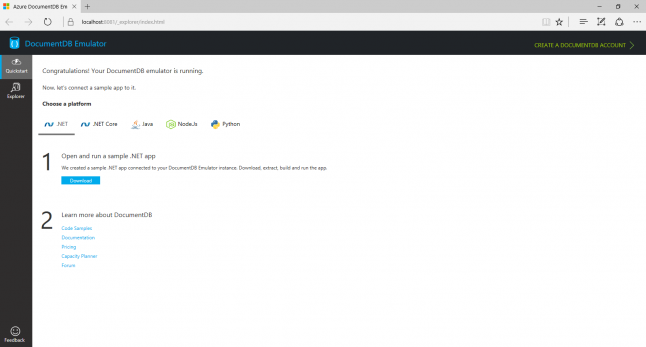
As always, it is very important to be able to setup and test everything locally first. Download and install the DocumentDB Emulator. After successful installation, the dashboard should open up in your browser. You can also open it by right-clicking the icon in the system tray and selecting Open Data Explorer...
Now that our local database is up and running, we need to teach our lobby actor to talk to it.
Right-click the LobbyActor project in the Solution Explorer and select Manage NuGet Packages...
Make sure the Browse tab is active (not the Installed tab) and search for Microsoft.Azure.DocumentDB.
Click Install and confirm all following prompts.
Our lobby actor is now able to act as DocumentDB client. If we expand the References node below the LobbyActor project, it should show a reference to Microsoft.Azure.Douments.Client.
Now, we're ready to write some actual code!
Creating the Database Connection
Open LobbyActor.cs in the LobbyActor project, and add a field for the database connection:
private Microsoft.Azure.Documents.Client.DocumentClient client;
Azure Service Fabric makes use of the concept of virtual actors. We may interact with virtual actors without worrying about creating or destroying them explicitly. Whenever any message is sent to an actor in Azure Service Fabric for the first time, i.e. any method of that actor is invoked, that actor will be activated. Actors may automatically be deactivated again to free up resources.
We want to open the database connection as soon as our lobby actor is activated. Add the following code to the method OnActivateAsync:
this.client = new Microsoft.Azure.Documents.Client.DocumentClient(
  new Uri("https://localhost:8081"),
"C2y6yDjf5/R+ob0N8A7Cgv30VRDJIWEHLM+4QDU5DE2nQ9nDuVTqobD4b8mGGyPMbIZnqyMsEcaGQy67XIw/Jw==");
For creating the client, we are passing the local connection URL, as well as the only well-known authentication key that is accepted by the DocumentDB Emulator.
Creating the Database
As we have learned before, we need to add the async keyword to the declaration of the OnActivateAsync method if we're going to run asynchronous operations from that method.
Then, we can ensure the database is created as follows:
// Verify the database exists.
const string DatabaseName = "GameDatabase";

try
{
    var uri = Microsoft.Azure.Documents.Client.UriFactory.CreateDatabaseUri(DatabaseName);
    await this.client.ReadDatabaseAsync(uri);
}
catch (Microsoft.Azure.Documents.DocumentClientException e)
{
    // If the database does not exist, create a new database.
    if (e.StatusCode == System.Net.HttpStatusCode.NotFound)
    {
        var database = new Microsoft.Azure.Documents.Database { Id = DatabaseName };
        await this.client.CreateDatabaseAsync(database);
    }
    else
    {
        throw;
    }
}
Because we'll be using DocumentDB to store data from now on, the following line can be removed from the method:
return this.StateManager.TryAddStateAsync("count", 0);
Creating the Collection
In DocumentDB, we are not working with database tables and rows as we would with traditional relational databases. Instead, we need to create a collection before we can insert documents into it.
Add the following code to OnActivateAsync as well:
// Verify player collection exists.
const string CollectionName = "Players";

try
{
    var uri = Microsoft.Azure.Documents.Client.UriFactory.CreateDocumentCollectionUri(DatabaseName, CollectionName);
    await this.client.ReadDocumentCollectionAsync(uri);
}
catch (Microsoft.Azure.Documents.DocumentClientException e)
{
    // If the document collection does not exist, create a new collection.
    if (e.StatusCode == System.Net.HttpStatusCode.NotFound)
    {
        var databaseUri = Microsoft.Azure.Documents.Client.UriFactory.CreateDatabaseUri(DatabaseName);
        var collection = new Microsoft.Azure.Documents.DocumentCollection() { Id = CollectionName };
        await this.client.CreateDocumentCollectionAsync(databaseUri, collection);
    }
    else
    {
        throw;
    }
}
Logging In Players
We're finally ready to add a login counter for our players. First, let's change the interface of our lobby actor, so we've got a method to call for logging in players. In the LobbyActor.Interfaces project (not LobbyActor), add a new class LoginResponse. We'll be using that class for defining the data to return whenever a player successfully logs in.
namespace LobbyActor.Interfaces
{
    using System.Runtime.Serialization;

    [DataContract]
    public class LoginResponse
    {
        [DataMember]
        public string Id { get; set; }

        [DataMember]
        public int LoginCount { get; set; }

        public override string ToString()
        {
            return string.Format("Id: {0}, LoginCount: {1}", this.Id, this.LoginCount);
        }
    }
}
The DataContract and DataMember attributes tell the runtime which properties to serialize and send over the network.
Now, we can change the ILobbyActor interface to provide a way for logging players in. Remove the GetCountAsync and SetCountAsync methods and add a method called LoginAsync as follows:
namespace LobbyActor.Interfaces
{
    public interface ILobbyActor : IActor
    {
        Task<LoginResponse> LoginAsync(string playerId, CancellationToken cancellationToken);
    }
}
Now that we've changed the interface, we need to change the actual implementation as well. In the LobbyActor class, remove the methods GetCountAsync and SetCountAsync.
The next step is to implement LoginAsync. Whenever a player tries to log in, we want to get his or her player document from the database, and increase the login counter. If no document can be found, we just create a new one.
Create a class called PlayerDocument in the LobbyActor project (not LobbyActor.Interfaces). This class looks quite similar to the LoginResponse for now:
namespace LobbyActor
{
    using Newtonsoft.Json;

    public class PlayerDocument
    {
        [JsonProperty(PropertyName = "id")]
        public string Id { get; set; }

        [JsonProperty(PropertyName = "login_count")]
        public int LoginCount { get; set; }

        public override string ToString()
        {
            return JsonConvert.SerializeObject(this);
        }
    }
}
The JsonProperty attributes tell DocumentDB how to serialize this document.
Next, we move the database and collection string constants out of the OnActivateAsync method, and implement LoginAsync.
private const string DatabaseName = "GameDatabase";
private const string CollectionName = "Players";

public async Task<LoginResponse> LoginAsync(string playerId, CancellationToken cancellationToken)
{
    PlayerDocument playerDocument = null;

    try
    {
        // Ensure player document exists.
        var documentUri = Microsoft.Azure.Documents.Client.UriFactory.CreateDocumentUri
            (DatabaseName, CollectionName, playerId);
        await this.client.ReadDocumentAsync(documentUri);

        // Get player document.
        var feedOptions =
            new Microsoft.Azure.Documents.Client.FeedOptions { MaxItemCount = 1 };

        var collectionUri =
            Microsoft.Azure.Documents.Client.UriFactory.CreateDocumentCollectionUri(DatabaseName, CollectionName);
        var playerQuery =
            client.CreateDocumentQuery<PlayerDocument>(collectionUri, feedOptions)
            .Where(p => p.Id == playerId);

        // Execute query.
        foreach (PlayerDocument player in playerQuery)
        {
            playerDocument = player;

            // Increase login count.
            ++player.LoginCount;
            await client.ReplaceDocumentAsync(documentUri, player);
        }
    }
    catch (Microsoft.Azure.Documents.DocumentClientException e)
    {
        if (e.StatusCode == System.Net.HttpStatusCode.NotFound)
        {
            // Create new player document.
            var collectionUri = Microsoft.Azure.Documents.Client.UriFactory.CreateDocumentCollectionUri
                (DatabaseName, CollectionName);
            playerDocument = new PlayerDocument { Id = playerId, LoginCount = 1 };
            await this.client.CreateDocumentAsync(collectionUri, playerDocument);
        }
        else
        {
            throw;
        }
    }

    // Return response.
    var loginReponse = new LoginResponse
    {
        Id = playerDocument.Id,
        LoginCount = playerDocument.LoginCount
    };

    return loginReponse;
}
Finally, we need to have our LoginController from the previous part of this series call our new login method. Open the LoginController class in our WebService project, and change its Get method, replacing the call to GetCountAsync by calling LoginAsync:
var response = await lobbyActor.LoginAsync(id, new System.Threading.CancellationToken());
return response.ToString();
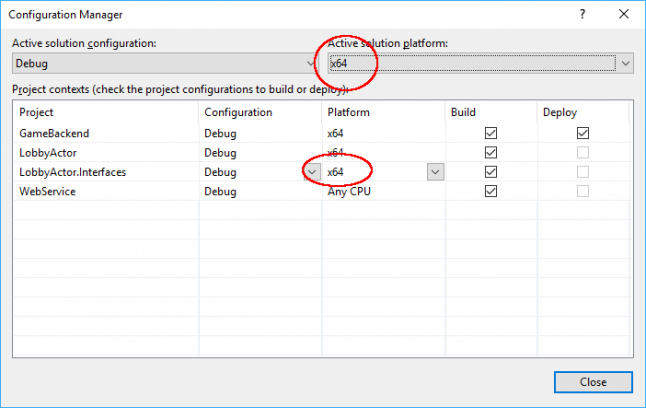
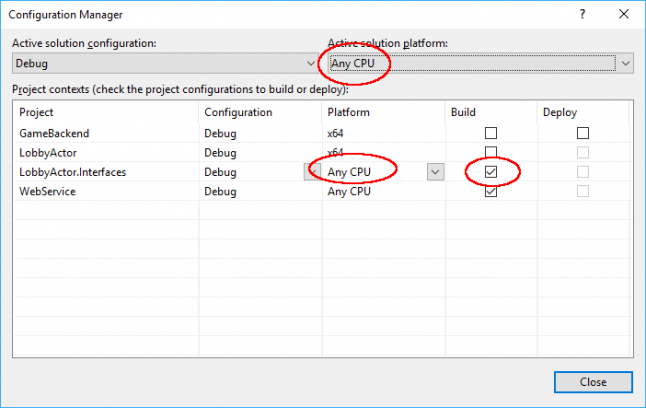
Hit F5 to build and run our application. If you should run into any compile errors for the web service, make sure you are building the AnyCPU configuration for the LobbyActor.Interfaces project.
If we call any login URL for our application now, such as http://localhost:8557/api/login/npruehs, we can happily see the results:
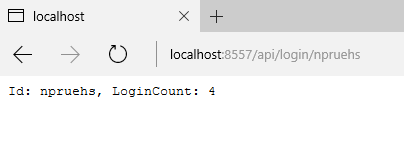
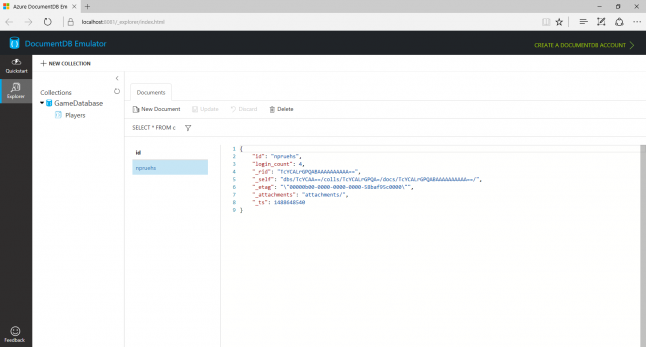
We can also verify the result in the DocumentDB Emulator Explorer that opened up earlier, by refreshing its view:
Congratulations! You've successfully connected the service to a scalable document-based database!
As always, the full source code of this part is available at GitHub.
In the next part of this series, we'll finally create an UWP client and have it connect to our backend.
References
Microsoft. Use the Azure DocumentDB Emulator for development and testing. February 2017. https://docs.microsoft.com/en-us/azure/documentdb/documentdb-nosql-local-emulator
Microsoft. NoSQL tutorial: Build a DocumentDB C# console application. December 2016. https://docs.microsoft.com/en-us/azure/documentdb/documentdb-get-started
Read more about:
Featured BlogsAbout the Author(s)
You May Also Like