Featured Blog | This community-written post highlights the best of what the game industry has to offer. Read more like it on the Game Developer Blogs.
In this in-depth analysis, I offer my perspective on the subtle player direction tricks that makes Super Metroid a tight and focused experience, while never quite letting the player out of the illusion that they are exploring Zebes on their own.

This Super Metroid analysis has been lying around on my own website for a while. Upon reading Mike Stout's Zelda dungeon design analysis here on Gamasutra, I realized that there is really no excuse not to post this here as well. Here I can assume that readers are somewhat familiar with the Metroid franchise or at least some other form of "Metroidvania", and skip some of the sight-seeing in favor of focusing on level design and the subtle tricks the designers seem to have used to direct the player through what may seem to be a haphazard experience, but is not.
This analysis takes most of its material from the first playthrough of the game by my friend Rufus, which I had the pleasure of observing from beginning to end. Watching him, a complete newcomer to the genre, still find his way around Zebes in pretty much the same way I'd do, almost never once getting lost or stuck for any considerable amount of time, made me question how that could be. This analysis is my answer.
First, I would like to establish what I percieve to be some of the core psychological phenomena behind the Metroid experience before we start.
Always Something
Before Super Metroid invented its supreme player leading skills, the original Metroid set up a safety net against frustration, which has always served the genre well. By hiding voluntary upgrades all over the place, it ensured that even when you don't find the correct path, at least you find something valuable. This greatly reduces the potential frustration of any Metroidvania experience, and encourages exploration of not just key locations, but the whole world.
Plot Twist of the Upgrade
Whenever a Metroid player aquires a new power-up, her mind races back in time in a way not unlike what happens at a turning point in a movie. When a secret is revealed we are forced back through the story to mentally review everything we've seen so far, sometimes changing the interpretation of entire scenes. So that's why Obi-Wan was so worried about Luke facing Vader. What did this change? This happens in Metroid too.
So I picked up the Ice Beam. I can freeze enemies solid and stand on them. Where can I use that? What did this change? I am forced to reevaluate every room I can remember, and see how this new technology fits in. And the result is that same feeling of ”Of course! That is the solution to that room in lower Brinstar, and it always was!” The player comes out of the experience with a mental list of rooms where she believes the new trinket can be of use. In most Metroidvanias you can only hope that the right path is on this list, but in Super Metroid it almost always is. I will explain why in each case as we go along.
In the Room and On the Map
Since the player never completely leaves an area behind and forgets about it, the game world constantly expands in the mind of the player. By never completely exhausting an area before moving on to the next, Metroidvanias promise us that if we remember and acquaint ourselves with the game world, it will not go unrewarded. The ever-accessible map is a huge help in keeping track of it all, but players will not be interested in looking at the map at every turn. Instead, they start to create a mental map of Zebes.
Because of this, the experience of most Metroidvania titles takes place on two levels simultaneously. On one level, you are traversing a dangerous corridor, avoiding lava puddles, solving riddles and shooting alien creatures. But at the same time, your mind is in macro mode. It sees you moving through the map, and is plotting your long-term course. This type of simultaneous navigation challenge ensures interest even when one level fails to enchant us.
The Player Will Follow Suit
The design of Super Metroid takes a laid-back approach to the problem of interactive storytelling. In every instance there is a clearly identifiable best solution, a certain way in which the game is clearly meant to be played. The game constantly assumes that the player behaves in exactly the way the designers expected. In an attempt to ensure this, the game is riddled with subtle hints and tricks to pull the player in the right direction, and much of this analysis will focus on these.
But it is important to note that Super Metroid recognizes the futility of this approach. The player will never play exactly the way the designers have planned, and so the game never once relies on player cooperation. It expects it, but doesn't rely on it. There is an important difference. Super Metroid will always allow you to take a detour, go exploring all the wrong areas and miss out on core concepts and scenes. But it always leaves a back door. Sooner or later, you will experience all of the crucial elements. Possibly in the wrong order, but that's okay. As long as you get it, Super Metroid is fine with it.
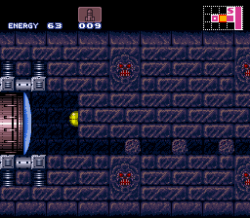
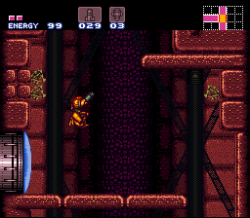
A premier example of this at the micro level is found in the room in the picture, near the beginning of the game. The player has bombed her way through the blocks in this tunnel from right to left, and now upon returning she finds the bombable blocks respawned. What a bore! But as the player starts bombing, Super Metroid knows that players are likely to keep pressing the D-pad to the right even though there's a wall in the way - there's just no point of letting go, we'll move right soon enough anyway. And so when the first bomb launches the player into the air, she will move right into this hidden tunnel, bypassing the tiresome bombing work. This is not something that every single player can be expected to experience. But most will - and the rest will manage.
ACT 1: TOUR OF ZEBES
The first part of Super Metroid is characterized by nearly constant forward motion, with the player often being limited to a relatively small area so as to reduce the risk of getting lost. It serves as an introduction to the basic concepts and areas of the game. It is during this first ”act” that the game's excellence in leading the player is most prominent and most important.
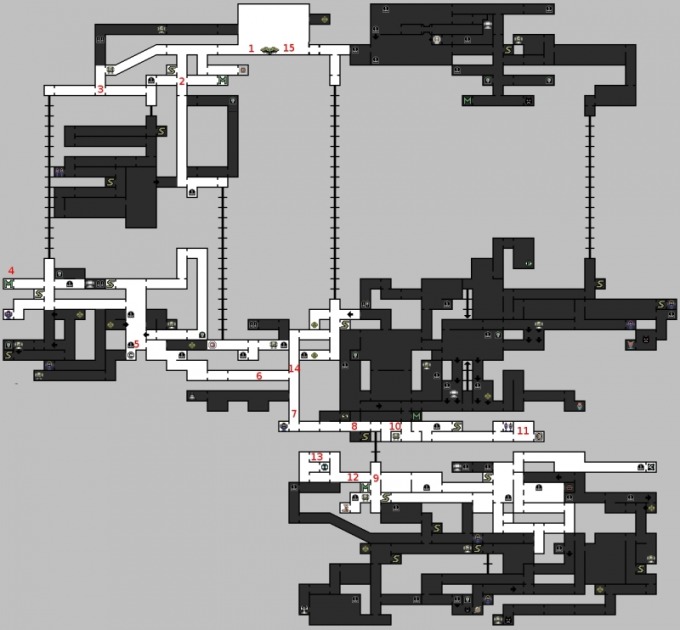
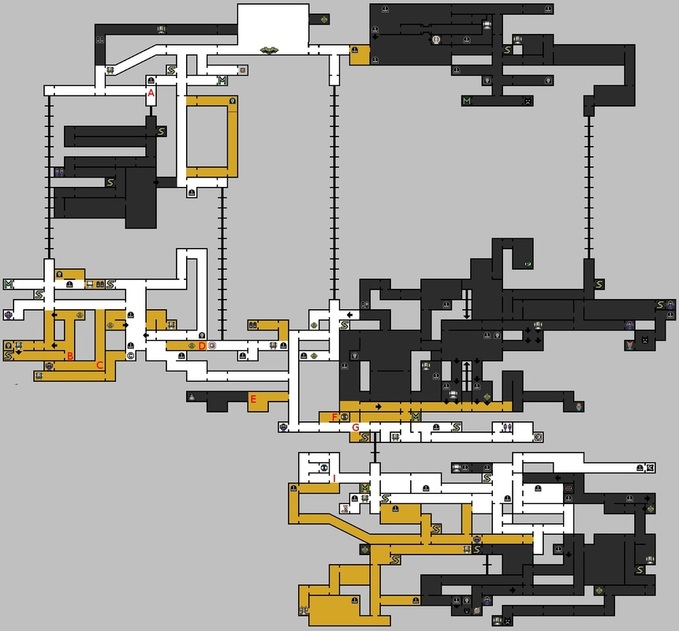
This map shows the parts of the world that will be accessible during the act. The greyed out areas are inaccessible and thus not interesting for now. The red numbers in the map each correspond to a text section below, so you can easily follow my path through Planet Zebes.
After a linear warmup level at the Ceres space colony which serves to introduce the core mechanics and set up the story premise – finding the Metroid larva stolen by Ridley – we land on the barren wastelands of Crateria.
1. The Ancient Art of Going Left
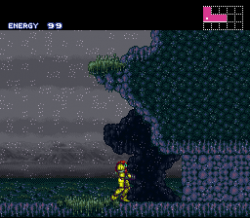
The game doesn't waste time trying to establish its nonlinear nature by making left (traditionally in games percieved as backwards) the correct and only way to proceed. A similiar design opens the original Metroid, where the player was allowed to travel through several rooms to the right before needing the morph ball upgrade to proceed – an upgrade which was to be found just to the left of the starting point all along – Super Metroid's way is more gentle by being more firm. To the right there is an insurmountable stone wall. It's clear that it's breakable, but you don't have the hardware yet. Turn around. Turn left.
2. The First Tunnel – There and Back Again
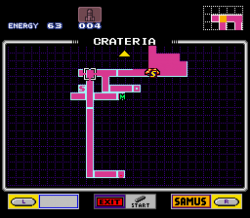
The subsequent segment is a clear introduction to how Metroid works. You are led through a strictly linear tunnel, surrounded by doors you cannot open yet. After your first upgrades at the bottom (the Morph Ball and missiles), you realize there is nothing more to find, and you must return through the tunnel. To counter the tedium of retraversal, the tunnel is mostly vertical, and so presents different challenges when you try to get back up than it did when simply falling down (though this was seemingly judged inadequate, as the tunnel was also filled with space pirates on the way back). The retraversal is important, because travelling this same route in both directions lets the player quickly set up a mental safe zone. This tunnel now feels perfectly safe, explored and familiar. There is already a part of the world to call home – something that takes most Metroidvanias hours to achieve.
Retracing your steps of course also lets you open many of the doors you couldn't on your way down, granting an efficient introduction to the hidden voluntary powerups. One of them includes the Map Room of Crateria, which reveals little more than what you have already explored. It does however reveal a series of less-than-obvious hidden rooms leading to the next powerup – the Bombs. These allow you to travel west, towards Brinstar.
3. Which Door to Choose?
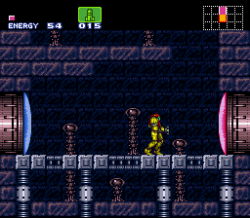
On the way towards Brinstar the player is presented with a shaft filled with space pirates which can only be killed using missiles (the space pirates are constantly used in this way to showcase the power of new weapon types). They also drop missiles when killed, ensuring that you have enough ammo to counter the next threat. Now, at the bottom of the shaft you see these two doors, like in the picture to the right. One of them requires missiles to open, the other one doesn't. Now that you have your missiles equipped and warmed up, what will you do? The player is compelled to go right.
This trick is important because it will lead a majority of players to a very important room. It's okay if they discover it later, but Super Metroid clearly wants us to find it as early as possible, as it is the game's most important indicator of progression. I'm talking about the statue room, where the game's four major bosses are depicted. When they are all defeated, this room will become the gateway to the final area, Tourian.
The left door will lead the player onwards to Brinstar.
4. The Map of Brinstar
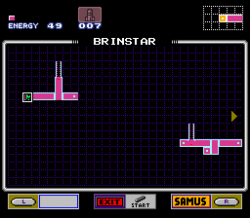
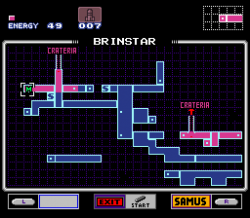
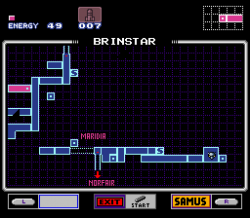
This is what Brinstar looks like when you first enter it. One of the first things you will find in the area however, is the Map Room, which reveals a majority of the area's structure (as seen in the pictures below). Unlike Crateria's Map Room, this reveals the full monty. With the exception of a clearly missing connection between the eastern and western parts of the area, this is essentially all you will ever need to know about Brinstar, and it makes your journey through this area a lot more straightforward than most of the game.
Super Metroid will soon take advantage of the fact that this particular map is so easy to find, in the one place where the map is your only hint to find the right path - it reveals the existance of Kraid's lair in the far east (see section 10).
5. In Plain Sight
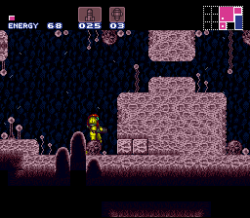
One of the game's most important voluntary upgrades is hidden here - the Charge Beam. But there won't be many players missing it. In this corridor, which is likely to be traversed several times, two blocks stand out like a sore thumb. Not only that, but the ground to the right of them seems strangely disconnected, and at the bottom of the screen we see a hint of the cieling of another room. Each of these hints would be enough to pull the player's attention, and by now the player knows to blast everything that calls attention to itself. This way the Charge Beam can feel like a hidden gem while being practically impossible to miss.
6. Examination of an Unclear Mechanic
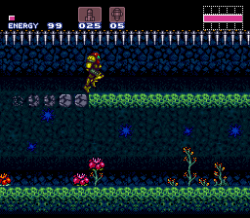
This room brought me great pain when I first played Super Metroid. Only later did I realize that the game did it all for my own good. What you see is the first room that requires you to use the run button - if you don't run, you will fall through the brittle floor. And if you haven't yet figured out that you can run, you're in for some frustration.
As it turns out, this is only the first of many rooms where you have the key to progress, but you might not know it yet. Whenever this happens, Super Metroid does the only right thing. It locks you in. Because the only thing that is more frustrating than not knowing what to do, is to turn back and give up when you were inches from the truth. That won't happen here, nor anywhere in the game. You will stay in this room until you learn to run. It's a harsh school, and students of modern game design may feel that the game should have just printed it out - Hold B to run. This is just not how Super Metroid rolls. It will never let go of the illusion that you are on your own. It will hold you by the hand, but it will never admit it.
7. Shaft of No Return - Lower Brinstar
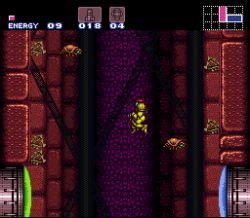
Traversing Brinstar from west to east, you will eventually find yourself falling down this shaft. The shaft is several screens high and populated with invincible flying bugs. There is simply no hope of returning. This sets the mood for the next section of the game, in which exploration only serves as a means to fulfil an overarching goal - escape back to the world you know.
The point of no return also serves to keep the player focused. If the player had access to the "old world" during her upcoming adventures in Norfair, she might be tempted to try her new powerups back in upper Brinstar and Crateria. By closing the road, Super Metroid essentially tells the player that the answer lies in the lower half of the map, and spares her the cognitive hassle of having to remember the entire world. This will be demanded later, but not until the player is trained and ready for it. For now, the upper areas simply do not exist. We're in world 2, so to speak.
8. The Mystery of the Fourth Area - Maridia
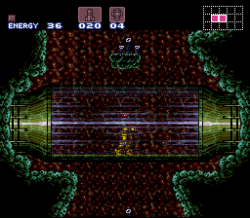
Lower Brinstar acts as little more than a passageway to Norfair, but on the way there it hosts one of the game's most spectacular tricks - the mystery of Maridia. A short corridor that seemingly belongs to lower Brinstar, is actually described by the game map as a separate area. This corridor, which is incidentally placed in a chokepoint of a passage which will traversed and retraversed over and over before the game is over, is actually the only part of Maridia we will see for most of the game.
This is a simple yet extremely effective design to create curiosity. We suspect that Maridia is essentially a fourth of the world, but while the player slowly conquers Crateria, Brinstar and Norfair, Maridia remains a complete and utter mystery. The knowledge of Maridia keeps the player nailed to the chair, and ensures that she never assumes the world to be fully explored. As long as there's Maridia, there will be the promise of something significant left to find. It's actually strange how seldom you see this in games nowadays.
9. Stuck in Norfair
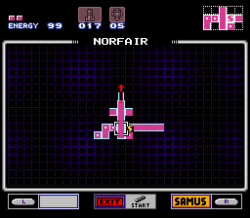
With the sky-high shaft blocking your way to the west, you will really have little else to do than explore Norfair. But as it turns out, Norfair is nigh inexplorable due to extreme heat in most of its rooms eating your health away. So the parts of Norfair you can actually reach are illustrated by the map above.
With such a limited set of options, it is child's play for Super Metroid to lead you to your correct destination - the High Jump Boots upgrade at the bottom left of the map. Still in the beginning of the game, the designers can be accused of over-utilizing the trick of shutting the player into a relatively small environment to avoid her getting hopelessly lost. But no one can deny that it works. And in this particular instance it has additional effects...
10. Lost in Norfair
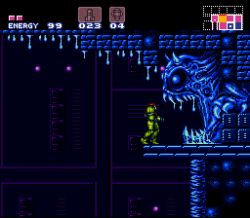
As it turns out, the High Jump Boots do not do much to open up Norfair, so the available area is still miniscule. This prolonged situation of near-captivity will define the player's relationship to Norfair for the rest of the game. Between scouring Norfair for the High Jump Boots and scouring Norfair for where to use them, most players are likely to completely exhaust the available rooms, creating a strong feeling of familiarity, however hostile. This is used in several ways. Not only does it help establish the mood of being stuck in Norfair and the goal of escape, but the game also uses the captivity to ensure that the player is exposed to a number of setups, most importantly the one discussed in section 12.
So where do the High Jump Boots go? Kraid's lair. Players who have already found the entrance will be too excited by the spooky door to be able to get it out of their minds, and the ones who haven't, will soon. This is once again due to the fact that the player is stuck in Norfair and eastern Brinstar and has limited options.
As I mentioned earlier, finding Kraid's lair relies heavily on finding the Brinstar Map Room. Players who haven't found the map may find themselves stunted here, as the entrance is concealed behind a wall by the elevator to Norfair - a room breeming with innocence. The problem is that the Map Room is in western Brinstar - an area now completely inaccessible due to the one-way shaft. This situation has extreme potential for frustration and should be seen as a design flaw, but it should be noted that it also boosts the familiarity effect.
11. Bigger Than You Think
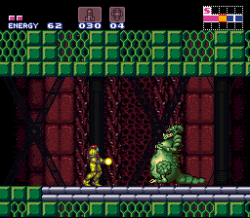
Kraid, the first of the four major bosses, is a returning character from the first Metroid. Back then, he fooled us by sending a weak clone of himself before the actual boss fight. This trick is reprised in Super Metroid, but on a completely different level. There is still a Kraid clone, and it closely resembles Kraid from the first game. Expecting the real Kraid to look similar, the player is unpleasantly surprised when the actual Kraid is big enough to cover the screen! But it doesn't end there - the epic battle culminates in Kraid breaking the cieling and stretching to his full length, which is even bigger - nearly enough to cover three screens. It always takes elegance to be able to pull the same trick twice in a row.
After defeating this important creature (clearly important since it was depicted in the statue room in Crateria, described in section 3), Super Metroid offers up a suitable reward. The Varia Suit not only opens up the hot sections of Norfair, it changes Samus' appearance in a dramatic flash. Many would call this the end of Super Metroid's first act - the first boss has fallen and Samus has changed.
But bear with me. The tour isn't over.
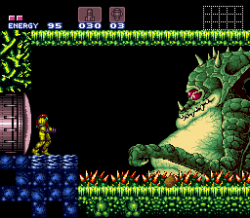
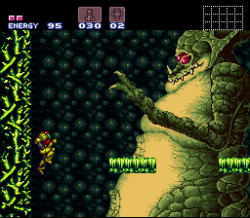
12. Where to Use the Speed Booster
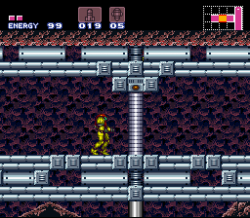
The Varia Suit cracks Norfair open by allowing Samus to traverse the hot chambers unscathed. There is only one way to go (although it twists and crosses itself enough to feel non-linear, much like the Zelda dungeons), and after an ultralinear series of challenges the player is lead to the next powerup - the Speed Booster.
This is the first real instance of the upgrade plot twist described at the beginning. For the first time there is no place close by where the new upgrade can be of use, and the available area is growing quite huge. So where to use the Speed Booster? The list is assembled in the player's mind. Those with good memory may remember places in the "old world", but these are not interesting at the moment (provided the Speed Booster doesn't let you climb the shaft of no return, which it doesn't). A number of Norfair locations are sure to pop up on the list, but there is only one that is more or less guaranteed. This is the room depicted above.
Why is this room so memorable? Well, players have spent a considerable time examining every wall in the beginning of Norfair. That familiarity helps now. In this room in particular, doors are slowly lowered as you approach them, and only with the speed boost can you slip through in time. During the early Norfair captivity, the challenge of this room is unique enough to leave a deep impression in the player's memory. To further boost the memorability of the room, Super Metroid intentionally lets players through the first door, but not the second. This creates a panic-filled situation where you get stuck between doors and need to find a secret way out. It creates a lasting memory of a traumatic event that could have been averted if you had only been able to run a little bit faster.
And now you can.
13. Where to Use the Ice Beam
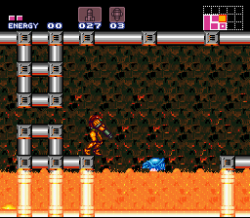
Beyond the sliding doors, we quickly come upon the Ice Beam, and with it we face another exquisite upgrade application. Where could freezing enemies solid possibly be of use? Again, there are several places in Norfair where this could lead to minor powerups. But there is also one Right Way, and Super Metroid needs to make sure this is among the rooms the player thinks of.
So in the next room, we encounter this enemy, and are encouraged to freeze it and stand on it to cross the pool of lava. The enemy is familiar. It is the invincible flying bug from the shaft of no return. A flash of insight - could it be possible to... There's only one way to find out. As it turns out, the escape from Norfair is indeed close at hand.
14. Think You're in Control?
It is indeed possible to climb the shaft by freezing the flying aliens, and for one quivering moment Super Metroid stands on the verge of losing control. If the player enters the door to the left in this picture, she will be back in the "old world". Now armed with the High Jump Boots, Varia Suit, Speed Booster and Ice Beam, the list of potential applications is way too large for the player's working memory to handle. If she enters that door, chaos will ensue. Super Metroid realizes that this chaos is ultimately inevitable, but it has a much better way of presenting it hidden up its sleeve.
So instead of entering that door, most players will wonder why they never jumped up to that platform. By now they are so used to their High Jump Boots (the first thing they found in the new world) that the notion of previously being unable to reach it seems unreal. They're here to explore the corners and crevices of the old world, and this is as good a place to start as any.
EDIT: It has been pointed out to me that the game is in fact more heavy-handed than that. Should the player go left through the door, they will be back in the room where they learned to run, remember? Remember how that room shut the player in? That block is still in effect, and is unveiled as an elegant solution to two completely different problems!
Anyway...
As it turns out, the path upwards is the Right Way, and quickly leads to yet another powerup - the Power Bomb. The chaos previously feared grows even more powerful, but for the moment Super Metroid has you trapped in a remote corner of Brinstar. Rather than going back, the idea of Power Bombing the yellow door leading upwards seems to reap more immediate rewards.
It's like stealing candy from a child, really.
15. Full Circle
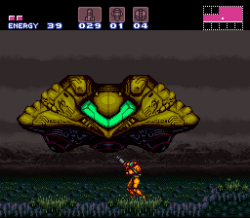
The player is on an exploration high. The promise of mountains of loot in the old world, powered by the recent super-fast progression through the Power Bomb area makes us careless. And the ensuing shaft is too easy and too linear for most players to bother checking the map.
Before you know it, you are back in Crateria, right where you landed at the beginning. The game clearly tries to delay the moment of recognition until as late as possible - even the music in the cave where you surface (which is part of Crateria) is specially scripted not to change from the Brinstar music until you reach the outdoor environment.
This is the first major turning point of Super Metroid. The game literally comes full circle, and we are back at square one. The chaos that has been building for the last hour or so is released at full power. Since you're back where you started, you have no idea where to go. The old world as well as Norfair lie at your feet, and they're both filled with opportunities to use your new toys - not only the High Jump Boots, Varia Suit, Speed Booster and Ice Beam, but also the Power Bombs. It signifies a radical and complete change of pace for the whole game. To emphasize the change, Super Metroid pulls an expertly timed change of music. The previously quiet Crateria is now graced with a grand, spacious piece which conveys the feeling of having just scratched the surface.
Super Metroid lies at your feet.
ACT 2: EXPLORATION
Immediately after the first circle, the guiding hand of Super Metroid almost completely disappears, leaving the player at the mercy of his own curiosity and will to explore. To make this experience worthwhile, almost all of the game's optional secrets are made available. The ancient Metroid feeling of "I didn't find the way forward, but I found something cool" is elevated to new heights, when what you find is often much cooler than the old missile expansions and energy tanks. Where almost all other Metroidvanias (or other adventure games for that matter) call this "Endgame" and save it until after the credits, Super Metroid utilizes it as a welcome change of pace.
16: Back to the Old World
Actually, the Right Way isn't in the Old World at all. It's where you'll least suspect, and feel least inclined to look - in the very same Norfair you've spent the last few hours trying to escape. This encourages the player to thoroughly explores Brinstar and Crateria and find as many of their secrets as possible before moving on.
Super Metroid has the self-confidence to expect curiosity from its players at this point, and wisely leaves time for them to explore. As speedrunners know, the fastest way would actually be to turn back and head down to Norfair immediately after getting the Power Bombs, completely bypassing the emotional moment of the closed circle, not to mention all of these secrets:
A - The Secret of the Statue Room
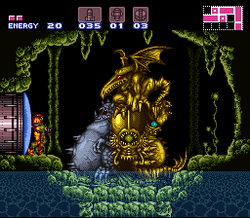
The fastest way from the landing site back down into the underground leads right past the statue room. For those players who managed to miss it the first time around, this is a second chance, and one that will be difficult to pass up with the explorative mindset that dominates the game at this point. But even if you've been here before, you will now witness the greying out of Kraid's statue, clearly heralding that something will happen here once the other three have fallen. To make sure that you don't miss the ceremony, the game subtly locks the door until the show is over.
B - Wall Jumping
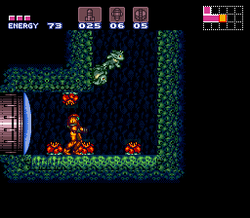
By Power Bombing the floor in the first room of Brinstar, you will uncover a new area with a few common powerups. But to make it back up, you will be forced to master one of the game's secret techniques.
For many players, this is where they realize the somewhat cumbersome wall jump even exists, instructed by the three adorable Etecoons that perform each jump ahead of you.
Now, learning to wall jump can be difficult, and might not be seen as a reward by all players as they could just as well have learned it without the Etecoons. With that in mind, trapping the player at the bottom of this shaft until they learn to do it may seem a bit harsh. Super Metroid sweetens the deal somewhat by giving the player an opportunity to save down there, and by providing an easy way out - if you can just pull off one clear wall jump you will reach an escape tunnel, but to get a Power Bomb Expansion you have to reach the top.
C - Learning to Fly
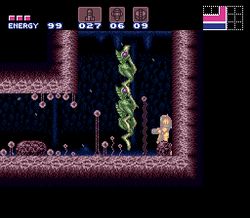
There is a second secret technique, which is technically available once you find the Speed Booster, but may be difficult to uncover. How to show it to the player? Rather than opt for a brief text screen, Super Metroid throws the player into a nigh bottomless pit by paving the floor in a particularly long and speed boost-friendly corridor with speed boost-sensitive blocks. It's a trap that every player I've watched has fallen into.
All you have for company in the long corridor at the bottom is a strange ostrich-like creature which spends its time sprinting until it reaches the pit, then it squats and is violently thrown skyward and offscreen.
Before you can escape the pit, you must realize that you can do the same. By accelerating to the Speed Boosters full potential and then sitting down, Samus will charge a bizarrely powerful jump which is capable of breaking speed boost-sensitive blocks. Players will soon break free and go on with the adventure in awe of abilities they didn't know they had.
D - Closed Circle 2.0
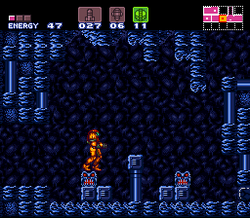
The Power Bombs enable something, well, I wouldn't call it a secret. But certainly something worth discovering. It turns out one of the yellow doors in central Brinstar lead to nothing but a big wall. It's to be expected that a Power Bomb will bring it down - what isn't expected is what lies on the other side. As the camera scrolls right, we recognize the place where the Morph Ball was first found, not only in this game but in its predecessor as well. The shortcut to Old Brinstar is a potent moment - it proves that everything is connected, and that secrets lay where you least expect them. If even the room from another age still has something to hide, which room hasn't?
E - Setting up the X-Ray
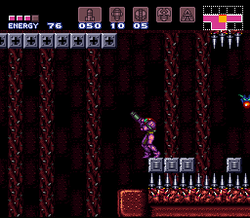
Just above the Shaft of no Return one of those yellow doors has been taunting you for long enough, and it's time to do something about it. Or so you thought.
Sure, you can open the door, but it's all but impossible to progress through the corridor, which is filled with spikes and requires either very advanced use of the Ice Beam or something you don't have yet - the Grapple Beam.
This is something Super Metroid seldom does - letting you pass one roadblock, only to present you with another. The frustration of this particular instance is a pretty good idea, though, as it will ensure that you return once you get the Grapple Beam and show this spiky corridor who's boss. And ultimately, that's why so few players miss the important sidequest upgrade that resides there - The X-Ray Scanner.
F: The Spazer
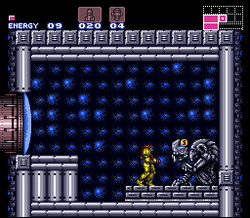
The most accessible example of Super Metroid's famous sequence breaks, the Spazer is actually accessible through somewhat clever wall jumping early in the game (notice the lack of Power Bombs or Varia Suit in the picture?), but "officially" requires the High Jump Boots. Not much to say here apart from that, it's a pretty redundant beam upgrade, but definitely worth adding to the pile of unique stuff that can be found (almost) only after returning to the Old World.
G: Breaking Into Maridia
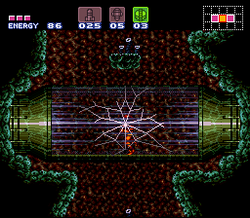
Finally, there is a bizarre adventure waiting for those who are really curious about that glass tunnel which is the only thing we know about Maridia. No, you're still not ready to explore this vast area - but nothing can stop you from trying. Not anymore.
Why not? The answer is as usual in this chapter: because you now have the Power Bombs. And you can, somewhat unexpectedly, use them to shatter the tunnel once and for all.
Yes, you can access the bottom floors of Maridia, but all it amounts to is one long dead end - and a frustrating one at that. There are two movement mechanics in Super Metroid that are so strange that I still haven't figured out how they work. One of them is how Samus handles in water without the Gravity Suit, and water so happens to be Maridia's element. She just seems to slide left and right randomly. The other one is the shady timing required for jumping out of quicksand - which is Maridia's secondary element. The internet said it best: GLHF.
So ultimately, all there is to do is make your way back (if you can), and keep wondering what the purpose of Maridia might be. Well, at least you have access to a save point near lower Brinstar now. That's something, isn't it? Oh, and okay, so you can find the Maridia map room, which will probably do little to sate your curiosity.
On a side note, the Power Bomb actually doesn't immediately destroy the tunnel - the glass won't shatter until you start to move after the explosion. So players may get that moment of wondering whether it worked, possibly even giving up and moving on - before the floor cracks beneath their feet.
17. Return to Norfair - No More Secrecy
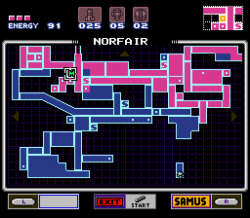
Back to the crime scene. As I've explained, no player will be dying to return to Norfair after the first act. But when they finally do, and they will because nothing else will propel them forward, they will immediately notice a yellow door in Norfair's hallway. This leads to the map room.
As we can see on the map now, there is a large unexplored complex in the lower left of the map. How to get there? Only two paths seem close from the current position, and one is blocked by a one-way shutter. So we head back to the corridor with the closing blast doors, famous for being the first use of the Speed Booster. And there's this hatch there. Power Bomb, please.
Crocomire attacks and is defeated. Then the game shuts you in, tests your Speed Booster skills for a bit, and awards you the Grapple Beam.
What did this change? Well, for one thing, Super Metroid is now back in business.
BY THE WAY! The map room also reveals the position of the boss of Norfair, in the lower right. But there's obviously a lot left out around it. We won't explore that for quite some time.
18. Where to Use the Grapple Beam
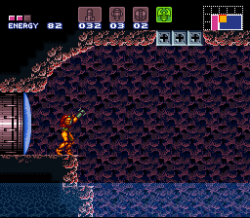
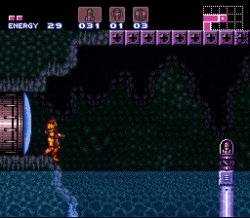
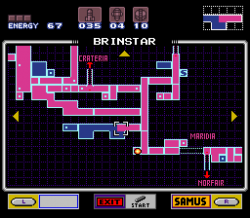
We're approaching what I would call the next act of Super Metroid, but how do we know where to go? This is one of my favorite psychological tricks in this game. Just take a look at the pictures.
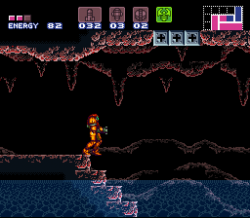
What is the difference between them? All three depict a purplish cavern, with some type of stairs leading out of a water-filled hole, and the only hope of crossing it is by swinging from the grapple blocks in the ceiling.There is only one difference worth mentioning. The first two rooms depicted are tutorial rooms right after acquiring the Grapple Beam. The third is in Crateria, and it's the place where the Grapple Beam needs to be used to further the game's progression.
So what the game is essentially doing, is planting the Craterian room in your mind (adding it to that list of possible utilities) immediately after giving you the Grapple Beam. And not once, either.
Bet you didn't see that one in 1994.
19. All the Way Back Up - An Empty Stretch?
This act is coming to a close as soon as we reach that Craterian cavern, but what better way to wrap it up than with some more sidequests? What could have been a pretty long trek from the deepest pits of Norfair and back up to the surface, has been seasoned with two new sidequests which require the Grapple Beam.
Finding the Wave Beam calls for a detour through Norfair, but if you want to explore the entirety of the map that was recently revealed, that's the direction you'll be taking anyway. On this trip, you may also come across the ominous, and completely inaccessible, entrance to Ridley's lair.
The X-Ray Scanner is harder to miss. There is no path to Crateria that doesn't pass by it, and players will be either thrilled to conquer that defiant corridor once and for all, or curious about that yellow door that they somehow managed to miss the last time the passed here with the Power Bombs.
Either way, their reward is the X-Ray Scanner.
ACT 3: Three Trials
Forget backtracking. In fact, you might as well forget the areas you've explored up until now, at least for a while. From here on Super Metroid takes on a much more linear structure, which will take us through all the remaining areas one by one, and introduce us to the remaining bosses. We will begin with Phantoon in East Crateria and the previously unknown Wrecked Ship, then we finally get to scour Maridia and deliver the last shock to Draygon, and to top things off - we will descend to hell.
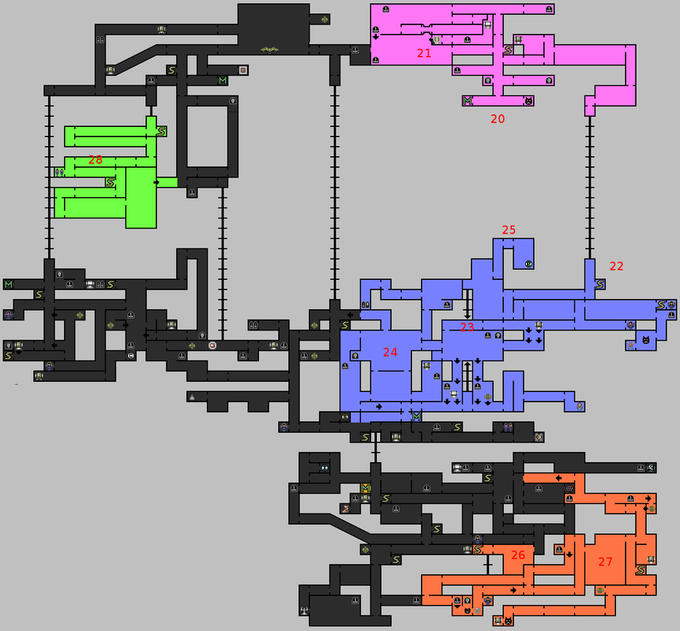
20. A Wrecked Ship and a Lost Buildup
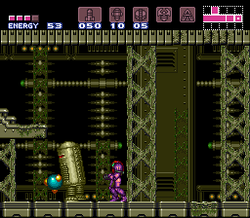
Crateria always seemed a bit... small. It felt like there must have been more of the surface that we hadn't seen. Super Metroid doesn't disappoint. Or does it?
Players will spend an hour or so exploring a huge lake in which an alien space vessel of unknown origin seems to have crashed - a location theme which was later to be reused in Metroid Prime for the Gamecube. Swinging across the lake is mainly used to set up my next chapter, while the Wrecked Ship itself is one big buildup for the boss. At least it tries to be.
This is as close as Super Metroid gets to actual horror gameplay. The ship is dark, the music approaches ambient sound rather than music (way ahead of its time here), and ghostly things pop up randomly around you. Since the power is out many doors are inoperable, conveyor belts are standing still and even the save point will refuse you service. Digging through the rubble of the ship interior will swiftly put you eye to eye with one of the four main bosses. I find it strange that Phantoon is allowed to appear from out of the blue like this. Although he has possibly the most atmospheric abode of the four, he is the only one whose arrival isn't heralded well in advance by showing his position on the map, and then preceded by an ominous save point (well, an ominous, working save point). This makes the buildup to the encounter quite powerless, since Super Metroid has no way left of telling what it is trying to build up towards.
Then again, considering what's coming, maybe yet another climactic boss battle would have diminshed the power of the later two. And I certainly support prioritizing Ridley over Phantoon.
21. Deep End of the Pool
This is just hilarious. Soon after Phantoon's death somehow reactivates the ship's electricity, you will be led to a new piece of equipment - the Gravity Suit (See? Once again, defeating one of the big bosses alters your appearance!).
As I mentioned in the last chapter, the lake that surrounds the Wrecked Ship is little more than a setup, but most players will hate it. The closer you get to the ship, the harder the swinging challenges will be, so the chance of falling in and having to head all the way back - underwater - is frustrating to say the least.
So what Super Metroid does is simply to lure you through a door which leads out into thin air, dropping you in the middle of that soup.
And of course, now you can move freely. They teach you with relief. That's a novel teaching emotion.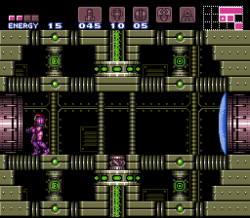
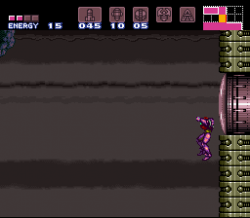
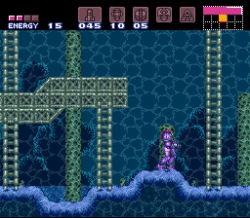
22. Finally a Way In
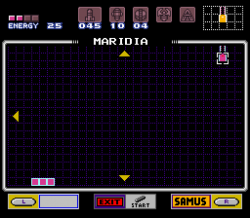
With this new ability, we could technically head back down to Maridia. But no one will when there is a closer mystery, just beyond the Wrecked Ship. Which so happens to take us straight there.
So we're finally in Maridia. We're so far from the parts we've already explored that I almost can't fit the two places on one map screen, so there must be a lot to find in between!
Now that we've finally invaded Maridia, nothing will force us to leave until we have defeated its boss and pillowed all of its powerups. So the experience gets very focused.
Anyway. The part of Maridia that we've found is, for now at least, little more than an express route to the parts that we already know. To get to the deeper parts, we will have to smash that glass tube. And for those players who still haven't grasped how to make that happen, there is a smashed glass tube just like it on the way down. Capisce?
23. The Mochtroid Mystery
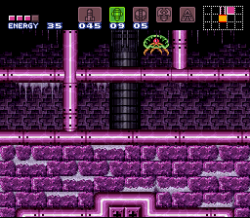
The only place where Super Metroid pays the third dimension a visit is when it takes a cue from Sonic the Hedgehog and lets Samus travel in a pipe between the top and the bottom of Maridia, watching a plethora of strange rooms swoosh by in the background. One of the things we get to see here is... What? No.
WAS THAT A METROID?
This clearly isn't the right place to introduce Metroids. So what was that thing? Well, when we reach the actual room quite a while later, we will be able to see the creatures as clearly as in this picture. Metroids don't have one eye. And they have teeth, not yellow talons. False alarm, as this turns out to be a Mochtroid, a space pirate creation which is detailed in the manual (it's 1994, everyone reads the manual).
But for a moment there in that pipe, I'll bet your blood froze.
24. The Grapple Beam's Final Mission
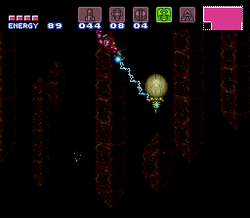
As players close the distance to Draygon's lair, room by room, one of their tools is promoted above all others. Maridia is littered with Grapple Beam challenges, and the beam easily sees more use in Maridia than in the rest of the world combined. One must ask, why is this?
The answer is simple. After defeating Draygon, you will acquire a method of vertical transportation so potent that it simply makes the Grapple Beam obsolete. The Space Jump is not a double jump, nor a triple jump, but... Basically, as many times as you like, jump. So, you can fly. So thank that beam for faithful service, and take to the skies. Since you may feel at this point that you have explored all the important places in the world, you are ready for a true empowerment, a feeling that you can go wherever you like. The Space Jump provides that.
It should also be noted that the grapple challenges are a great way to showcase how amazing this ability is, since they provide a very vertical environment. There's no need to scale those walls anymore. Not when you can fly.
25. How Plasma Works
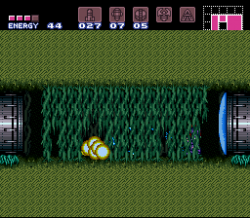
This is anecdotal, but before we leave Maridia I really need to shed light on this simple but sweet piece of design. In the corridor leading to the optional Plasma Beam upgrade, a pile of amoebas block your passage. They can only take one hit, but killing them all individually is still a pain. This is the ultimate way to sell the Plasma Beam, which allows your shots to pass through enemies - on the way back you can simply fire once and blow them all away.
26. Three Down - Where to Go?
If I haven't made that clear, two of the three trials referenced in the act title have now been cleared. East Crateria has been conquered, and so has Maridia. Both their masters are history. But the transition to the third isn't as obvious, and requires a small measure of exploration.
But really, you can fly. So basically, you should be able to go anywhere. And the most logical anywhere to go to is of course the only remaining boss, which we almost certainly know can be found in the depths of Norfair. And when we see this, we know we're on the right track.
It's entirely possible that players have already seen the entrance to Ridley's lair during their previous exploration of Norfair, most likely on the detour which also makes many find the Wave Beam. But it's impossible to actuallly reach it without the Space Jump.
27. Why Ridley's Lair is Hell
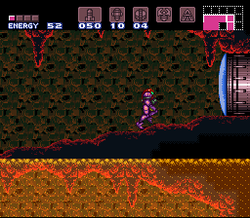
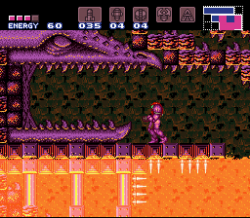
Already by the elevator, you get this feeling of dread. Why is there an elevator? They are usually reserved for passages between different zones. It seems we are leaving Norfair and entering something... else. Something even deeper. There is also a save point right by the elevator, and the message is clear. You are going to need it.
Lower Norfair is a wonder of atmospheric level design. The ominous music obviously does its part, but that's not it. Remember how that very same piece failed to provide any kind of tension to the Magmoor Caverns in Metroid Prime. What really makes Ridley's home genuinely haunting is instead a series of nasty surprises.
To even get here, you had to swim through a sea of lava - did you think your Gravity Suit protected against anything? Not against this lava. You can fly, and the world is an open book to you - and yet here you find creatures that you cannot even inflict a scratch upon. You are deeper down than you've ever been, but your path leads ever downwards. Add to this enemies that are at once more aggressive and more resilient than anything else on the planet, and the artstyle once again veers towards that creepy retro style. It is around that kind of background that the music can wrap its magic.
There is a nice closure in having the game's final miniboss, the golden Chozo Statue, be an upgraded version of the first. This adds a fitting symmetry, which I think many players sense on some level, and they know that this is indeed the final miniboss. When this thing is defeated, we can channel all energy into hunting Ridley. For a time, Super Metroid invokes the same kind of raw determination as classic Mega Man. Overall, the Chozo and temple imagery makes the descent all the more engaging. This is the heart of the planet. And at its core, we will find those piercing eyes.
27. Notes on Tourian
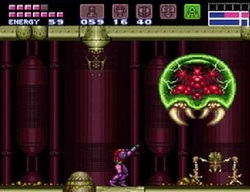
All Ridley was guarding was an empty room, with a shattered glass container in it. This is a subtle but efficient way of making players picture what has happened. Thus, the realization that the Metroid hatchling has escaped comes from within, making it all the more bone-chilling. The only place to go is the Statue Room, which now opens the way to Tourian.
This is the only screenshot in this guide that I have not taken myself. There's simply no need. Nor is there much need to elaborate on the ending scenes and battles in Tourian. Tourian is already all over the internet. For me, hunting Ridley represents the ending to the explorative Super Metroid experience, with Tourian being something else. Tourian is an ending for the Metroid series, tying together loose ends from both predecessors. It is absolutely crucial for sorting out what happened to the Metroid hatchling and settle the score with Mother Brain. It's also quite touching, and a wonder of semi-interactive storytelling that wouldn't be surpassed for many years.
But that's not the story I've been trying to tell here. This has been a story about a girl and a planet. Because first and foremost, Super Metroid is a game about exploration, like so many others. What is amazing is how it approaches the experience of exploration with the same love and care as a writer would approach a story. I hope that I've been able to show that.
Thanks for reading!
Hugo Bille is an independent game designer with the Working Parts doing his best to live up to the legacy of Super Metroid. When not crafting cryptic, story-centric gameplay he still writes the occasional stageplay.
Read more about:
Featured BlogsAbout the Author(s)
You May Also Like


