Daily news, dev blogs, and stories from Game Developer straight to your inbox
Sponsored By
Featured Blog | This community-written post highlights the best of what the game industry has to offer. Read more like it on the Game Developer Blogs.
This is my first post-mortem of a series about how a designer think about code. I decided to start with a custom controller for a 2D classic platformer game, in Unity.
11 Min Read

** UPDATE ** My entire controller's source code is now available here !!
Hi everybody! With this “hobbyist coder” series, I want to share my experience as a…well…hobbyist coder. This sharing has two main goals: showing to non professional programmers making prototypes is not inaccessible and showing to professional programmers the way a designer takes on programming, and maybe have some feedbacks/advices about perfectible parts! Finally, it’s some kind of personal post-mortems… So, let’s start with the custom 2D platformer controller I made in Unity for a personal project:
Why using a custom controller and not the Unity’s default one?
You may ask yourself “but why not using the unity character controller from Unity?” Actually, I did. At least, at start! Then, I encountered some problems:
The Unity’s default character controller is based on the Unity’s physics engine: it’s probably a good solution if you want a physics-based platformer feeling (like Little Big Planet, Trine, etc.). However, I wanted a “sharp” and precise control, like old school 2D platformers (mario, sonic, meat boy, etc.), so the physics engine way turned out to be very difficult to tweak in this way.
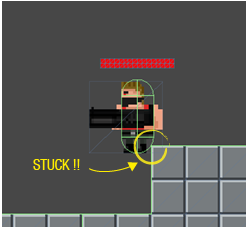
The Unity’s default character controller is based on a capsule shape collider : so, the player is able to walk on slopes easily but, when you have to handle platforms with right-angled edges, the capsule gets stuck on the edges and it’s just unacceptable:
Finally, I decided to do my own controller when thinking about future IA pathfinding : I think it will be much easier to control the IA moves along the path with simple function like Run(speed) and Jump(height) on a generic platformer controller, dealing itself with the world constraints (collisions and gravity).
Basic principle
Nothing extraordinary here, there is a lot of tutorials about collisions on 2D games on the internet and the way I took is just a mix among different things I read and some of my own (unsuccessful) experiences.
As my prototype is a tile-based platformer, I could have used a simple system to check if the tile I want to move on is a wall or not. For several reasons, mainly because I previously had difficulties to handle slopes with this kind of approach, I chose a more versatile system, using raycasting to detect collision.
So, a basic collision concept is very simple: the controller moves with… a speed value, except if this speed brings its collider into another collider. So, we just need to detect these potential collisions !
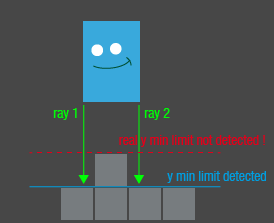
To detect the collisions, as I said above, I use a raycast: when there is a speed value, some rays search for a collision in the direction of this speed, for each axis x and y. If the ray hits some collision, the hit point will define the maximum value the controller will be able to reach on the axis.
In pseudocode, it looks like this for each ray of the four directions:
If speed on x axis > 0
If raycast to the right hits a collision on point (Px,Py)
Set xMaxLimit = Px
Depending of the size of my controller collider and the size of my tiles, I had to cast only two rays per side, for each corner. But if one of your two is bigger than your tiles size, you may encounter some issues with only two rays:
With more than one ray per side, I also have to compare their hit points P1 and P2 and keep the closest one:
Set xMaxLimit = Minimum value between P1x and P2x
Finally I check if the controller is blocked on each side to set the speed value to 0 in case of. If not, the controller will still be blocked but will keep a speed value against the wall. So, if you want to suddenly go the other way, you have to wait the opposite acceleration compensate the actual speed to finally increase speed in the other direction: it results a “stuck” feeling for the player.
The solution was pretty simple:
If controller position on x axis >= xMaxLimit – 1 (I added a 1 pixel buffer to prevent errors)
� Set rightBlocked to trueIf rightBlocked is true AND speed on x axis > 0
Set speed on x axis = 0
So, very simple and traditional way I guess...
Let’s bring Newton!
Gravity is just a constant acceleration applied on speed on y axis each frame when in the air :
speed on y axis = speed on y axis + gravity acceleration * delta time
(I won’t talk about delta time here, as coders now exactly what it is and non-coders can find much better explanation on the internet, for example here : http://alexreidy.me/game-programming-an-explanation-of-delta-time/ )
I won’t explain the jump system I chose in details now (maybe another post…). The important thing here is that when a jump input is called, an impulsion speed is applied on the controller on y axis and then the gravity makes its job to step-by-step compensate the elevation and bring back the controller to a fall state.
Then I used the same system as above to determinate move limits and grounded flag:
If raycast to the bottom hits a collision on point (Px,Py)
Set yMinLimit = PxIf controller position on y axis <= yMinLimit + 1
Set grounded to trueIf grounded is true AND is not jumping
Set speed on y axis = 0
Else
Apply gravity (see above)
You can see some variations with the previous code:
No need to check if there’s a speed in the bottom direction to raycast as there is always one (generated by the continuous gravity acceleration).
The same way, no need to check it when grounded.
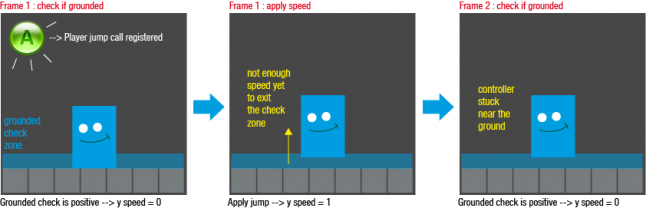
I thought a new check if the controller is jumping was needed before set speed on y axis to 0: if not, when the jump impulsion is applied on y speed, it directly returns to 0 as the controller will be probably still considerate grounded at the next frame.
The importance of rays origins
It’s not a big problem and I guess not very hard to solve for a professional coder. But I took some time for me to and I really want to share the hard time I had to understand it :)
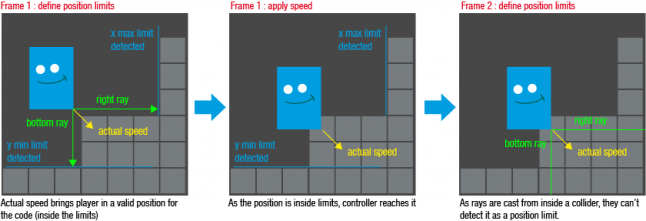
At start, my rays were generated from the exact corners of the controller collider. The problem is the controller was not able to handle correctly right-edged collisions. Now I understand it’s a question of code execution order that is much easier to explain with a little scheme:
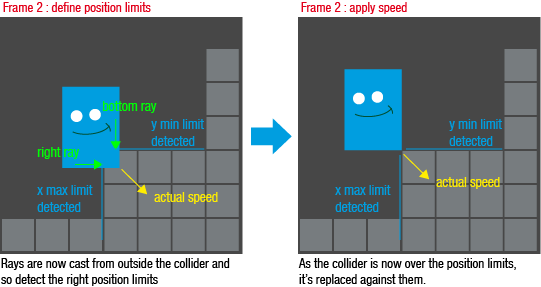
So I found a solution casting rays from further to have a “buffer”:
The slopes problem
Slopes… it always frightens me when thinking about a collision system. It frightened me enough to really considerate the “no slopes” options! But, let’s see how I did to finally handle them!
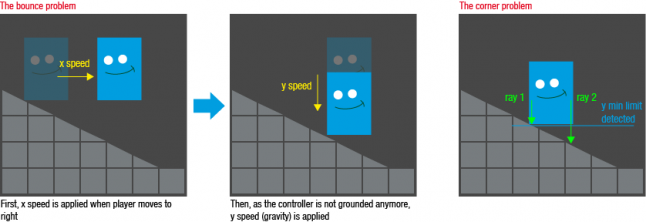
Surprisingly, after I integrated the basic collision system, the controller was able to take slopes. Ok, really roughly, but it wasn’t stuck on them and it was encouraging for me Actually, the climbing of slopes was pretty good, as the limit position on x axis was always “pushed back”. However, the descent was problematic because when the player was running very fast, he moved on x axis just before falling on the slope with gravity, resulting in a “bouncing” descent!
In addition, on old school 2D platform games, the player touches the slope ground with its bottom center. But when my collision basic system does the job, the controller touches the slope ground with the closest bottom corner.
After trying a lot of solution to keep the controller on the ground on slopes, from different tutorial or by my own, I finally decided to use a simple one. Basically:
Detect when controller is grounded on a slope
If it is, directly set the y position relating to the y position of the slope collision
Detect if grounded on slope
First, to detect if the controller is grounded on a slope, I detect if it is “above a slope”. To do that, when one bottom rays hit a collision, I just check the difference between this collision normal vector and a unit vector to the right:
If raycast to the bottom hits a collision on point (Px,Py)
If angle between collision hit normal vector and right unit vector differs from 90°
set slopeOnHitPoint to true
Only one of the two bottom rays can’t determinates if the controller is really above the slope because of this case:
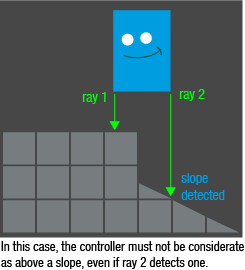
So to determinate if above a slope, one of the following conditions must be true:
If there a slope detected with the left AND the right ray, the controller is above a slope.
If there a slope detected only with one ray AND the hit point were the slope is detected is higher than the other hit point
Then, to determinates if the controller is ON the slope, I just have to determinates if it is grounded AND above a slope. However, I found that I need a bigger “buffer” to prevent the controller to exit its “grounded” state when on a slope. So, the modifications in pseudo-code:
If aboveSlope
Set groundCheckValue to yMinLimit + 5
Else
Set groundCheckValue to yMinLimit + 1If controller position on y axis <= groundCheckValue
Set grounded to trueIf grounded is true And is not jumping
Set speed on y axis = 0
If aboveSlope
set onSlope to true
Else
Apply gravity
Set onSlope to false
Set the controller y position
Now I know if the controller is on a slope or not. I just have to determinate its position.
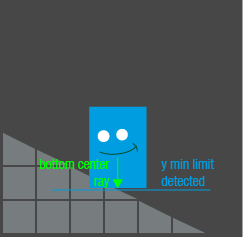
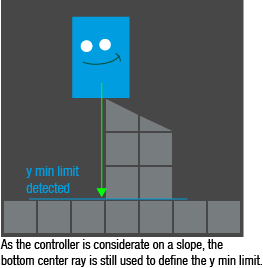
As I want the controller to “stay” on slope on its bottom center, I cast a vertical down ray from its center and use the hit y position as the new yMinLimit.
Then, to avoid the controller to make bounces descending the slopes, I discard the classic speed application on y axis and directly set the controller y position to the yMinLimit (the speed application on x axis never changes):
If onSlope
Set controller y position to yMinLimit
Else
Set controller y position to actual y position * y speed * deltaTimeSet x position to actual x position * x speed * deltaTime
And now the peaks problem!!!
As soon as all these tricky stuff seemed to work, I encountered a new problem: the *$@! peaks!! The fact is, as the controller is considerate on a slope when on a peak, it continues to define the yMinLimit with the ray from the center. So, as soon as the center goes over the peak, the controller goes through the collision as the yMinLimit is defined below:
As a designer, I have to admit that I didn’t know at this time if I wanted to have such collisions in my game… But I didn’t want to refuse them just because I wasn’t able to handle them!
Actually, I didn’t found a clean solution to handle this case, but the one I chose doesn’t work so bad…
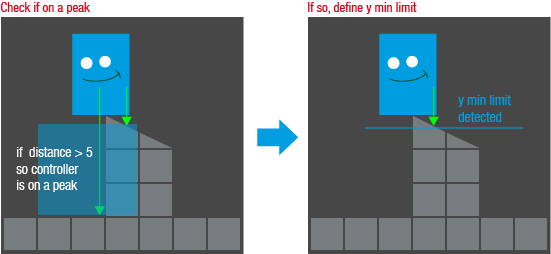
First, I check if my controller is above a peak which means, for a peak on the left: if slope detected with left ray AND distance between left hit point and center hit point > 5 (arbitrary value determinate with tests depends of tiles size, controller collider size, etc…).
Finally, if the controller is above a peak, I use the other side ray hit point to define the yMinLimit.
It’s not perfect because there’s no transition between the center ray and the side ray to determinate the yMinLimit and it results a little strange shift. But I haven’t lost hope in finding a cleaner solution someday!
Conclusion
In conclusion that was a really cool challenge for me to handle collisions myself and the result works pretty good for what I wanted to do. If some coders read this, I would be glad to have some feedbacks about this solution. I’m also asking myself if more complex systems of collisions with physics engines, working with different kind of geometrical shapes, are using similar approaches ? If you have some answers or reading about that, feel free to share and satisfy my curiosity ! Thanks for your reading and maybe see you later for another episode of the “hobbyist coder”!
Read more about:
Featured BlogsAbout the Author(s)
You May Also Like