id's new rendition of DOOM is spectacular. Yet, its brilliant single player campaign can quickly become stale. With its new update, DOOM adds a fantastic arcade mode based on high-scores. So how exactly has id Software balanced it? Read on to find out!

TL:DR; If you just want to know how to get better scores, jump to the end of the article!
DOOM Arcade Feedback Loops Analysis
I am a DOOM freak. I have played DOOM more hours than I care to admit.
And yet, the recent single player campaign for DOOM (2016), as awesome as it is, becomes stale after a few playthroughs.
id Software knows this, and they have answered in full glory with their new Arcade Mode. Playing it for the first time a few weeks ago, I was impressed by how well balanced its loops are in order to achieve enough complexity that it becomes almost a new, more strategic game. As a game designer, I was very interested in how this balance was achieved, and so have graphed its feedback loops in this article.
Feedback Loops Analysis
As anyone who has been following the new DOOM knows, its developers have stated that the game is all about killing demons, big f***ing guns, and moving fast.
In this regard, the single player campaign did wonderfully thanks to amongst other mechanics, glory kills. So how have they extended this idea forward with Arcade mode?
The main mechanic used to achieve this goal has been the Multiplier Bonus, which increases each kill’s score (admittedly an extrinsic reason to keep playing the mode, but hey, it works). Stopping too long until the next kill will diminish the Multiplier Bonus by means of its Decay Speed which will eventually diminish its total effect, taunting the player to move and kills as fast as possible. Therefore, we have a balanced system where the more kills per unit of time, the higher the score. Wasting time eliminates opportunities to drive our score to the maximum.
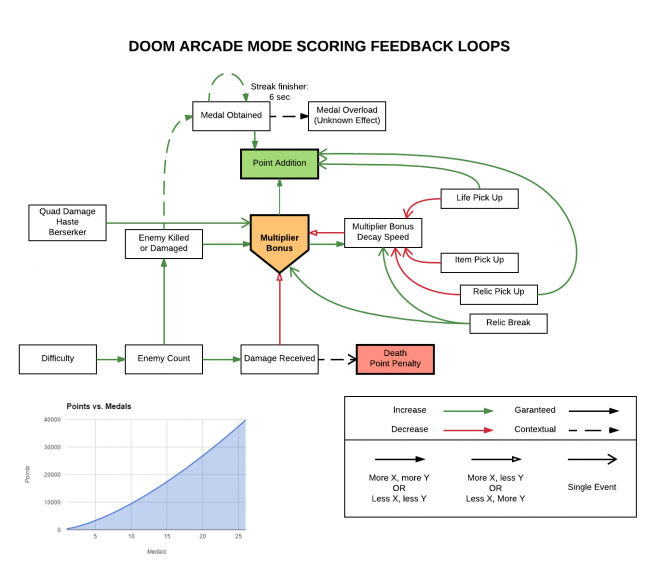
However, while this system is clear enough, it might in fact be too clear to be fun. More complexity is needed to add to the pleasure of discovery, and to keep advanced players engaged by means of APM during low intensity sections of the levels. The solution, of course, is to link all other systems in the game to our multiplier and/or its reduction speed. Enter the doom arcade feedback loop graph.

DOOM’s Arcade Mode Feedback Loop in all its glory.
Its main system is centered around the Multiplier Bonus and its Decay Speed (from now on MB and DS respectively). Ideally, we want to have the MB be as high as possible and its DS as low as possible. Due to its smart balancing however, the higher the MB, the fastest its DS, creating more urgency at higher levels of play, a highly desirable quality of such a system.
Multiplier Bonus
The MB comes into effect every time an enemy is killed. Quite simply, each enemy has a base score value that is multiplied by the MB and that score is added to our total score, in values from 1X to 32X. Obviously, the more enemies we kill the higher the score, which explains why higher scores are easily achieved in higher difficulties.
The MB can easily be increased by killing demons, picking up a Relic, and interestingly enough, a few pick ups (Quad damage, haste, and berserker) automatically increase the MB to its maximum value of 32X for as long as they are active.
Now, the MB can also be lowered either by its DS over time, by getting hurt or (DoomSlayer forbid) dying, which additionally would inflict a
direct score penalty should players decide to continue.

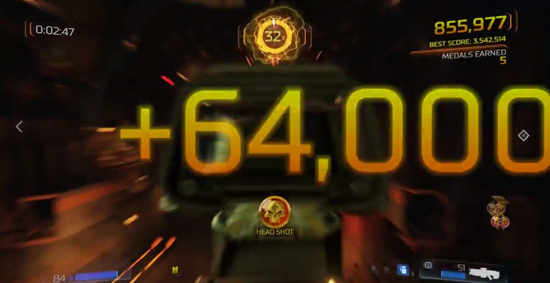
DOOM’s Arcade Mode Multiplier Bonus in action!
Multiplier Bonus Decay Speed and Pickups
The DS is more complex, and it requires most of the mental management effort during playtime. Pretty much any pickup in the game will influence it, in order to allow for the level space to be used strategically. Otherwise our multiplier would eventually fall to 1X every time we have to move to a new combat arena.
Only one pickup will increase the decay speed, making it harder to keep our MB up, and that is breaking a Relic. This is so because relics create a devastating explosion which often will gives us a combat advantage plus medals (more on them later), as well as increasing our MB. Picking up the relic will undo this DS increase and gives us additional points, so if picked up quickly enough, they are advantageous. They basically reward players who are competent at moving at high speeds around levels, and penalize those who become overwhelmed by enemies or the level layout.
All other pickups reduce DS, and often will be used strategically to maintain our MB high when there are no enemies around. This is in itself a very interesting feedback loop, because we may need those pickups for our current fight, but that would hurt us later. This is an interesting choice and good game design.
Lives will additionally add extra points to our score and, paradoxically enough give us another chance at the level should we die… a notion that any serious player will discard because of the huge penalty for reloading a checkpoint anyway.
Medals
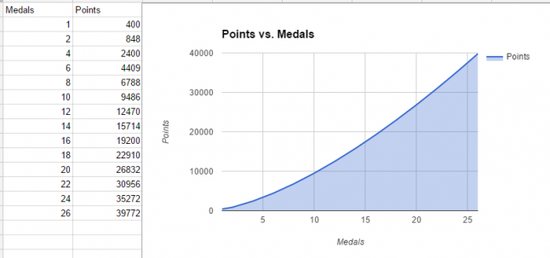
Medals are a very interesting mechanic , as they offer many small pleasures for the player as they are acquired (Yeah! Headshot!), and beyond that, are the most important strategy to obtaining a high score in Doom Arcade. All other things being the same, stacking medals will give us the biggest boost in the leaderboards, because they give us an extra scoring option that has been balanced to what might at first glance seem an exponential curve (my calculations show that it is actually a diminishing returns curve, but that is another topic).
Since this system could get out of control quickly, the developers have set up a 6 second limit between obtaining medals, whether if this limit is surpassed, the medal stack is calculated and added to our score. Getting 10 medals in 2 stacks, or getting 20 medals in 1 single stack, are not even close score-wise. The difference is almost triple the points!

It can not be appreciated here, but that is a diminishing returns curve. Luckily there aren't enough demons to get to the other side!
Going for that Slayer Rating
So, for you players out there who are asking yourselves how to get the highest possible scores, here are some ground rules of how to distinguish yourselves:
Do NOT get hurt. If you die (shame on you), restart the level because the penalty is too big to ever recover.
Try to get a medal for each kill, and to stack them. To do this do NOT kill enemies who are separated, let them bundle up (keep your MB high with items) and attack.
The easiest medals to obtain are stun kills and glory kills. Stun with the plasma gun and ideally perform a glory kill, or a headshot for double the medals.
Save all pickups for when there are no enemies around. When shooting a Relic, the most important thing is to pick it up ASAP, ignore everything else unless you are about to get killed.
Read more about:
BlogsAbout the Author(s)
You May Also Like


