Featured Blog | This community-written post highlights the best of what the game industry has to offer. Read more like it on the Game Developer Blogs.
The main objective of this blog post is to give you an idea about how to do Sprite Sheet Animation in Unity3D.

Objective
The main objective of this blog post is to give you an idea about how to do Sprite Sheet Animation in Unity3D.
Are you looking for animation in your 2D games?
Do you want your Character have some real feel and look more living ?
Then here it is, I’ve brought you some easy and quick ways to make your game look attractive and give a real life feel to the character of your game.
In this post we will learn how to give animation to your game character with 2 easy ways.
By Animation And Animator controller.
By Scripting.
Interesting right..?
So tight up your seat belts and get ready for this joyful ride!
Let’s start with the first option.
1. By Animation And Animator Controller
First set up the scene like the given image.
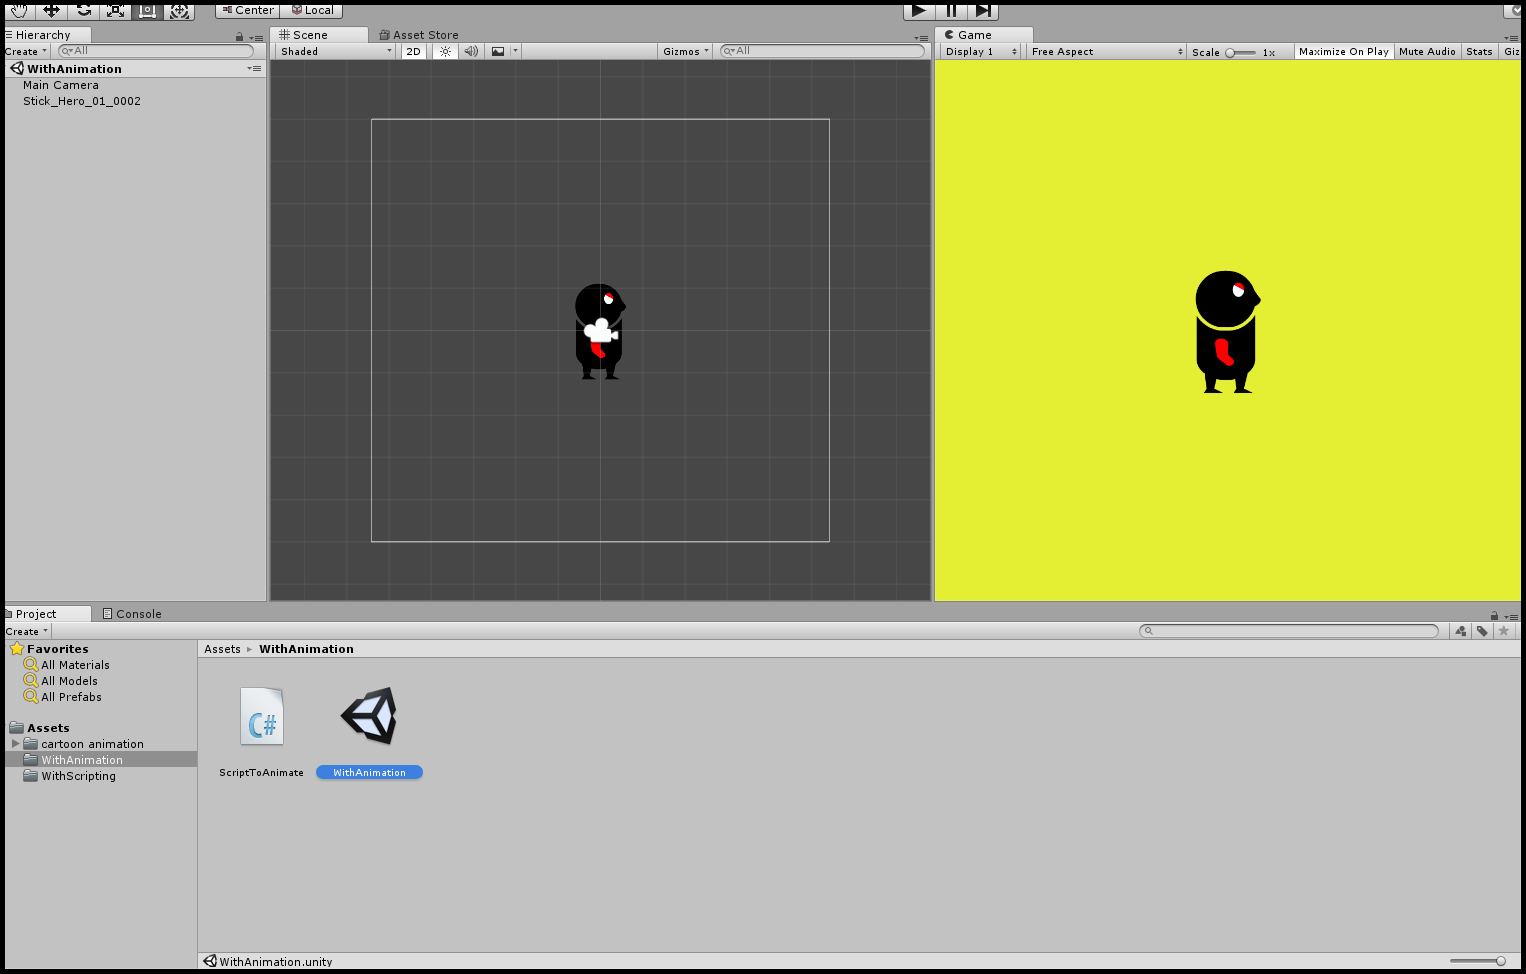
Don't forget to add sprites folder that will be use for the the different animation to your scene, if you don't have the Sprites you can download it from here.
Create a 2D sprite object and assign the first sprite of the idle Animation to it. (Idle animation is the animation in which the character is just standing still and breathing no other activity).
Create the Script named AnimationWithScripting and attach it to hero Object.
Now, follow the below steps to create the different animation.
First select all the sprites of Idle Animation folder and drag it on our hero object and drop there, a new animation will be created. Then Unity will ask to name the animation name it as Idle.
Then select all the sprites of Kick Animation folder and drag it on our hero objectand drop there , a new animation will be created. Again Unity will ask to name the animation name it as Kick.
Then select all the sprites of Walking Animation folder and drag it on our hero objectand drop there, a new animation will be created. Again Unity will ask to name the animation name it as Walk. I hope you all are ready with your 3 animations.
The animator controller will be automatically added to our hero object.
Now set the transitions and trigger as per the below image.
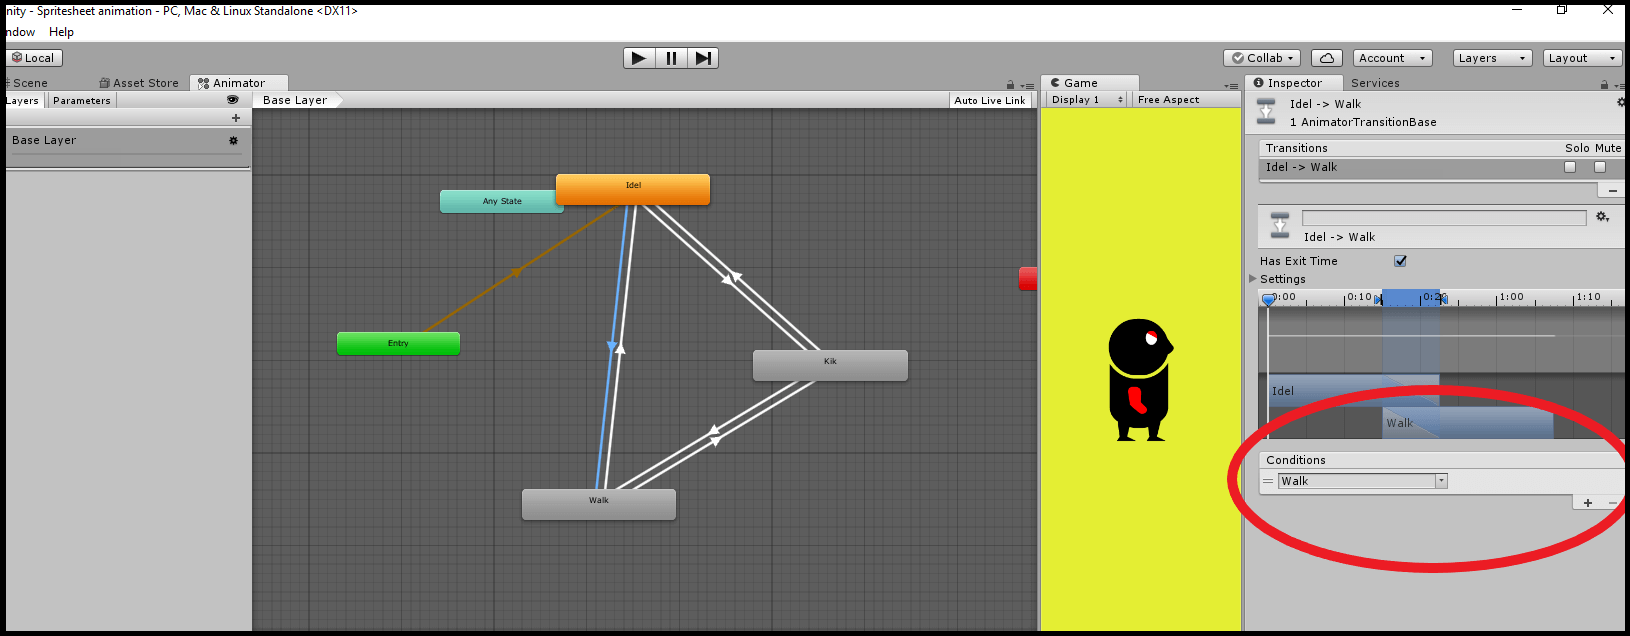
trigger-setup
See what Triggers are to be set in the following transitions:
Transition | Trigger |
|---|---|
Idle -> Walking transition | Walk |
Walking -> Idle transition | Idle |
Kick -> Walking transition | Walk |
Walking -> Kick transition | Kick |
Idle -> Kick transition | Kick |
Kick -> Idle transition | Idle |
Let’s see the code is to be written in the Script
ScriptToAnimate.cs
using UnityEngine;
using System.Collections;
public class ScriptToAnimate : MonoBehaviour
{
    public Animator animator;
    void Update()
    {
        if (Input.GetKeyDown(KeyCode.I))
        {
            animator.SetTrigger("Idle");
        }
        if (Input.GetKeyDown(KeyCode.K))
        {
            animator.SetTrigger("Kick");
        }
        if (Input.GetKeyDown(KeyCode.W))
        {
            animator.SetTrigger("Walk");
        }
    }
}
Let’s see what's there in the scripts.
Name | Type | Description |
|---|---|---|
Animator animator; | variable | To store the reference of the Animator Controller of the object |
Update() | Unity Callback | To write conditions according which the animation is To be triggered |
Go to Unity now and play the scene you will see the idle animation playing default.
Now press the keys I, K and W respectively and check.
Did you see your character..?
Yeyy ! your character got life. Your character is breathing, kicking and walking.
I'm sure you are on the right track. Now, let’s move to another method.
By Scripting
First set up the scene like the given image.
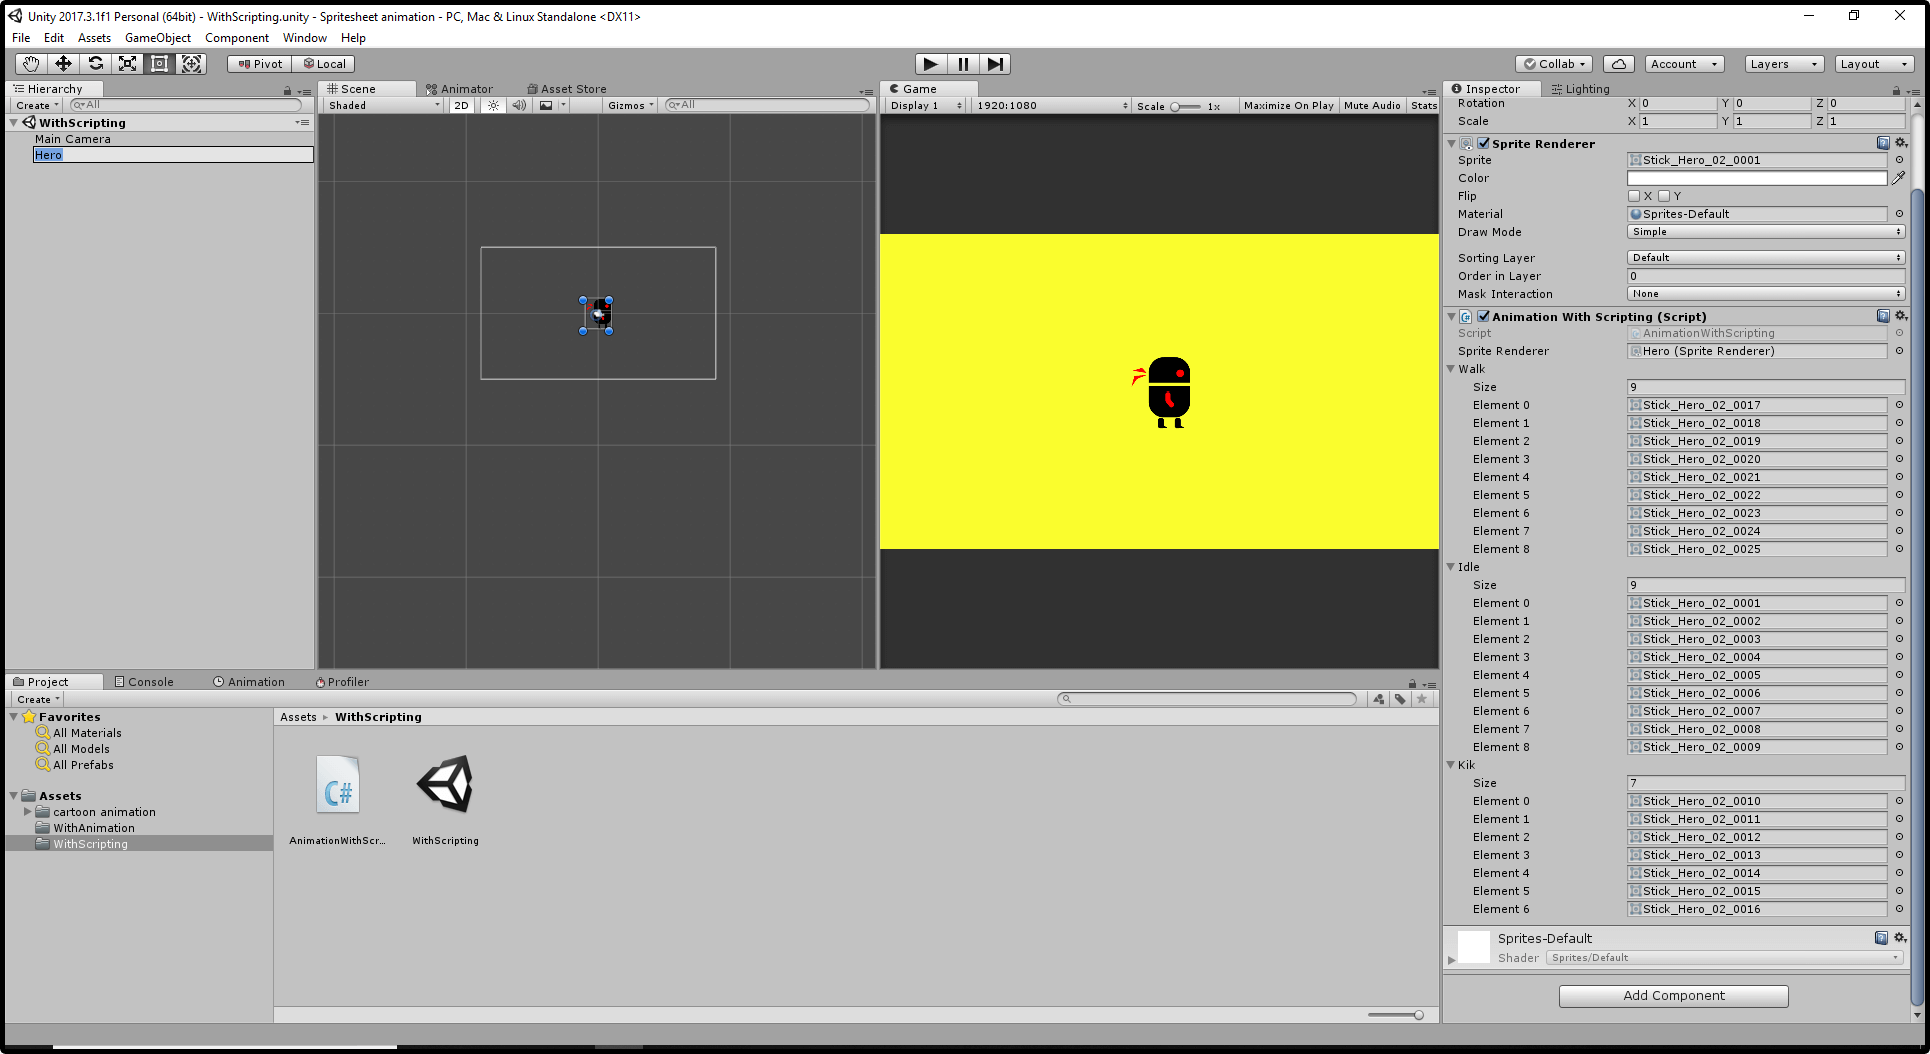
Don't forget to add sprites folder that will be use for the the different animation to your scene, if you don't have the Sprites you can download it from here.
Create a 2D sprite object and assign the first sprite of the idle Animation
Create the Script named as AnimationWithScripting and attach it to hero Object and write the following code in it
AnimationWithScripting.csusing UnityEngine; using System.Collections; public class AnimationWithScripting : MonoBehaviour { public SpriteRenderer spriteRenderer; public Sprite[] walk; public Sprite[] idle; public Sprite[] kick; void Start() { StartCoroutine(Idle()); } void Update() { if (Input.GetKeyDown(KeyCode.I)) { StopAllCoroutines(); StartCoroutine(Idle()); } if (Input.GetKeyDown(KeyCode.K)) { StopAllCoroutines(); StartCoroutine(Kick()); } if (Input.GetKeyDown(KeyCode.W)) { StopAllCoroutines(); StartCoroutine(Walk()); } } IEnumerator Idle() { int i; i = 0; while (i < idle.Length) { spriteRenderer.sprite = idle[i]; i++; yield return new WaitForSeconds(0.07f); yield return 0; } StartCoroutine(Idle()); } IEnumerator Walk() { int i; i = 0; while (i < walk.Length) { spriteRenderer.sprite = walk[i]; i++; yield return new WaitForSeconds(0.07f); yield return 0; } StartCoroutine(Walk()); } IEnumerator Kick() { int i; i = 0; while (i < kick.Length) { spriteRenderer.sprite = kick[i]; i++; yield return new WaitForSeconds(0.07f); yield return 0; } StartCoroutine(Kick()); } }
Now go to Unity and add the sprites of walking, kicking and idle state in their following lists in the inspector as per the image.
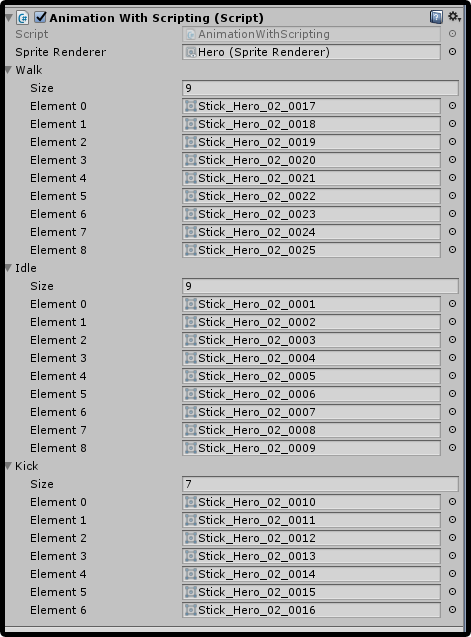
Let’s see what's there in the script.
But wait...
In this script, the coroutine is used for Sprite Sheet animation. If you don’t know how to use coroutine.
Don't worry our coroutine unity blog post will help you. Trust me you will be master in 10mins.
Name | Type | Description |
|---|---|---|
Start() | Unity Callback | To start the idle coroutine. |
SpriteRenderer spriteRenderer; | variable | To store the reference of the spriterenderer of the object. |
Sprite[] walk; | list | To Store walking Sprites |
Sprite[] idle; | list | To store idle Sprites |
Sprite[] kick; | variable | To store Kicking Sprites |
Update() | Unity Callback | To write conditions according which the animation is played |
IEnumerator Idle() | coroutine | To Run the Idle Animation |
IEnumerator Kick() | coroutine | To Run the Kicking Animation |
IEnumerator Walk() | coroutine | To Run the Walking Animation |
Now, go to Unity and play the scene you will see the Idle animation playing default.
Now press the keys I,K and W respectively and check.
Yeahhhhh ! Again you see character, its breathing kicking and walking.
But wait which one is more optimised?
Yes, maybe you would be having the same question.
Both the methods run the same way when checked in the profiler.
So, it's up to you whichever you feel easy and quick and in accordance to the requirement of your game.
Feel free to contact us if you really liked this blog. And don’t forget to share your comments below!
Read more about:
Featured BlogsAbout the Author(s)
You May Also Like


