Daily news, dev blogs, and stories from Game Developer straight to your inbox
Sponsored By
Featured Blog | This community-written post highlights the best of what the game industry has to offer. Read more like it on the Game Developer Blogs.
Former Discord QA Engineer explains how to build your superfan base with some simple tips from Modus Indie Access.
14 Min Read

Former Discord QA Engineer explains how to build your superfan base with some simple tips from Modus Indie Access.
What is Discord?
Every once in a while, a new big thing comes along that becomes instantly popular because it fills some sort of void that people didn’t know was missing. Discord is one such technology which has now become synonymous with VOIP (voice over internet protocol) and online community management.
Discord was founded to act as an instant text messenger and voice chat solution for people playing MMORPGs. Its first beta test was completed using the Final Fantasy XIV subreddit and was so well received that many players abandoned their existing solutions in favor of Discord. The ability to send someone who had never heard of Discord a URL and have them join you in a voice chat session within 30 seconds was a massive draw and helped spread the program like wildfire.
The ethos behind Discord was always to have small communities to participate in with the ability to access others quickly and easily. In the past, if you had a group of friends with whom you played Rocket League and another that played World of Warcraft, you might have to keep track of multiple logins on disparate platforms. Discord began to offer players a place to centralize all of those different groups, while being completely free.
Discord has exploded in popularity since then, growing from 45 million registered users in 2017 to 130 million in 2018. Developers now have an unprecedentedly direct way of communicating and engaging with fans. While you can just throw a server together to provide a hub for your community, there’s so much more you can and should do with it to get the most impact.
What are the benefits of having a community on Discord?
Imagine being a fan of a game series and hearing about a long-awaited sequel that’s in the works. You might go on Discord, find the official server for the sequel or game series and join it. With Discord, you’re immediately connected with a group of people who are as excited as you about the game. Then, while you're chatting about how much you love the series, one of the developers stops by and thanks you for your support and kind words. Imagine them asking you for your feedback about something, and when you provide them with a suggestion, they say they’ll add it to the new game and you’re filled with pride and excitement.
When people are a part of something that they truly enjoy, and for which they feel valued, they transform from being a fan into becoming a superfan. When this happens, your new superfans can become megaphones, espousing your company, game, service, web comic, etc. to the world. In turn, this can lead to more people joining your community, spreading your word, and, ultimately, more people buying your game when it launches. When you interact with your fans in a meaningful and enjoyable way, you have the opportunity to turn them into superfans.
You can also engage your fans to help make your product better. Discord makes a great central location to organize and run early access playtests for people all over the world, 24 hours a day, 7 days a week. Imagine having a pre-alpha build you want feedback on, giving it to a group of people who you trust because they’re active, helpful, friendly members of your community, going on a long weekend, and when you get back, you have pages of thought-out, discussed and useful feedback organized for you. This scenario is not only possible, it’s happening right now.
How do I get started?
It all starts with creating a server, which is Discord’s term for “community of people.” If you haven’t done so already, create a login over at the main webpage. Once you’re in the app, on the left-hand side you’ll see your server list. Every new community you join will have its own image that’s added there, including the one you’re about to create. Even if your account is brand new, you should still see these two buttons:
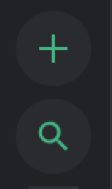
Those are the “Add a Server” and “Server Discovery” buttons. We’ll cover the latter in a bit, so for now, click on the “+” button. On the prompt that appears, select the “Create a Server” button. You’ll be taken to one last prompt before your server is created that has three options:
Server name – What you want the server to be called. Generally speaking, “{Game name} Official” and the like are considered undesirable names, while simply “{Game Name}” or “{Company Name}” are solid. And note: if your server is not dedicated to specific game you cannot make use of the Server Discovery feature.
Server Region – This is purely for using Voice Chat, and determines with which voice servers your client communicates. If you’re not planning on using voice chat, the selection doesn’t matter; otherwise, pick the option closest to your physical location.
Change Icon – Clicking on this will allow you to upload any image that you want. Note that there is no cropping option built in, but even if you don’t have proper art right this second, that’s fine. You can always add this later.
Click on the “Create” button to see your new server!
When a new server is created, it’s given one text channel and one voice channel by default, both labeled “General.” If you have no plans to use voice chat, feel free to delete it by right-clicking on the channel name and selecting “Delete Channel”.
That’s it! You now have a server and can start inviting people if you so desire. Before you do that, however, the most important thing you should do is plan out the kind of community you want to have and build a server structure that will support it.
Here’s a few basic best practices:
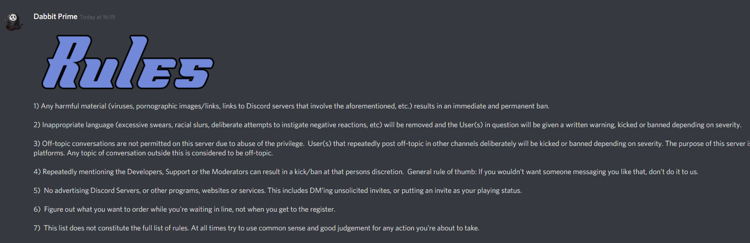
Rules Channel – The first publicly visible text channel in the list on the left under your server name is the first channel that every single person that joins your server will see the contents of. When writing out your rules, consider that if you have too many rules they’ll never be read. Keep the rules deliberately broad and add to them as necessary.
Pro Tip!
If you upload transparent text as an image you can make great-looking headers for a channel that has lots of text!
Announcements Channel – People who join your server may want to hear all of the latest updates and details that you want to provide. If you post an update in a channel that gets a lot of chatter, it’ll get buried! An Announcement Channel provides a great location to advertise your updates and make them easily discoverable for people that are interested in them.
FAQ Channel – People tend to ask the same questions over and over, not realizing that they’ve been answered previously. You’ll get a lot of “when’s the update coming?”, “where can I...?”, “How do I...?” questions, and rather than answering them individually, you can just point people to this channel where you’ve already provided the answers.
News Channel – This is functionally similar to an announcement channel, but has a unique icon and is only for Verified Servers, which we’ll discuss below. The main difference is that things posted in the News channel will show up outside your server in the Activity Feed (Discord’s “homepage”) of people who are interested in your product.
Advertise your Server
Server discovery is a real problem in the Discord ecosystem, and while Discord does provide some methods of discovery (see “Verify Your Server” below), the majority of the work getting your server out there is going to be on your shoulders. Luckily, people can join your Discord server by clicking a link on any device.
Newsletters, tweets, trailers, announcements, anywhere that your users see your content is the perfect place to show a link to your server. It just takes one click to join, and the concept of joining a Discord server has become commonplace among video games. Don’t be afraid to put it out there with the rest of your social links!
Identify standout members of your community
Chances are that if you’re reading this article, you’re not a robot. Which means that you need to eat, sleep, have a life, and work on your game, and you can’t spend every waking moment moderating a Discord server. Luckily for you, your users are probably located across all time zones and are usually more than willing to help out.
People want to feel useful and appreciated. Special roles and permissions help make sure that your server is protected from trolls 24/7 and offer the helpful members of your community something to work towards.
This section will help you set up a vanity role and a moderator role. To begin, click on your server name on the top left of your screen and select “Server Settings.”
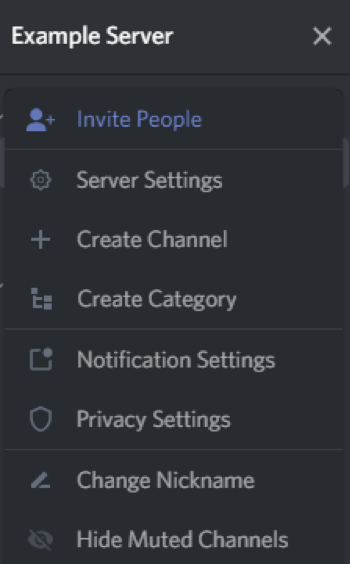
From the menu that appears, select “Roles.”
Now, before we continue any further, you’re going to need a quick lesson in how roles and permissions work in Discord. The permission system is based on a hierarchy, where the highest role on this page determines a number of different things: which order role groups are displayed in the member list, what roles can be granted by a specific role and a few other things. You can only grant new permissions to people on this particular page; you can’t take away existing ones.
So the first thing we’re going to need to do is examine the @everyone role, which comprises the basic permissions that each person who joins your server will have. If the @everyone role has the “Create Instant Invite” permission checked, it won’t matter if a higher role has it unchecked, for example: the higher role still will be able to create Instant Invites. Go through this list and make sure there are no permissions selected that you don’t want everyone to be able to use.
When you’re satisfied with your selections, click on the “+” button in the roles list. This will create a new role with the same permissions as the @everyone role. Let’s say that you want this role to be called “Friend” and anyone with this role should be able to change their nickname, but anyone without this role should not be able to. Make sure the “Change Nickname” permission is toggled to OFF for the @everyone role, and that it’s toggled to ON for the Friend role. Now, whenever someone joins your Discord server, they won’t be able to change their nickname, but as soon as you’ve decided that they’ve earned the privilege, you can enable their account with the Friend role and they’ll be granted that ability.
Create another new role and name it “Moderator.” As above, make sure that the @everyone role does not have the permission to “Manage Messages” (unless you want them to), and that the Moderator role does. Pick the friendliest, most active, and trustworthy person or people in your community and ask them if they’d be interested in moderating for you!
Play around with your roles and make them colorful using the built-in tool. As a general best practice, don’t make the role “mentionable” unless it’s for important things that can’t wait, such as if someone posted some inappropriate material that needs to be removed immediately. If you have a role that’s mentionable assigned to 1000 people, trolls will try to mention it all the time.
Verify Your Server
Similar to Facebook, YouTube, and Twitter, Discord has a verification process that you can complete so that people know you’re the authentic you. When your server gets verified, you’ll also receive a few perks like a vanity URL, a check mark in your server, the ability to upload a cover image, VIP voice servers, and a few more.
This is an application process that is manually reviewed, and it’ll take some time to get a response. Be sure to read over this help article before submitting an application. The big things to remember are:
You must own the IP of the game you’re promoting.
Community-led servers are ineligible.
Your server must follow the Verified Server Moderation guidelines.
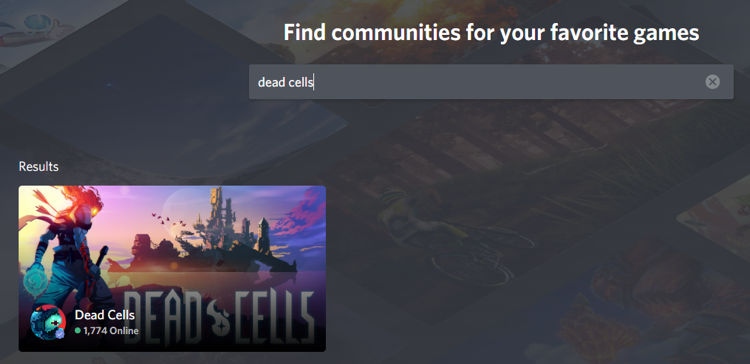
The most important part of getting your server verified, in terms of discoverability, is that it will now show up in Discord’s “Server Discovery” feature. On the left-hand side of the application is the server list. At the bottom, you’ll see a magnifying glass icon that leads to the Server Discovery page. Once your server is verified, people will be able to search for your game in this list.
Server verification is a free service provided by Discord, so there’s no reason not to take advantage of it for your game.
Get feedback from Playtests
Discord opens up a brand new world for gathering feedback. Gone are the days of inviting a group of people to your office over the weekend and watching them play your alpha build for 8 hours. Here’s our suggestion for running a playtest through your Discord server so that you can go back to enjoying your weekend.
Reward active, helpful, friendly members of your community by inviting them to join your Playtests. You can create another vanity role to distinguish your playtesters from your normal server members (you’ll find that people LOVE roles). New players will join your server, see the users that have this role and work towards getting it. It’s strongly recommended that anyone that agrees to play test is made to sign an NDA
Upload a build to Discord. In order to do this you need to have set up a developer account with Discord. This does require a one-time fee to access, but the benefits you gain from it are worth it. The rest of this article assumes you’ve fully followed the steps on that page.
Create one channel that only your play testers can see where they can discuss the build, and another channel for them to provide feedback. Click on the “+” button next to the appropriate channel category on the left-hand side of your screen to create a new text channel, and name it something appropriate, such as “Playtest Discussion.” Make sure to set the “Private Channel” toggle to ON.
Under the “Who can Access this Channel?” section, set the toggle next to your Playtester role to ON. Also consider adding roles like Moderators, Developers, and anyone else that would benefit from having access to this channel. When you’re ready, click on “Create Channel.”
Now, create another channel, and this time call it "Playtest Feedback.” If you have a channel dedicated to people leaving their feedback and suggestions, and the moderators have instructions to remove anything that doesn’t fit that criteria, all of your specific playtest feedback will be in one location for quick and easy reference.Start the Playtest. At this point, all the playtesters need to get started are keys to your game build. Unlike some services where you have to request them, Discord lets you generate any number of keys to your game, whenever you want them, in the developer portal. Consider sending them in a direct message to your playtesters, as displaying all of them publicly would encourage people to offer extras to friends who aren’t in the playtest or aren’t under NDA.If your playtesters have clear instructions, you can begin focusing on reading over the feedback when you’re ready for the playtest to end. While you can let the playtest run itself, it’s always best to be available and part of the conversation.
Wrap up
Discord is about communicating with your fans, and them with you. The amount of effort you put into it is what you’ll receive from it. Remember that it doesn’t matter if there’s 50,000 people in your server, or 50, or 5. It’s all about how you relate to them and engage with them when it comes to your game. Make your server the place you’d want to hang out, and others will join you.
Jared Neal is a 15-year industry vet having worked at companies like Sony, GREE, and poignantly, Discord. He is a Producer at Modus Games, currently working on the upcoming Trine 4: The Nightmare Prince.
For more how-tos about industry best practices, behind-the-scenes content featuring veteran game developers, and Q&As regarding the most important topics in indie game development and publishing, head to the Modus Indie Access Hub.
Read more about:
Featured BlogsAbout the Author(s)
You May Also Like