Daily news, dev blogs, and stories from Game Developer straight to your inbox
Sponsored By
Featured Blog | This community-written post highlights the best of what the game industry has to offer. Read more like it on the Game Developer Blogs.
In this article I will be going over multiple photogrammetry techniques that I stumbled upon, experimented with, and used in order to create the textures for the castle. I will be going over many solution to delight a texture, and create a tile-able one.
19 Min Read

A couple of month ago I wrote an article on how I was able to scan an entire castle for $70, and at the end I mentioned how I was porting that castle into the Unreal Engine to use in my game World Void. Working with a huge structure with millions of polygons can bring the most powerful software solution to its knees, and a lot of people have showed interest in the creative process that I am using to port the castle into a game engine. Making the castle game ready is a very tedious and long process, and before I can explain the work that goes into splitting the castle into game assets, I found it essential to first explain the challenges of manipulating 3D scans in general. Over the past few month I struggled to find a universal process that can be used on any mesh, in fact every mesh is different and requires a different remedy. Therefore in this article I will be going over multiple techniques that I stumbled upon, experimented with, and used in order to create the textures for the castle. I will be going over many solutions to delight a texture, and create a tile-able one.
Keep in mind that while 3D scans do make some assets creatiion tasks easier, it does come with its own challenges, and creating a proper texture from a 3D scan can sometimes take the same amount of time as to create a texture from scratch. The good news is however that this process becomes faster as you become more experienced with it.
A lot of research has gone through this article, and once again I would like to thank the 3D
Scanning User Group on Facebook, if it wasn’t for them I would never have learned about most of these tools and techniques. I would also like to thank Kenneth Brown from DICE, who was one of the speakers at GDC for a talk on photogrammetry and delighting techniques, who helped me when I got stuck trying to recreate the process he explained. Another thank you would go to Fedor Boytsov who suggested a few interesting links that were added to this article. Again a special thanks to Faisal Naamani for correcting some of my grammar mistakes. Finally, a quick shout out to all the people who read this article before publishing it, and provided me with some valuable feedback.
For these results it’s worth noting my computer specifications. I am using an Alienware laptop, if you are going to use a laptop for this intensive work, better make sure it’s a gaming laptop with a killer ventilation system. The laptop has 24GB of RAM installed, and when it comes to 3D scan you can never have enough RAM. A NVidia GTX 860M 2GB (Kepler), which is a good gaming GPU, but it’s not the highest end one which is sometimes not powerful enough for a 3D scan mesh, especially those 2GB of VRAM are definitely a bottleneck. And a 3.5GHz quad core i7.
Retopology and Mesh Editing Tools
Instant Meshes
This a very useful retopology tool that can generate good topologies for high poly meshes in a matter of seconds. You can download it for free from this website, which I also would encourage you to check out for other free cool utilities. On the download page you will find a quick video tutorial, and that is all you need to know to get up and running with this application.
The advantages of this tool are the following:
Very simple user interface
Can handle very high resolution meshes
Is really fast
Gives you easy and efficient control over the retopology process
Creates really good results easily
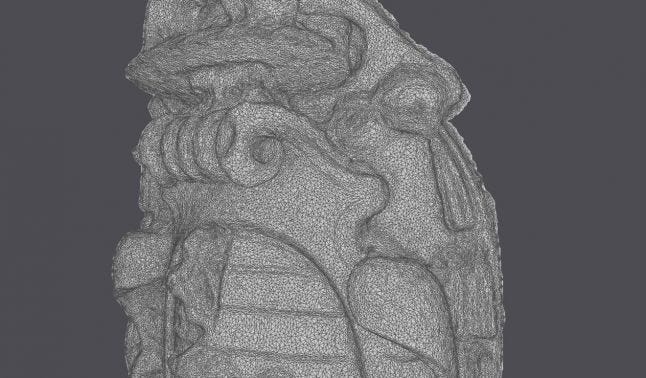
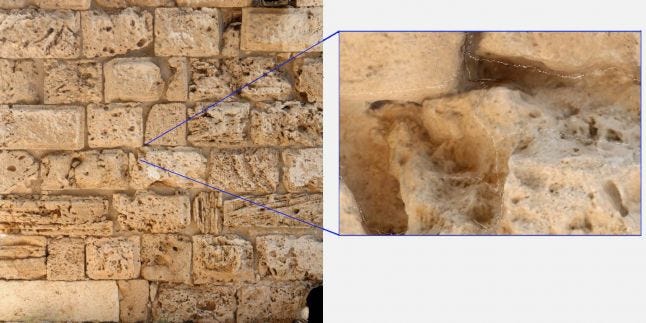
Here is an example of a 3D scan that I generated in Agisoft PhotoScan, notice how messy the wireframe is:
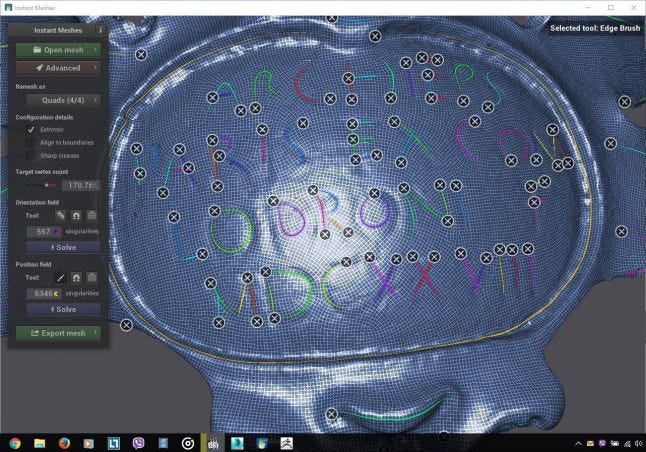
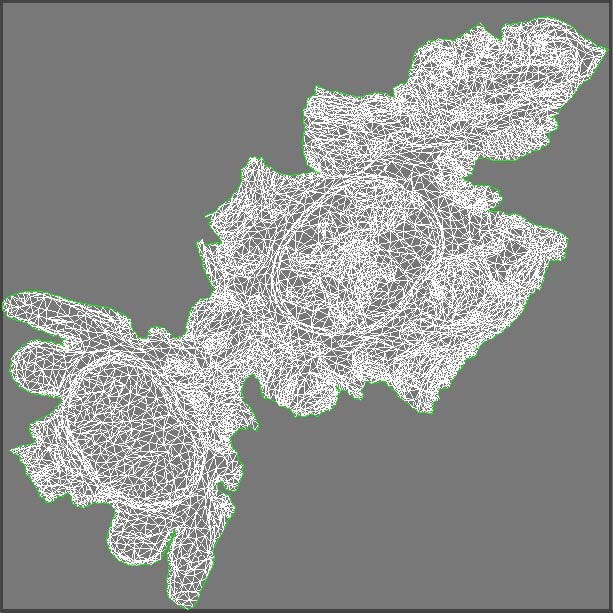
And here is a screenshot of the model in Instant Meshes after generating the new topology:
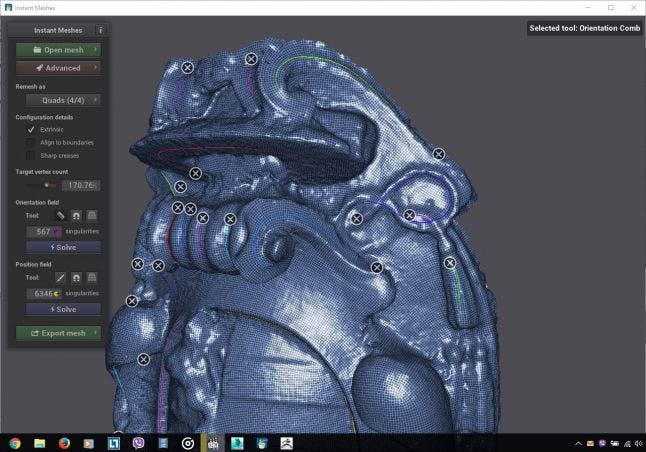
The most impressive thing is that the entire process of generating this topology took a few minutes in Instant Meshes, not to mention that I was also able to keep some details that normally would have been lost in conventional retopology tools:
However this solution is not perfect, and depending on how noisy the original mesh is, you might end up with a few erroneous polygons, but then again this issue is common with many software, and sometimes the best way to fix it would be through multiple iterations of retopology.
If you prefer another more manual retopology approach, you can also check out Sketch Retopo from the same site.
If you are already familiar with your own 3D modeling application, and don’t feel comfortable using 3rd party application, I would recommend knowing your tools very well. Almost any 3D modeling application on the market has its own retopology tools built-in:
Autodesk 3Ds Max have some neat retopology tools. Keep in mind that 3Ds Max does struggle with meshes over a million polygon, which makes this utility more useful for meshes with a reasonable polygon count. However you can always use a Poly Cruncher like the built in ProOptimizer Modifier to reduce the polycount, though you might lose some of the finer details. After a quick search on YouTube, here’s a video that I found that demonstrates those tools.
Modo has similar retopology tools to 3ds max, and here’s a quick tutorial that goes over them.
Autodesk Mudbox, has also its own retopology tools, and while Mudbox can in fact open high poly meshes, it will fail to do any retopology on a mesh that is not perfectly quad, which will cause it to crash a lot.
MeshLab, a lot of people have recommended MeshLab which is a free and powerful tool, that can edit a mesh, and help clean it and close some holes, my 2GB VRAM GPU did not have the capacity to open some of my higher poly meshes, therefor I was unable to test it.
There are other tools that I was unable to test, and I would encourage you to explore, to name a few: 3D-Coat, and TopoGun.
Autodesk Remake
This tool is made for 3D scans, it can open high poly scans, and I use it sometimes to select and remove some polygons from the mesh. I also use it to check the mesh for errors, like removing floating particles, and closing holes. Remake does offer some basic functionalities like extrude and bridge, but depending on the quality of your mesh, sometimes these functionalities will not work. Remake also offers retopology and Poly Cruncher functionalities in addition to texture baking options. This tool is not perfect and does crash sometimes, however it seems to do the job, and while the generated models are not always efficient, this tool is perfect for fast prototyping, and creating placeholder meshes. One thing to note, always have incremental saves, I used Remake to fix some Mesh issues, and it crashed during save, which corrupted the entire file, and I had to start over.
ZBrush
If you want to work with 3D Scans I would highly recommend learning ZBrush. ZBrush is an all in one solution, and if you learn it properly you’ll find that you will not be needing any other solution. The interface is not the greatest, especially if you do not own a touch screen, and the tools are not the most accurate, but they tend to deliver, not to mention that during my testing ZBrush was the only tool fully capable of handling millions of polygon. Moreover, ZBrush offers multiple tools for retopology like ZRemesher which I was never able to make it generate a mesh over 100k polygon (therefore you need to subdivide the mesh then reproject the details), Dynamesh which is great but will also close any hole in your mesh, and ZSphere the manual way of doing proper retopology work.
Highlight Removal
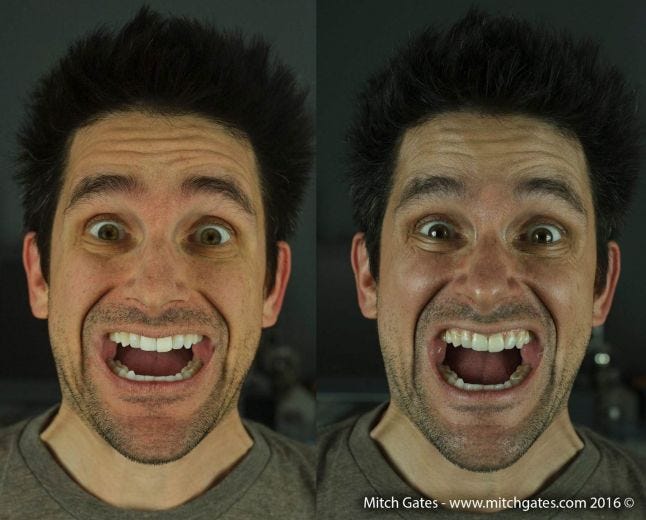
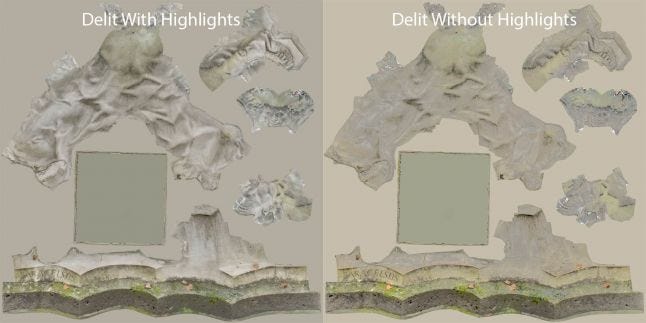
Like removing shadows from a texture, it is also possible to remove highlights. One way to do so would be to use a cross polarized photography rig, in fact the previous image was taken with such a rig, however if you did not use one when you captured your photos don’t worry there are other ways to get similar results. James Busby from Ten24 released a quick Nondestructive Image flattening and reflection removal video tutorial where he demonstrates a process to remove highlights from a texture which does not require any rig and can give decent results. In short this technique consist of selecting darker areas in a picture and then bumping their exposure a little. While he used this technique on a head shot, I found this technique to work well on rocks, especially the ones that have an overall similar coloration.
Delighting a Texture
In order to remove shadows from a texture there is a very accurate way to do so that requires a special rig.
Epic Games used this technique in order to create the assets for their open world demo. They even wrote two blog posts titled “Imperfection for Perfection” where they explained their choice of equipment, and their delighting process. In short this technique requires you to capture a panoramic HDR image of the environment around the scan, then by projecting this image on a sphere in your rendering application, and properly orienting it to your scan, you can replicate the lighting setup, which enables you to subtract the shadows.
However if you don’t have access to such a rig, another interesting method for delighting would be the one that was used in Star Wars Battlefront. The team behind the Star Wars game was kind enough to explain its workflow during GDC in a talk entitled “Photogrammetry-and-Star-Wars-Battlefront” which is available for free on the GDC Vault, and I would highly recommend you check it out, really go watch it. The talk contained a ton of useful information, however I will be focusing on their delighting process.
Step 1: Generate 3D scan
There are a lot of tutorials on how to create a 3D model in Agisoft, therefore I will only be going over it swiftly.
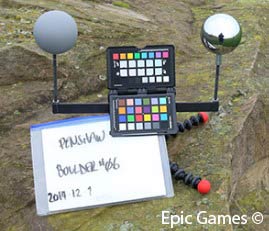
Pre-process the RAW photos, calibrate the colors etc. Using Adobe Camera RAW or DxOptics. Make sure to output the images as 16-bit because you will need that color range when tweaking the image later
Import Images into Agisoft PhotoScan or Reality Capture, align images, build dense cloud model on high settings (Ultra High is an overkill unless you have some really low res images), generate model, and generate UVs and texture.
Once you have the final geometry with its texture, you might notice some strange lines (seams) over the textured geometry, especially when previewing the mesh in renderers that downgrade the original texture resolution. To solve it you need to do one of the following:
Generate an extremely high resolution texture for the high resolution model in Agisoft, that once baked into the low res model in another application (i.e. Substance, XNormal, 3Ds Max) those seams will become so small that they are barely noticeable.
Generate a proper high res model with proper UVs. My workflow is to do the mesh clean up in Autodesk Remake, clean the noise and reconstruct some missing details in ZBrush, Generate the retopology in Instant Meshes, then generate the UV in ZBrush’s UV Master. Conversely, UV Master might have trouble creating UVs for this dense mesh, and you are better off using Agisoft’s automatically generated UVs. Keep in mind, that if you plan to re-import the model into Agisoft you cannot change the model’s transforms (Location, Rotation, and Scale).
If your low poly mesh looks a lot like the high resolution one, just import the properly UVed low poly mesh into Agisoft, and recreate the texture. Just make sure that you mark the option in Agisoft to keep the UVs instead of generating new ones.
Triplegangers.com have released a highly detailed 2 hours free tutorial videos on vimeo about their process for cleaning high resolution RAW scans, and I would highly recommend that you watch this two part tutorial 1 & 2.
Step 2: Generate the Low Res Model and Textures
In order for your model to run in game engine you need to create a lower res model, however that does not mean that you need to create an extremely low resolution model either. Unless you are trying to make the game run on a low end mobile phone, new generation GPUs can easily handle a few million polygon on screen. And while you can compensate for the lack of details in the textures, you are paying that cost in texture memory, and as Sam Dieter from Epic Games has said “it is infinitely more expensive to render a pixel than to render vertices”. It is up to you to find that perfect balance between mesh resolution and texture resolution, also LODs are your friends. In the Star Wars battlefront GDC talk they mentioned the detail texture technique that is widely used in video games, and I will be going over it in more details in my next article. To generate the low res model, you can use whatever modeling software you feel comfortable using, just make sure to use a poly cruncher first to reduce the poly count to a reasonable level that your application can handle. Once you have the model, you need to generate the UVs, keep in mind that you will need to edit those textures in Photoshop, and that your texture should have a reasonably shaped UV not some scattered random mini pieces. Here’s an example:
Now that you have the low res model generated, and you have not changed its original transforms, because we need it to match the exact position of the high resolution mesh, you can bake the textures using a tool like XNormal. XNormal is a free powerful application for texture baking, and you can download it from here.
Here’s what to do:
Click the “High Defintion Meshes”, this will open up a list, if the list is not empty, right click the listed items and choose “Remove Mesh From List”, then right click and select “Add Meshes”, if you want to also bake a diffuse map, right click your added mesh and select “Base Texture To Bake”.
Now click the “Low Definition Meshes”, clear the list, then add your low res mesh.
Go to baking options, select your texture resolution, select your destination folder, and select “Normal Map”, “Bake Base Texture”, “Ambient Occlusion”, “Height Map”. Just make sure to save the base texture as a 16bit TIFF, as you will need all the color information you can get.
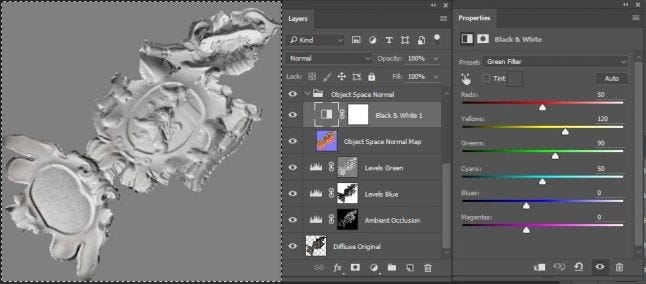
Select the “…” next to the “Normal Map” in order to open the option menu, and deselect “Tangent Space”, this will generate the object normal map, which is needed to delight the texture later.
Hit the big “Generate Maps” button
Go the generated maps output folder and add the suffix “_objectspace” to the normal map’s name. We will be generating another normal map, and we don’t want it to overwrite this one.
Go back to the “Baking Options” menu, deselect all the maps, and reselect the “Normal Map”, now go to options, and select “Tangent Space”.
Hit the big “Generate Maps” button
Congrats, now you have everything you need to start delighting the texture in Photoshop.
Step 3: Delight the texture
Now that you have all the texture you can start by opening Photoshop, going to File > Open As, select your diffuse image, and make sure to select “Camera RAW”, in the drop down menu next to the “File Name”.
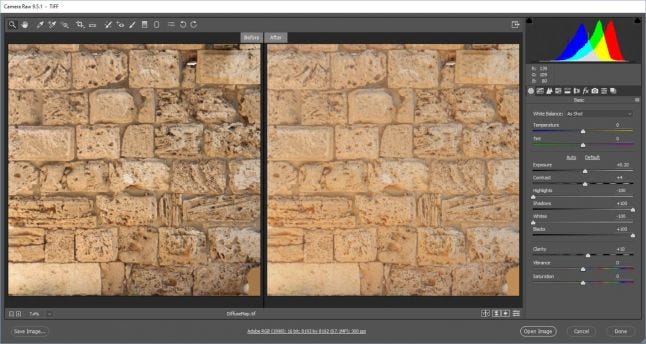
This will open up the camera raw plugin. Make sure that there is a sentence in the middle similar to “Adobe RGB (1998); 16 bit; #your image resolution#; 300 ppi”. If it says 8bit instead of 16bit, click that sentence and select 16 bit in the option. Of course your original image has to be 16 bit in the first place. Now you can play around with the sliders on the right, especially the shadows slider, and tweak the image as you see fits in a way that reduces the shadows. I also like to bump the clarity slider a little, but that is because my camera is not sharp enough. Here’s an example:
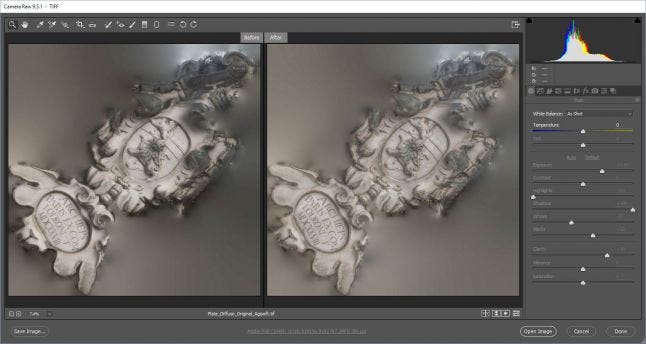
Camera RAW gets you halfway, and sometimes the result can be good enough to be used immediately, like this one for example:
Now that you removed most of the shadows, you can use your object space normal map to remove the ambient light shadows. And while I was trying to replicate this technique, I struggled a little bit, and that is when I contacted Ken Brown, the person who explained this workflow at GDC, and he was kind enough to answer my questions, which I’m really grateful for.
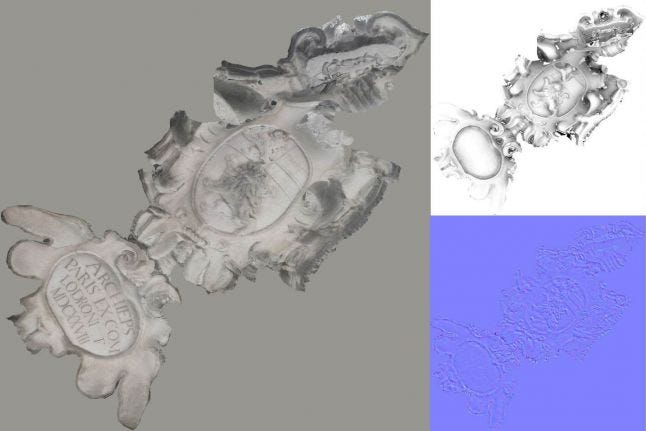
Take your Object Space Normal map and drag it into Photoshop. This map contains the direction of each polygon of your mesh’s surface, and this information in embedded in the RGB channels, and in order to extract this information, you will need to separate those channels. To do so, you will need a black and white adjustment layer, and then select the Green Filter Preset for the green channel image, the Blue Filter Preset for the blue channels image, etc. For each images, create a level adjustment layer, and paste the channel image into the mask. Also sometimes you don’t need all 3 channels, in this case the red channel had little to no difference and that is why it was not used to delight this texture. Create one additional level adjustment layer, and this time past the ambient occlusion map. All that is left to do now is to manipulate the histogram’s sliders of the level adjustment layers as you see fit.
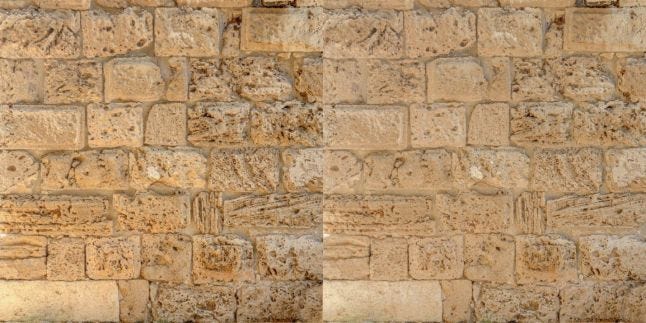
And here is the final result:
Also you can check out the PSD file here.
After doing a few experiments I realized that this technique might work on some models more than others, or maybe I still have not mastered it enough yet. Also, it is worth noting that some darker areas are just dirt and not shadows, but you can always get rid of them using the highlight removal technique explained earlier in this post. I used this process on another scan and here’s the result:
Here’s the model on Sketchfab:
After writing this article, someone from NVG released a short video on YouTube with his own different take on this process, you can find it here Equalize texture of 3d scanned model using normal map. I tried his technique but I found the one I describe to work best, at least on the model I tested on.
Tiling a Texture
Depending on the type of assets you are making you might want to make a Tileable texture, or even a Tileable mesh, and here are few methods that you can use:
Photoshop
For a while the entertainment industry have been using Photoshop to create tileable textures using the offset filter and the clone brush. Nonetheless, Photoshop does not offer a way to edit multiple textures at once.
Substance
Substance Painter is a tool that specialize in editing multiple maps at once, and here is a short video by Warren Marshall on how to create Tiling Textures in Substance Painter using a simple trick. I haven’t used Substance Painter a lot yet, but it’s a promising tool that I am still experimenting with, and hopefully I will be covering more in the future.
Mudbox
Mudbox has a feature called the Tiling Plane, and its concept is simple, it will create a 3X3 grid, and any change you make on one of the cells will be replicated to the others. This feature enables you to sculpt your geometry around the edges, and make sure it tiles, all you need is a displacement map and your sculpting brush. This feature looks to be the most promising, too bad it doesn’t work. While I was testing this feature, even when I used a clean plane mesh and a displacement map, Mudbox kept crashing or creating weird unintended geometry, eventually I stopped trying. If you want to experiment with it be my guest, and let me know if you manage to make it work.
ZBrush
And here is where ZBrush comes to the rescue, ZBrush has a similar feature to Mudbox’s Tiling Plane named WrapMode, and here is a step by step tutorial titled “ZBrush TilingTextures WrapMode” by Zuccarello that I found on YouTube, and that you can check out. Tip: Instead of sculpting your geometry, bake a displacement map and apply it to the plane in the tutorial.
Conclusion
Now that you know the techniques that are available out there, you are able to apply one or a combination as you see fit. I even saw developers use the scan as is (using a Poly Cruncher of course), especially for VR, having already baked-in lighting can be an advantage. Try them all, make your own judgment, but remember that sometimes this extra small boost in quality is not always worth it, and it can go unnoticed especially when working with real-life imagery. It is always good to know when to let go of some details. As for what software to use, it’s the one that doesn’t crash. Handling those meshes will cause most software to crash, and basically you’re going to find yourself using different software for each mesh. Just make sure to give each process the time it deserves, work on each step, do it well then move on to the next one, don’t try to batch process everything, because it will lead to some less appealing results.
Finally, if you think that there is any software that I missed, please mention it in the comments below, and I’ll be happy to check them out. Please note that I am still learning and experimenting with photogrammetry, and I haven’t mastered everything yet, therefore feel free to question everything I mentioned, and try to come up with your own opinions. As well, if you found this article interesting let me know, send me a tweet, or even check out my game World Void, it would mean a lot.
See you in my next article where I will be demonstrating these techniques while performing a neat Alchemy trick that turns a European stone statue into a Middle-Eastern one, and ttherefore creating a game ready piece that will be imported into Unreal Engine.&
Read more about:
Featured BlogsAbout the Author(s)
You May Also Like